Saltar al contenido principal

HP Chromebook 11a-nb0013dx LCD Replacement

Qué necesitas

  1. HP Chromebook 11a-nb0013dx LCD Replacement, LCD: paso 1, imagen 1 de 1
    • Locate the eight 8mm screws at the back of the computer.

    • Using your Phillips #1 screwdriver, begin unscrewing the 8mm #1 Phillips screws. Make sure to keep them in a safe spot where they wont get lost or damaged.

  2. HP Chromebook 11a-nb0013dx LCD Replacement: paso 2, imagen 1 de 2 HP Chromebook 11a-nb0013dx LCD Replacement: paso 2, imagen 2 de 2
    • Locate the four rubber feet at the bottom of the laptop.

    • Remove the feet on the bottom of the laptop with the metal spudger.

  3. HP Chromebook 11a-nb0013dx LCD Replacement: paso 3, imagen 1 de 1
    • Once you have removed all securing components at the bottom of the laptop, take your IFixit pick and slide it into the crevices between the keyboard and the casing all around the keyboard. As you do this, gently push down on the pick to pop the keyboard up so you can open the laptop.

  4. HP Chromebook 11a-nb0013dx LCD Replacement: paso 4, imagen 1 de 3 HP Chromebook 11a-nb0013dx LCD Replacement: paso 4, imagen 2 de 3 HP Chromebook 11a-nb0013dx LCD Replacement: paso 4, imagen 3 de 3
    • Use the IFixit Opening Tool to lift the two tabs located on the zero insertion force (ZIF) connectors.

    • Gently unplug the ribbons from the ZIF connectors.

    • Once you have unplugged both ribbons, the keyboard is free to come off completely.

  5. HP Chromebook 11a-nb0013dx LCD Replacement: paso 5, imagen 1 de 2 HP Chromebook 11a-nb0013dx LCD Replacement: paso 5, imagen 2 de 2
    • You do not need to remove the daughterboard or speakers to unplug the Wi-Fi chip like in the images

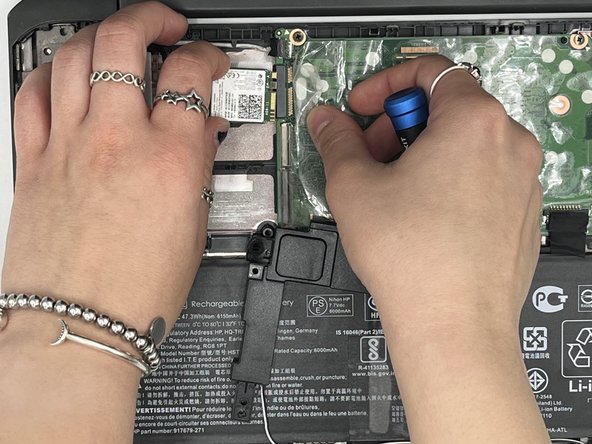
    • Locate the 4mm #0 Phillips screw securing the Wi-Fi chip in place.

    • Using a #0 Phillips screwdriver, unscrew the 4mm #0 Phillips screw holding the Wi-Fi chip into place and keep it in a safe place.

    • Once you have removed the screw that holds the Wi-Fi chip in place, gently unplug the Wi-Fi chip from the motherboard.

  6. HP Chromebook 11a-nb0013dx LCD Replacement: paso 6, imagen 1 de 2 HP Chromebook 11a-nb0013dx LCD Replacement: paso 6, imagen 2 de 2
    • Using your precision tweezers, gently pull off some of the fabric covering the bundled cord and LDC cord.

    • Begin to gently unplug the bundled cable at the top left of the motherboard gently. Remember that these wires are very delicate, so try not to pull too hard.

    • If it feels too tough to pull out, try to pry out the plug from the port on the motherboard using a small blunt object such as precision tweezers or a IFixit Opening Tool

    • For the LDC cord gently pry out the cable from the port by using a small blunt or pointed object such as the IFixit Opening Tool or precision tweezers.

  7. HP Chromebook 11a-nb0013dx LCD Replacement: paso 7, imagen 1 de 1
    • Locate the four 4mm #0 Phillips screws in the hinges.

    • Use a #0 Phillips screwdriver and unscrew the 4mm #0 Phillips screws.

  8. HP Chromebook 11a-nb0013dx LCD Replacement: paso 8, imagen 1 de 1
    • This part can be tricky so just be careful.

    • Once you have removed the screws that hold the hinges in place, close the laptop towards you to about 15 degrees and begin to pull the screen towards you and to the left. This should pull the screen off cleanly.

  9. HP Chromebook 11a-nb0013dx LCD Replacement: paso 9, imagen 1 de 2 HP Chromebook 11a-nb0013dx LCD Replacement: paso 9, imagen 2 de 2
    • Using the IFixit pick, slide the pick in the crevice between the screen border and casing and push down like in the third step.

    • Once the border has been loosened, gently pull it off and push down any glue that may be attached to the screen border.

  10. HP Chromebook 11a-nb0013dx LCD Replacement: paso 10, imagen 1 de 2 HP Chromebook 11a-nb0013dx LCD Replacement: paso 10, imagen 2 de 2
    • Locate the six 4mm #0 Phillips screws on the LCD frame.

    • Take your #0 Phillips screwdriver and unscrew the 4mm #0 Phillips screws.

    • These screws have a brighter and more lustrous silver color than the other 4mm #0 Phillips screws. Make sure you keep these separate from the other 4mm screws.

    • Once you have removed the 4mm screws on the LCD frame, remove the LCD frame.

    • Then, take your IFixit pick and begin to gently slide the pick into the crevice between the LCD and the screen casing. As you do this, gently push down on the pick to pry the LCD off off the screen case.

  11. HP Chromebook 11a-nb0013dx LCD Replacement: paso 11, imagen 1 de 2 HP Chromebook 11a-nb0013dx LCD Replacement: paso 11, imagen 2 de 2
    • At the back of your LCD, locate the LCD cable tape at the bottom of the LCD.

    • Using your precision tweezers peel off the LCD cable tape holding the wire in place and unplug the wire from the port.

    • Once this wire has been unplugged, the LCD will come off cleanly and you can apply your replacement LCD.

Conclusión

To reassemble your device, follow these instructions in reverse order.

0 comentarios

Agregar Comentario

Ver Estadísticas:

Ultimas 24 horas: 0

Ultimos 7 días: 0

Ultimos 30 días: 5

Todo El Tiempo: 153