Qué necesitas
-
-
Remove the black rubber screw covers using the point of your spudger. Then, remove the 10 #0 Phillips screws from the palmrest.
-
-
-
Open the Chromebook at a 90 degree angle, and set it on it's side.
-
Insert the spudger into the gap in between the glossy keyboard bezel and the rubbery side part. Gently pry to release the clips. Move the spudger around the perimeter of the device, releasing clips as you go.
-
-
-
Lift up the locking tabs on the system board for both ribbons
-
As you lift the palmrest up, the ribbon for the touchpad (white in my case) will be sticking to the bottom of the palmrest with adhesive. Carefully pull the ribbon off so that you can reach in there.
-
Disconnect both ribbons from the system board.
-
Lift up the palmrest and set it off to the side.
-
-
-
-
Remove the 3 smaller screws on the system board
-
Remove the one larger silver screw on the system board.
-
Remove the screw holding thew WiFi card in place.
-
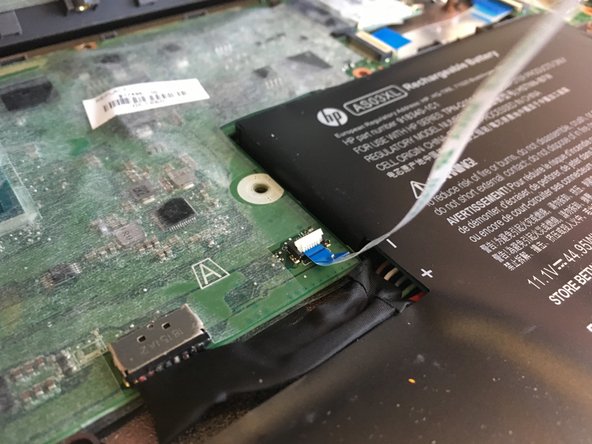
Remove the screw holding the battery in place.
-
-
-
Disconnect the 4 ribbons pictured that are connecting to the system board
-
-
-
Once the screws are removed, carefully close the chromebook until it is only open at around a 20 degree angle, make sure the ribbon will not get caught, and slide the screen off of the Chromebook.
-
Set the screen off to the side.
-
-
-
Locate the plastic clips/tabs that are holding the system board down. There are 2. One by the battery and one by the left-side hinge.
-
Carefully lift upward from the right-side the battery/system board all at the same time. You will need to lift it up and press in the first tab, and pull it out to the right.
-
Set the system board and battery off to the side.
-
-
-
The DC IN cable will be stuck to the bottom assembly with adhesive. Peel up the cable.
-
Remove the screw holding the DC IN cable in place.
-
Connect the new replacement DC IN cable.
-
Cut a piece of packing tape and use it to tape the replacement DC In cable to to the bottom plastic assembly.
-


To reassemble your device, follow these instructions in reverse order.
To reassemble your device, follow these instructions in reverse order.
Cancelar: No complete esta guía.
7 personas más completaron esta guía.

2 comentarios
Hi there, nice guide but you can get away with not taking off the entire screen just unscrew the left hinge while the lid is at a 90 degree angle and simply fold flat to have access at the screw holding the DC jack in place
My Hp 11 G5 has a silver palmrest on it and the bottom half of the casing isn’t rubberized. I’ve use my plastic pry tool popping the clips round the case after removing the screws from the underside of the case. I however cannot get the palmrest / keyboard to release. It’s as if it’s still screwed in or glued , a lot. (Yes, I removed ALL the screws from the underside of the casing, including the ones under the rubber plugs {not the rubber feet})
How should I proceed?