Saltar al contenido principal

HP 15-ba0709dx Hard Drive Replacement

Qué necesitas

  1. HP 15-ba0709dx Hard Drive Replacement, Battery: paso 1, imagen 1 de 1
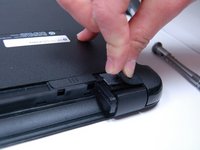
    • Flip the device over and locate the battery compartment.

    • Slide the battery release latch on the left and right side until the battery is detached from its slot.

    • A noticeable pop will be heard when the battery is fully released.

  2. HP 15-ba0709dx Hard Drive Replacement: paso 2, imagen 1 de 1
    • Pull the battery out of its slot.

    • Be careful not to damage any of the connectors in the process.

  3. HP 15-ba0709dx Hard Drive Replacement, Back Cover: paso 3, imagen 1 de 1
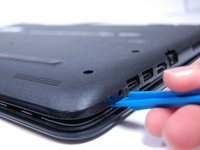
    • Place the laptop on a clean, flat surface with the bottom side facing up.

  4. HP 15-ba0709dx Hard Drive Replacement: paso 4, imagen 1 de 1
    • Using a Phillips Head Screwdriver, remove the screws anchoring the bottom casing.

    • Note: Make sure to keep track of the screws once they have been removed.

  5. HP 15-ba0709dx Hard Drive Replacement: paso 5, imagen 1 de 1
    • Locate the screws about 1 inch from the battery release tabs and use a Phillips Head Screwdriver to remove these screws.

    • Note:Place these newly removed screws with the ones removed in Step 2.

  6. HP 15-ba0709dx Hard Drive Replacement: paso 6, imagen 1 de 2 HP 15-ba0709dx Hard Drive Replacement: paso 6, imagen 2 de 2
    • Locate the rubber friction pads on the top corners of the laptop. Pry the pads from the laptop and place them off to the side

    • Removing the friction pads will reveal two more anchoring screws.

    • Note: The adhesive keeping the pads on the laptop will weaken once doing this, but it is necessary to removing the bottom cover of the laptop.

  7. HP 15-ba0709dx Hard Drive Replacement: paso 7, imagen 1 de 1
    • Remove disc reader.

    • Note: If all screws are removed it should slide out easily.

  8. HP 15-ba0709dx Hard Drive Replacement: paso 8, imagen 1 de 2 HP 15-ba0709dx Hard Drive Replacement: paso 8, imagen 2 de 2
    • Use a plastic prod to pry the back cover off the laptop.

    • Be careful not to damage the laptop while prying.

  9. HP 15-ba0709dx Hard Drive Replacement, Hard Drive: paso 9, imagen 1 de 1
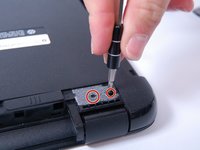
    • Locate the square, blue hard drive

    • Unscrew the two screws holding it in place using a Philips screwdriver head, PH1. The screws will be 8 mm long with a 4 mm width head.

  10. HP 15-ba0709dx Hard Drive Replacement: paso 10, imagen 1 de 1
    • Lift the hard drive out of its slot after screws are removed.

  11. HP 15-ba0709dx Hard Drive Replacement: paso 11, imagen 1 de 1
    • Squeeze to release and pull adapter cable from the side of hard drive.

    • Be careful not to damage the adapter.

Conclusión

To reassemble your device, follow these instructions in reverse order.

5 personas más completaron esta guía.

Lydia Brown

Miembro Desde 03/20/17

369 Reputación

2 Guías creadas

Equipo

Un comentario

Many thanks for this! The adhesive pads were foiling my attempts, and I was afraid of breaking things. Perfect instructions, I accomplished my goal :)

Diana K - Contestar

Agregar Comentario

Ver Estadísticas:

Ultimas 24 horas: 0

Ultimos 7 días: 0

Ultimos 30 días: 13

Todo El Tiempo: 5,348