Saltar al contenido principal

HP 15-ba0709dx Back Cover Replacement

Qué necesitas

  1. HP 15-ba0709dx Back Cover Replacement, Battery: paso 1, imagen 1 de 1
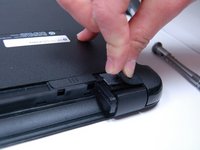
    • Flip the device over and locate the battery compartment.

    • Slide the battery release latch on the left and right side until the battery is detached from its slot.

    • A noticeable pop will be heard when the battery is fully released.

  2. HP 15-ba0709dx Back Cover Replacement: paso 2, imagen 1 de 1
    • Pull the battery out of its slot.

    • Be careful not to damage any of the connectors in the process.

  3. HP 15-ba0709dx Back Cover Replacement, Back Cover: paso 3, imagen 1 de 1
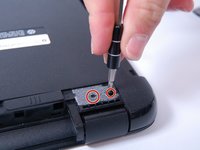
    • Place the laptop on a clean, flat surface with the bottom side facing up.

  4. HP 15-ba0709dx Back Cover Replacement: paso 4, imagen 1 de 1
    • Using a Phillips Head Screwdriver, remove the screws anchoring the bottom casing.

    • Note: Make sure to keep track of the screws once they have been removed.

  5. HP 15-ba0709dx Back Cover Replacement: paso 5, imagen 1 de 1
    • Locate the screws about 1 inch from the battery release tabs and use a Phillips Head Screwdriver to remove these screws.

    • Note:Place these newly removed screws with the ones removed in Step 2.

  6. HP 15-ba0709dx Back Cover Replacement: paso 6, imagen 1 de 2 HP 15-ba0709dx Back Cover Replacement: paso 6, imagen 2 de 2
    • Locate the rubber friction pads on the top corners of the laptop. Pry the pads from the laptop and place them off to the side

    • Removing the friction pads will reveal two more anchoring screws.

    • Note: The adhesive keeping the pads on the laptop will weaken once doing this, but it is necessary to removing the bottom cover of the laptop.

  7. HP 15-ba0709dx Back Cover Replacement: paso 7, imagen 1 de 1
    • Remove disc reader.

    • Note: If all screws are removed it should slide out easily.

  8. HP 15-ba0709dx Back Cover Replacement: paso 8, imagen 1 de 2 HP 15-ba0709dx Back Cover Replacement: paso 8, imagen 2 de 2
    • Use a plastic prod to pry the back cover off the laptop.

    • Be careful not to damage the laptop while prying.

Conclusión

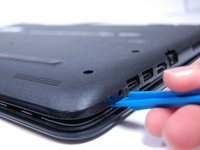
To reassemble your device, follow these instructions in reverse order.

Una persona más ha completado esta guía.

Lydia Brown

Miembro Desde 03/20/17

369 Reputación

2 Guías creadas

Equipo

2 comentarios

Make sure to use a very thin shim, but strong enough to pry.

spotty118 - Contestar

thanks- also worked for 15-ba053nr

Renee Brandt - Contestar

Agregar Comentario

Ver Estadísticas:

Ultimas 24 horas: 0

Ultimos 7 días: 0

Ultimos 30 días: 8

Todo El Tiempo: 1,882