Saltar al contenido principal

Garmin Nüvi 370 LCD Display Replacement

Qué necesitas

  1. Garmin Nüvi 370 LCD Display Replacement, Into Core Components: paso 1, imagen 1 de 2 Garmin Nüvi 370 LCD Display Replacement, Into Core Components: paso 1, imagen 2 de 2
    • Unscrew the two screws on the antenna unit using a torc-head screwdriver.

    • The Torx-Head Screws' size is T-5, which is about 1.5mm.

    • Gently pry open the antenna unit with your fingers.

    • Be careful and try not to damage the small plastic tab.

  2. Garmin Nüvi 370 LCD Display Replacement: paso 2, imagen 1 de 3 Garmin Nüvi 370 LCD Display Replacement: paso 2, imagen 2 de 3 Garmin Nüvi 370 LCD Display Replacement: paso 2, imagen 3 de 3
    • Slide out the inner casing attached to the antenna body.

    • Remove the rotating joint connecting the antenna casing to the main device:

    • Squeeze tweezers into the shown location and compress the spring.

    • Lift out the outer casing while keeping the spring compressed.

    • watch out, as the spring loaded portion may fly out unexpectedly.

  3. Garmin Nüvi 370 LCD Display Replacement: paso 3, imagen 1 de 1
    • Using a torx-head screwdriver, unscrew the two revealed screws that connect the front and back of the device.

    • The Torx-Head Screws' size is T-5, which is about 1.5mm.

  4. Garmin Nüvi 370 LCD Display Replacement: paso 4, imagen 1 de 3 Garmin Nüvi 370 LCD Display Replacement: paso 4, imagen 2 de 3 Garmin Nüvi 370 LCD Display Replacement: paso 4, imagen 3 de 3
    • Insert the plastic opening tool into the center of the edge as shown in first picture.

    • Slide the plastic opening tool along the central gap of device, making sure that each edge is free, as shown in the second picture.

  5. Garmin Nüvi 370 LCD Display Replacement: paso 5, imagen 1 de 3 Garmin Nüvi 370 LCD Display Replacement: paso 5, imagen 2 de 3 Garmin Nüvi 370 LCD Display Replacement: paso 5, imagen 3 de 3
    • Detach the front display from the back panel of the device.

  6. Garmin Nüvi 370 LCD Display Replacement: paso 6, imagen 1 de 2 Garmin Nüvi 370 LCD Display Replacement: paso 6, imagen 2 de 2
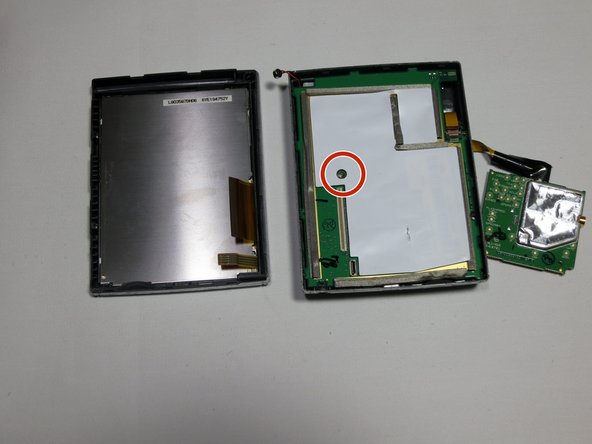
    • Using tweezers, gently lift the microphone from its resting position to fully separate the device into two parts.

    • Finally, remove the screw that connects the motherboard to the back casing with a 3mm head driver.

  7. Garmin Nüvi 370 LCD Display Replacement, LCD Display: paso 7, imagen 1 de 1
    • After following the instructions in the main dis-assembly guide, you should have the screen detached from the motherboard.

  8. Garmin Nüvi 370 LCD Display Replacement: paso 8, imagen 1 de 1
    • Hold the front panel plastic and screen as shown.

    • Gently apply pressure on the left and top left corner to allow the screen to come out of the plastic shell.

  9. Garmin Nüvi 370 LCD Display Replacement: paso 9, imagen 1 de 1
    • Once the top-left corner is out, carefully start detaching the bottom of the screen, starting from the bottom left.

  10. Garmin Nüvi 370 LCD Display Replacement: paso 10, imagen 1 de 1
    • Finally, gently pull the screen out of the right side of the plastic shell.

  11. Garmin Nüvi 370 LCD Display Replacement: paso 11, imagen 1 de 1
    • The screen should now be completely detached.

    • Insert new, functional display screen.

Conclusión

To reassemble your device, follow these instructions in reverse order.

Una persona más ha completado esta guía.

Matt West

Miembro Desde 04/18/13

31 Reputación

4 Guías creadas

Equipo

Cal Poly, Team 13-65, Johann Spring 2013 Miembro de Cal Poly, Team 13-65, Johann Spring 2013

CPSU-JOHANN-S13S13G65

3 Miembros

6 Guías creadas

0 comentarios

Agregar Comentario

Ver Estadísticas:

Ultimas 24 horas: 0

Ultimos 7 días: 0

Ultimos 30 días: 0

Todo El Tiempo: 548