Introducción
If you find your Game Boy Pocket no longer turning on with ease, use this guide to replace the faulty power button. All you need is prior knowledge using a small screwdriver and a steady hand; no special skills are required!
Qué necesitas
-
-
Place the Game Boy Pocket face-down on a clean, flat surface.
-
Use a Y1 tri-wing screwdriver and turn counterclockwise to remove the four external screws.
-
Use a Y1 tri-wing screwdriver and turn counterclockwise to remove the two screws inside the battery compartment.
-
-
-
-
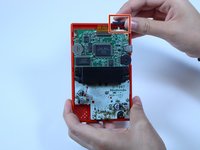
Place your hands on the front and back covers of the Game Boy Pocket, and carefully separate the device.
-
-
-
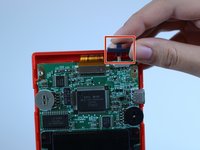
Use your fingers to remove the grey power button to the right of the ribbon cable.
-


To reassemble your device, follow these instructions in reverse order.
Cancelar: No complete esta guía.
Una persona más ha completado esta guía.
Equipo

USF Tampa, Team 1-1, Leahy Fall 2014 Miembro de USF Tampa, Team 1-1, Leahy Fall 2014
USFT-LEAHY-F14S1G1
Miembros de 4
19 Guías creadas