Saltar al contenido principal

Game Boy Micro Outer shell Replacement

Qué necesitas

  1. Game Boy Micro Outer shell Replacement, Remove the Cover: paso 1, imagen 1 de 2 Game Boy Micro Outer shell Replacement, Remove the Cover: paso 1, imagen 2 de 2
    • Remove the Phillips #00 screw on the side of the Game Boy closest to the directional pad.

    • Once the screw has been loosened, lift the cover off the back of the device.

  2. Game Boy Micro Outer shell Replacement, Remove battery: paso 2, imagen 1 de 3 Game Boy Micro Outer shell Replacement, Remove battery: paso 2, imagen 2 de 3 Game Boy Micro Outer shell Replacement, Remove battery: paso 2, imagen 3 de 3
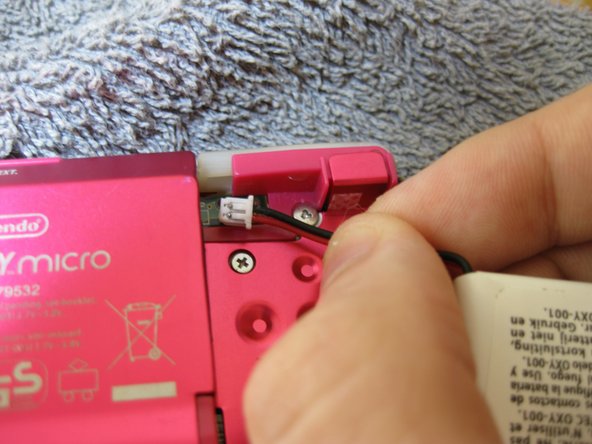
    • Grip, and gently pull outwards on the cable as close to the battery connector as you can

    • Pull in level with the back cover in the direction as indicated by the arrow (not upwards, and not sideways), otherwise you could damage the connector, the cable, or just rip everything off.

    • When plugging the battery back in, make sure to use a non-conductive tool with a flat head to push the battery plug back into the connector, to avoid shorting the battery pins in the plug.

  3. Game Boy Micro Outer shell Replacement, Unscrew side screws: paso 3, imagen 1 de 2 Game Boy Micro Outer shell Replacement, Unscrew side screws: paso 3, imagen 2 de 2
    • Near the volume button, unscrew the two side screws

    • Near the external port, unscrew the two side screws
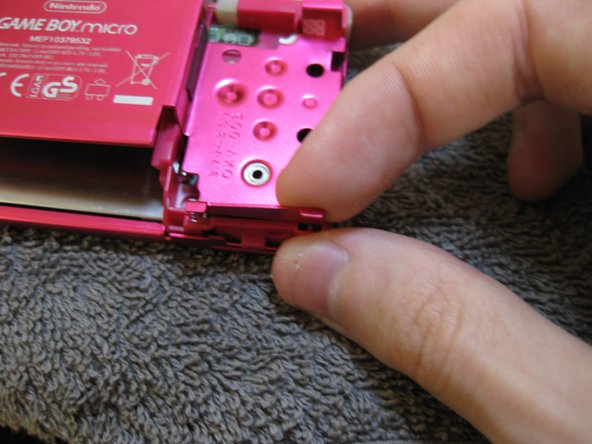
    • Depending on the model, these screws could be either Philips #00 or tri-wing.

  4. Game Boy Micro Outer shell Replacement, Remove the backplate: paso 4, imagen 1 de 3 Game Boy Micro Outer shell Replacement, Remove the backplate: paso 4, imagen 2 de 3 Game Boy Micro Outer shell Replacement, Remove the backplate: paso 4, imagen 3 de 3
    • Unscrew these two tri-wing screws holding the backplate in place.

    • The other screws keep the PCB and the plastic frame together, it's not necessary to unscrew these for outer shell replacement.

    • Start to lift out the backplate near the top-right corner, and then you can gently wiggle it up and off.

    • When putting the new backplate back on, make sure that the bottom-right corner is flush with the plastic frame. If it isn't, lift out the entire backplate, and try lowering it again, but try gently pinching the plastic frame and the backplate together, like shown on the 3rd image. Do not try forcing it into place, it will not work!

  5. Game Boy Micro Outer shell Replacement, Remove faceplate: paso 5, imagen 1 de 3 Game Boy Micro Outer shell Replacement, Remove faceplate: paso 5, imagen 2 de 3 Game Boy Micro Outer shell Replacement, Remove faceplate: paso 5, imagen 3 de 3
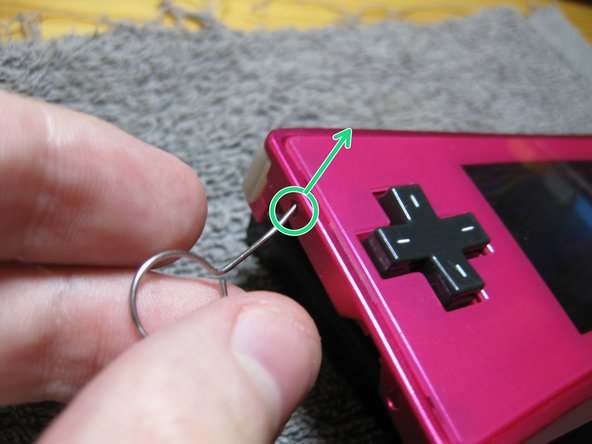
    • The faceplate is held on by two plastic clips near the battery screw.

    • Starting with the top clip is easier, as it's easier to get a grip of the faceplate once it pops out a little bit. Use a spudger to prevent it from popping back in, but holding it in place with your fingernail is also possible.

    • Push in the holes with a bent paperclip or SIM eject tool with minor force.

    • Pushing slightly off-angle (as indicated by the arrows) can be much easier due to the internal shape of the clips, so it is recommended to do it this way to prevent damaging the plastic.

    • Once both clips are undone, the faceplate lifts off like turning a page in a book backwards.

    • Lift the left side, and lift it upwards and right.

    • Then it should be possible to just lift it upwards to remove it.

  6. Game Boy Micro Outer shell Replacement, Remove the frontplate: paso 6, imagen 1 de 3 Game Boy Micro Outer shell Replacement, Remove the frontplate: paso 6, imagen 2 de 3 Game Boy Micro Outer shell Replacement, Remove the frontplate: paso 6, imagen 3 de 3
    • Grab the frontplate like shown

    • Lift the frontplate up and away

    • Start to lift the top part upwards

    • While lifting, try to unhook the bottom catches to let you lift the frontplate away

    • It's okay if the power switch and the Start/Select buttons fall out, they always do. Just remember to put them back before re-assembling!

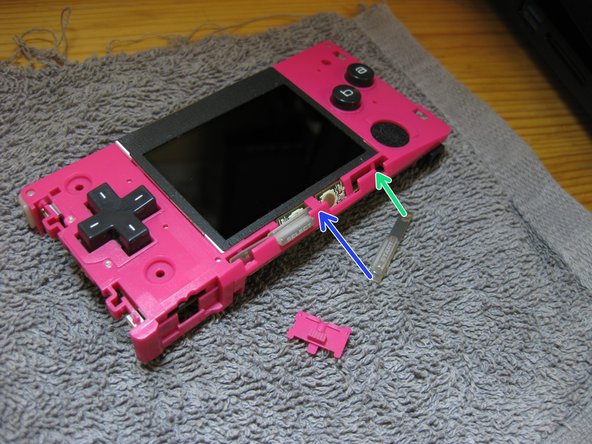
    • Insert the short part of the Start/Select buttons in the middle first

    • Then lay the long part into its groove. It should just rest in there, do not press on it at all!

Conclusión

To reassemble your device, follow these instructions in reverse order.

SonoSooS

Miembro Desde 07/30/24

212 Reputación

2 Guías creadas

0Guía Comentarios

Agregar Comentario

Ver Estadísticas:

Ultimas 24 horas: 0

Ultimos 7 días: 15

Ultimos 30 días: 136

Todo El Tiempo: 662