Saltar al contenido principal

Game Boy Micro Motherboard Replacement

Qué necesitas

  1. Game Boy Micro Motherboard Replacement, Faceplate: paso 1, imagen 1 de 2 Game Boy Micro Motherboard Replacement, Faceplate: paso 1, imagen 2 de 2
    • Locate the two circular holes on the side of the Game Boy nearest to the directional pad.

  2. Game Boy Micro Motherboard Replacement: paso 2, imagen 1 de 3 Game Boy Micro Motherboard Replacement: paso 2, imagen 2 de 3 Game Boy Micro Motherboard Replacement: paso 2, imagen 3 de 3
    • Straighten the end of a paper clip and push it into each of the circular holes.

    • You may hear a faint click afterwards.

    • Use the paper clip to lever the faceplate off from the unit.

  3. Game Boy Micro Motherboard Replacement, Remove the Cover: paso 3, imagen 1 de 2 Game Boy Micro Motherboard Replacement, Remove the Cover: paso 3, imagen 2 de 2
    • Remove the Phillips #00 screw on the side of the Game Boy closest to the directional pad.

    • Once the screw has been loosened, lift the cover off the back of the device.

  4. Game Boy Micro Motherboard Replacement, Unscrew the Outer Cover: paso 4, imagen 1 de 2 Game Boy Micro Motherboard Replacement, Unscrew the Outer Cover: paso 4, imagen 2 de 2
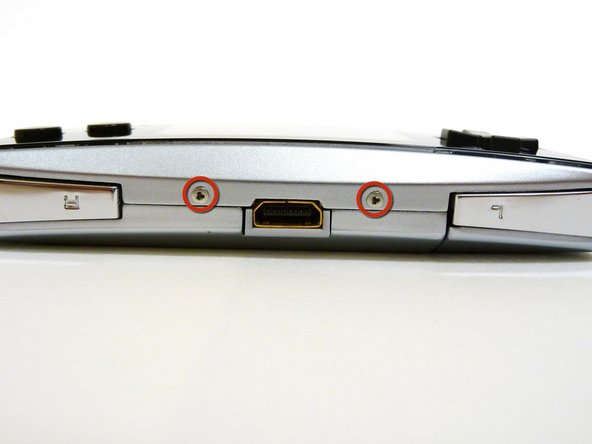
    • Remove the two tri-wing screws on the top of the Game Boy and the two screws next to the volume/contrast switch.

  5. Game Boy Micro Motherboard Replacement: paso 5, imagen 1 de 3 Game Boy Micro Motherboard Replacement: paso 5, imagen 2 de 3 Game Boy Micro Motherboard Replacement: paso 5, imagen 3 de 3
    • Remove the three Phillips #00 screws.

    • Remove the two tri-wing screws.

  6. Game Boy Micro Motherboard Replacement: paso 6, imagen 1 de 3 Game Boy Micro Motherboard Replacement: paso 6, imagen 2 de 3 Game Boy Micro Motherboard Replacement: paso 6, imagen 3 de 3
    • Lift the back cover off of the Game Boy.

  7. Game Boy Micro Motherboard Replacement: paso 7, imagen 1 de 3 Game Boy Micro Motherboard Replacement: paso 7, imagen 2 de 3 Game Boy Micro Motherboard Replacement: paso 7, imagen 3 de 3
    • Remove the two Phillips #00 screws from the plastic frame.

    • As you are pulling off the plastic frame, the shoulder buttons and the volume switch may fall out of the device.

    • Underneath each shoulder button is a small spring. Do not lose them.

  8. Game Boy Micro Motherboard Replacement: paso 8, imagen 1 de 2 Game Boy Micro Motherboard Replacement: paso 8, imagen 2 de 2
    • With a spudger, depress the small clip on the lower right corner of the plastic guard.

    • Grab the edges of the plastic frame and lift the frame off the motherboard.

  9. Game Boy Micro Motherboard Replacement: paso 9, imagen 1 de 1
    • Remove the two gold Phillips #00 screws from the motherboard.

  10. Game Boy Micro Motherboard Replacement: paso 10, imagen 1 de 2 Game Boy Micro Motherboard Replacement: paso 10, imagen 2 de 2
    • With one hand, gently slide the top left end of the motherboard up and out of the front case.

    • With your other hand, pull out the EMI shield until the tab comes out of the front case.

    • Once the tab is pulled out from the bottom, slide the EMI shield down and out of the device.

  11. Game Boy Micro Motherboard Replacement: paso 11, imagen 1 de 3 Game Boy Micro Motherboard Replacement: paso 11, imagen 2 de 3 Game Boy Micro Motherboard Replacement: paso 11, imagen 3 de 3
    • The entire motherboard is now accessible.

    • Take extreme care when working with the motherboard to avoid damaging the device and its components.

    • A small ribbon cable connects the start and select buttons to the motherboard. It can rip very easily, so do not pull on it.

    • Lift the motherboard and the front plastic cover assembly off of the front case.

    • Once the front case is removed, the plastic on/off switch will fall out of place.

  12. Game Boy Micro Motherboard Replacement: paso 12, imagen 1 de 3 Game Boy Micro Motherboard Replacement: paso 12, imagen 2 de 3 Game Boy Micro Motherboard Replacement: paso 12, imagen 3 de 3
    • When you remove the motherboard from the front case, the start and select buttons may fall out.

    • If the buttons do not fall out, remove them with a pair of tweezers.

  13. Game Boy Micro Motherboard Replacement: paso 13, imagen 1 de 3 Game Boy Micro Motherboard Replacement: paso 13, imagen 2 de 3 Game Boy Micro Motherboard Replacement: paso 13, imagen 3 de 3
    • Without the front case, you will be left with the motherboard and the plastic mount. The LCD screen is attached to the motherboard by a ribbon and can fall off the plastic mount.

    • Using metal tweezers, grab the start/select board and slide it out gently.

  14. Game Boy Micro Motherboard Replacement: paso 14, imagen 1 de 2 Game Boy Micro Motherboard Replacement: paso 14, imagen 2 de 2
    • Lift the entire motherboard assembly off the plastic guard.

    • Take caution not to damage any of the gold ribbon cables on the motherboard.

    • The LCD screen is the only thing connecting the motherboard and plastic guard.

  15. Game Boy Micro Motherboard Replacement: paso 15, imagen 1 de 2 Game Boy Micro Motherboard Replacement: paso 15, imagen 2 de 2
    • To remove the LCD screen, carefully angle it until it is diagonal to the square hole in the plastic guard and slide it out.

    • It is now possible to remove the entire motherboard assembly from the plastic guard.

  16. Game Boy Micro Motherboard Replacement: paso 16, imagen 1 de 3 Game Boy Micro Motherboard Replacement: paso 16, imagen 2 de 3 Game Boy Micro Motherboard Replacement: paso 16, imagen 3 de 3
    • On the plastic guard, there are two rubber pads that cover the buttons. Remove them.

    • These pads rest on the motherboard and sometimes stick to it. If they do, peel them off.

    • With the rubber pads off, you may use your fingers to remove the buttons to clean or replace them.

    • When returning the buttons to the guard, they have to be put back in exactly the way they were pulled out.

  17. Game Boy Micro Motherboard Replacement, Motherboard: paso 17, imagen 1 de 3 Game Boy Micro Motherboard Replacement, Motherboard: paso 17, imagen 2 de 3 Game Boy Micro Motherboard Replacement, Motherboard: paso 17, imagen 3 de 3
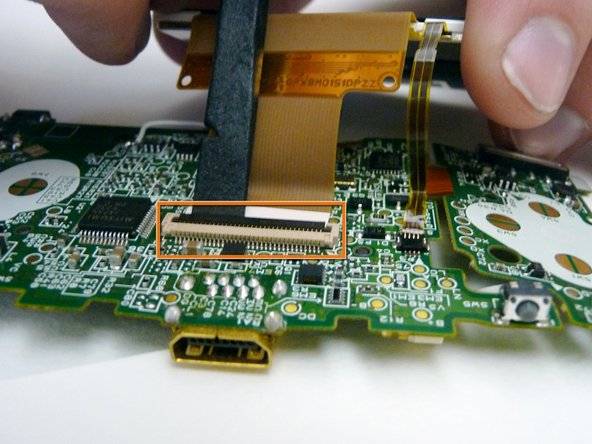
    • The LCD screen is connected to the motherboard by two ribbon cables.

    • Use a plastic spudger to disconnect the LCD's ZIF connector.

  18. Game Boy Micro Motherboard Replacement: paso 18, imagen 1 de 3 Game Boy Micro Motherboard Replacement: paso 18, imagen 2 de 3 Game Boy Micro Motherboard Replacement: paso 18, imagen 3 de 3
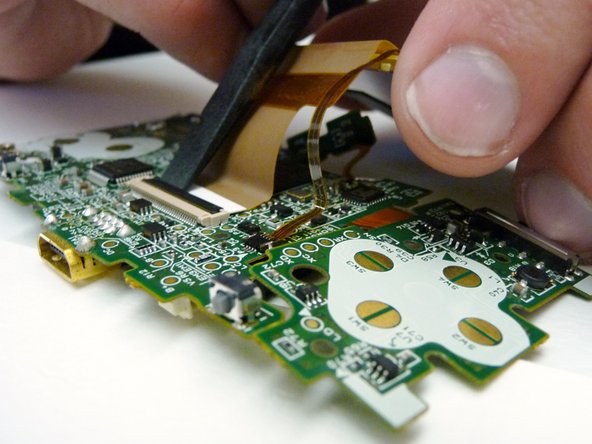
    • Use the tip of the spudger to lift the small, black tab holding the thin ribbon.

    • With both tabs lifted, pull the ribbons off the motherboard and remove the LCD screen.

Conclusión

To reassemble your device, follow these instructions in reverse order.

19 personas más completaron esta guía.

Brendan Kelly

Miembro Desde 01/26/10

269 Reputación

2 Guías creadas

Equipo

Cal Poly, Team 8-46, Regan Winter 2010 Miembro de Cal Poly, Team 8-46, Regan Winter 2010

CPSU-REGAN-W10S8G46

5 Miembros

25 Guías creadas

0 comentarios

Agregar Comentario

Ver Estadísticas:

Ultimas 24 horas: 7

Ultimos 7 días: 47

Ultimos 30 días: 212

Todo El Tiempo: 26,041