Saltar al contenido principal

Esta guía ha sufrido modificaciones. Revisa la última versión sin revisar.

Galaxy Tab S 10.5 Battery Replacement

Qué necesitas

  1. Galaxy Tab S 10.5 Battery Replacement, Disassembling Galaxy Tab S 10.5 Back Cover: paso 1, imagen 1 de 2 Galaxy Tab S 10.5 Battery Replacement, Disassembling Galaxy Tab S 10.5 Back Cover: paso 1, imagen 2 de 2
    • Place the plastic opening tool into the SD card slot or charge port.

    • Try in an upward motion until you see a separation between the tablet and back cover.

  2. Galaxy Tab S 10.5 Battery Replacement: paso 2, imagen 1 de 1
    • Work around the entire device by sliding the plastic opening tool around the rim.

    • If this is the first time, it will be hard to separate the back cover from the tablet.

    • The clips are approximately 5 cm apart. While working around the device, the clips will make a dislocating sound when disconnected.

  3. Galaxy Tab S 10.5 Battery Replacement: paso 3, imagen 1 de 1
    • Remove the back cover once all links have been separated.

    • Be careful when touching any of the internal components of the tablet.

  4. Galaxy Tab S 10.5 Battery Replacement, Battery: paso 4, imagen 1 de 3 Galaxy Tab S 10.5 Battery Replacement, Battery: paso 4, imagen 2 de 3 Galaxy Tab S 10.5 Battery Replacement, Battery: paso 4, imagen 3 de 3
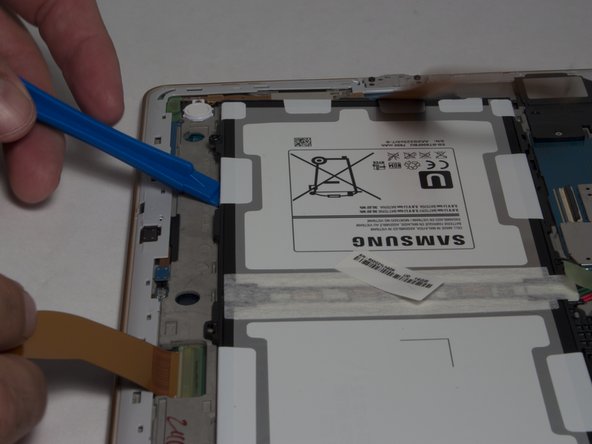
    • Using tweezers, peel back the green tape from the ZIF connectors on the two black ribbon cables.

    • Use a plastic opening tool to lift up the plastic clips on the ZIF connectors.

  5. Galaxy Tab S 10.5 Battery Replacement: paso 5, imagen 1 de 1
    • Remove the six 2mm screws Phillips #000 screws surrounding the battery.

  6. Galaxy Tab S 10.5 Battery Replacement: paso 6, imagen 1 de 3 Galaxy Tab S 10.5 Battery Replacement: paso 6, imagen 2 de 3 Galaxy Tab S 10.5 Battery Replacement: paso 6, imagen 3 de 3
    • Place the plastic opening tool between the frame and battery.

    • Move the plastic opening tool in a downward motion, away from the battery to bring the battery out of the device.

  7. Galaxy Tab S 10.5 Battery Replacement: paso 7, imagen 1 de 3 Galaxy Tab S 10.5 Battery Replacement: paso 7, imagen 2 de 3 Galaxy Tab S 10.5 Battery Replacement: paso 7, imagen 3 de 3
    • Hold the battery and disconnect the plug to remove the battery.

Conclusión

To reassemble your device, follow these instructions in reverse order.

82 personas más completaron esta guía.

Jordan Soto

Miembro Desde 08/26/15

3,249 Reputación

6 Guías creadas

Equipo

USF Tampa, Team 3-2, Eyestone Fall 2015 Miembro de USF Tampa, Team 3-2, Eyestone Fall 2015

USFT-EYESTONE-F15S3G2

3 Miembros

20 Guías creadas

19 comentarios

where is a good place to buy a replacement battery?

brianference - Contestar

Artículo muy positivo: pasos muy bien detallados. Me ha resultado fácil la el cambio de batería. Gracias por tu colaboración.

Miguel Ángel - Contestar

Bought mine off of ebay

Jerry Belschner - Contestar

Great guide! Thanks a lot!

Markus - Contestar

I bought a battery but am afraid to do the replacement myself. Where can I take the tablet to have it done?

Barb - Contestar

Agregar Comentario

Ver Estadísticas:

Ultimas 24 horas: 6

Ultimos 7 días: 58

Ultimos 30 días: 297

Todo El Tiempo: 98,407