Esta traducción podría no reflejar los cambios más recientes añadidos a la guía de referencia. Ayúdanos a actualizar la traducción o revisa la guía original.
Introducción
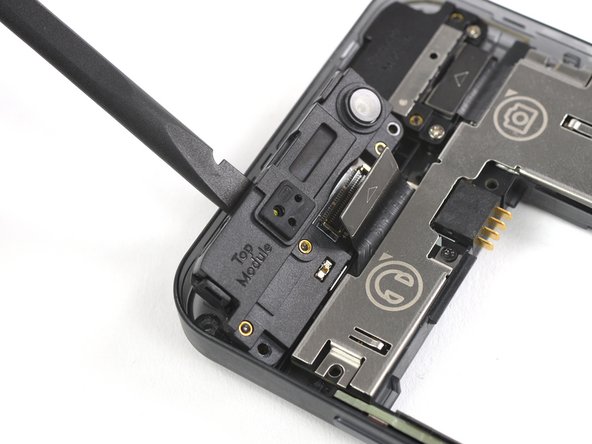
Usa esta guía pra reemplazar el módulo superior en tu Fairphone 3.
Qué necesitas
-
-
Inserta una uña o una herramienta de palanca como un spudger en la muesca en la parte inferior de la tapa trasera.
-
Levanta la tapa trasera para empezar a separar sus clips de plástico.
-
-
-
Usa una uña o una herramienta de palanca en la muesca marcada para levantar la batería de su recoveco.
-
Haz palanca en la batería hasta que consigas agarrarla bien.
-
-
-
-
Asegúrate de insertar la púa de apertura entre el marco medio y el módulo de visualizacióny no en el pequeño espacio junto a la pantalla. De lo contrario, levantarás la pantalla en lugar de todo el módulo de visualización.
-
Inserta una púa de apertura entre el marco medio y el módulo de pantalla en el borde derecho del teléfono.
-
Desliza la púa de apertura en la esquina inferior derecha para abrir las abrazaderas de plástico del módulo de pantalla.
-


Para volver a ensamblar tu dispositivo, sigue estas instrucciones en orden inverso.
La información sobre qué hacer con el módulo antiguo se puede encontrar en la página de soporte de FairPhone] y en el foro de FairPhone].
Recicla tus residuos electronicos.
¿La reparación no salió según lo planeado? Prueba con solución de problemas básicos, o pide ayuda en nuestro foro.
Cancelar: No complete esta guía.
9 personas más completaron esta guía.
Un agradecimiento especial a estos traductores:
87%


Estos traductores nos están ayudando a reparar el mundo! ¿Quieres contribuir?
Empezar a traducir ›


3 comentarios
I just did exactly that, and the camera won't work. both of the cameras. when I open the camera app, it is all black, and seems like still loading for around 10 seconds, and afterwards it prompts the error: "open camera error id =0".
I tried to replace it back to the old top module and the problem remained the same.. @fairops
tried the fairphone builtin checks from "myFairphone" app, and both front and back camera failed for not presenting anything.. used the automatic form to reach fairphone customer support, but they should reply me in about 9 days...
meanwhile I cannot use my phone camera!
so please if anyone knows how to handle it please help
now I see I can't use my flashlight too, the button is disabled and it says "camera in use"... although the green sign that should be on the top right corner to inform of camera status does not appear, so it seems like the phone thinks the camera is in use although it is not in use... disturbing..
Danks -
solved! (kinda..)
the connecting part of the new top module I tried to install was dirty, and so, after installing it, the connecting part in the phone itself got dirty too, which blocked the old top module to connect back successfully.
after cleaning the old top module and the connecting part of the phone, the old top module connected back successfully!
although when I tried to clean the dirty new one(which caused the troubles from the first place), and connected it, it still didn't work.
so not greatly happy about it I keep using the old top module.
disclaimer: the new top module I tried to install was a top module from a fairphone that was ran over by a car, lucky me that other parts survived and I'm currently using them on my fairphone without any troubles.
Danks -