Saltar al contenido principal

Epson Stylus Photo 820 Driver Motor Replacement

Qué necesitas

  1. Epson Stylus Photo 820 Driver Motor Replacement, Top Cover: paso 1, imagen 1 de 2 Epson Stylus Photo 820 Driver Motor Replacement, Top Cover: paso 1, imagen 2 de 2
    • To remove the top cover of the printer, you have to first release it from several tabs.

    • This may take more than one person to complete.

    • These three are the easiest tabs to remove. They are located on the back side of the printer.

  2. Epson Stylus Photo 820 Driver Motor Replacement: paso 2, imagen 1 de 2 Epson Stylus Photo 820 Driver Motor Replacement: paso 2, imagen 2 de 2
    • Push the tab in with one of the plastic opening tools.

    • Keep the tab pushed in by leveraging the tool between the tab and the hole. Pull up on the case so that the tab doesn't lock back into place.

    • Repeat this process with the furthermost right tab, then proceed with the middle tab.

  3. Epson Stylus Photo 820 Driver Motor Replacement: paso 3, imagen 1 de 3 Epson Stylus Photo 820 Driver Motor Replacement: paso 3, imagen 2 de 3 Epson Stylus Photo 820 Driver Motor Replacement: paso 3, imagen 3 de 3
    • It is recommended that Steps 3 and 4 be completed simultaneously. The tabs are identical, just on opposite sides.

    • Insert the pointed end of a spudger into the hole on the bottom left corner of the printer and pry out the tab.

    • This tab is the easiest to break, so be very careful.

  4. Epson Stylus Photo 820 Driver Motor Replacement: paso 4, imagen 1 de 2 Epson Stylus Photo 820 Driver Motor Replacement: paso 4, imagen 2 de 2
    • Insert the pointed end of a spudger into the hole on the bottom right corner of the printer and pry out the tab.

  5. Epson Stylus Photo 820 Driver Motor Replacement: paso 5, imagen 1 de 3 Epson Stylus Photo 820 Driver Motor Replacement: paso 5, imagen 2 de 3 Epson Stylus Photo 820 Driver Motor Replacement: paso 5, imagen 3 de 3
    • The final two tabs can be more difficult to release. Viewing from the front, they are located in the back left and right corners of the printer.

    • The release points for the tabs are located in holes on the depressed area of the base (darker piece).

    • Use the pointed end of a spudger to pry out the tab.

    • Use one of the plastic tools to keep the tab pried out. Once it releases, push in towards the printer (viewing from the side) and pull up on the case.

  6. Epson Stylus Photo 820 Driver Motor Replacement: paso 6, imagen 1 de 1
    • All of the tabs have now been released.

    • When trying to completely remove the cover, it gets caught on these two back components. Maneuvering around these can be tricky.

    • Push the cover to the right slightly and then push it backwards (out of the screen in this picture). This should give it some wiggle room. Repeat this as necessary.

  7. Epson Stylus Photo 820 Driver Motor Replacement: paso 7, imagen 1 de 2 Epson Stylus Photo 820 Driver Motor Replacement: paso 7, imagen 2 de 2
    • Pull the cover up and off.

  8. Epson Stylus Photo 820 Driver Motor Replacement, Driver Motor: paso 8, imagen 1 de 2 Epson Stylus Photo 820 Driver Motor Replacement, Driver Motor: paso 8, imagen 2 de 2
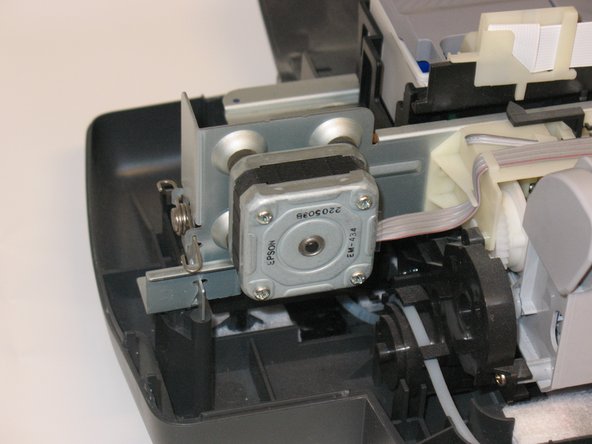
    • Locate the drive motor. It is the square object located in the back right of the chassis.

  9. Epson Stylus Photo 820 Driver Motor Replacement: paso 9, imagen 1 de 2 Epson Stylus Photo 820 Driver Motor Replacement: paso 9, imagen 2 de 2
    • Remove the four screws that hold the motor down.

    • Use a small pair of needle-nose pliers to hold the back nut steady.

    • Be careful not to lose the small washers and grommets under the nut when removing the screws.

  10. Epson Stylus Photo 820 Driver Motor Replacement: paso 10, imagen 1 de 3 Epson Stylus Photo 820 Driver Motor Replacement: paso 10, imagen 2 de 3 Epson Stylus Photo 820 Driver Motor Replacement: paso 10, imagen 3 de 3
    • Push on the spring loaded tensioner on the left side of the belt to loosen the force on the drive motor.

  11. Epson Stylus Photo 820 Driver Motor Replacement: paso 11, imagen 1 de 1
    • Remove the red cable connecting the motor to the logic board.

    • Be careful, this is the most sensitive part of the printer.

  12. Epson Stylus Photo 820 Driver Motor Replacement: paso 12, imagen 1 de 1
    • Once your old motor is out, follow the previous steps in reverse to install the new one!

Conclusión

To reassemble your device, follow these instructions in reverse order.

Una persona más ha completado esta guía.

Alex Lin

Miembro Desde 04/10/11

99 Reputación

3 Guías creadas

Equipo

Cal Poly, Team 20-68, Walters Spring 2011 Miembro de Cal Poly, Team 20-68, Walters Spring 2011

CPSU-WALTERS-S11S20G68

4 Miembros

12 Guías creadas

0 comentarios

Agregar Comentario

Ver Estadísticas:

Ultimas 24 horas: 0

Ultimos 7 días: 0

Ultimos 30 días: 1

Todo El Tiempo: 2,081