Esta traducción podría no reflejar los cambios más recientes añadidos a la guía de referencia. Ayúdanos a actualizar la traducción o revisa la guía original.
Introducción
Esta guía te enseña el proceso de reemplazar un ensamblaje de pantalla LCD y un digitalizador en un teléfono Motorola G4 Plus.
Esta guía es para reemplazar un ensamblaje de pantalla completo que incluye el marco de pantalla. Tu parte de reemplazo debería verse así. Si has comprado una pantalla sin nada, debes completar los pasos adicionales de desmontaje que no están incluidos en esta guía.
Para tu seguridad, descarga tu batería por debajo de 25% antes de desmontar tu teléfono. Esto reduce el riesgo de un evento térmico peligroso si la batería se daña accidentalmente durante la reparación.
Qué necesitas
-
-
Inserta una uña o un spudger en el borde inferior del teléfono cerca del puerto de carga.
-
Separa la tapa posterior del cuerpo del teléfono.
-
-
-
Desliza y remueve la tarjeta SIM.
Tenho un Motorola g4 plus 64 G
El celular se volvía loco abriendo y cerrando aplicaciones
Ahora no reconoce la tarjeta SIM
Internet y Wasapp funciona
Alguien sabe donde lo reparan soy de Argentina Buenos Aires CABA
-
-
-
Remueve los 19 tornillos T3 de 3.1 mm que sujetan el marco medio.
A pair of binocular magnifiers is helpful here. Also, a magnetic pickup will help pull the tiny screws out of their counterbores.
Well I'm stuck. 3 screw heads are stripped on mine, not lucky as they are two on USB port end and screw in-between two SIM slots. Phone bought new and this is 1st time screws have been touched, could see they were already stripped before getting screwdriver near them. Any tips on removing stripped screws?
Hi Mark,
I’m sorry to hear that! You can try some techniques from the stripped screw guide.
I found that a T4 driver was the correct size for the screws.
-
-
-
-
Despega la lengüeta negra de la batería y jala despacio pero firmemente para separar la batería del marco.
Does anybody know, what the black tape covering the metal cans an the battey is made of? It seems to have a heat insulating effect.
No, but the tape completely separated from itself when I removed it. Glue separated from the backing. I figure the glue in the frame is holding it well enough.
I found prying the battery out was the trickiest part of this job. Take your time and pry with the plastic tool, working from the end away from the wires, but try not to deform the battery in the process. It does finally come out.
Hi, I cannot remove the Battery, it has too strong glue. Any Ideas?
Regards
You can try to drip some high concentration isopropyl alcohol along the battery edge to help loosen the adhesive.
-
-
-
Despega la cinta amarilla que se encuentra encima del tornillo T3 al lado de la ranura para la tarjeta SIM.
-
Despega la cinta cobre que cubre el conector de pantalla.
When putting this metal tape back down. place it on the center of the connector first. Use the Spudger and GENTLY rub on the metal tape from the center out, to get the creases out of it that will appear when you take it off. By doing this, you can get it VERY flat and eliminate any creases that formed.
-
-
-
Usa un spudger para hacer palanca y desconectar el conector de pantalla de la placa madre.
As you try to re-attach this clip, it helped me to look at it from the side (top of phone ) and look under the clip to help align the connector. It was easy to see when it did not line up and correct it so it clicked in cleanly. Same thing applies in Step 15
-
-
-
Remueve los dos tornillos T3 de 2.4 mm al lado de la ranura para la tarjeta SIM.
General hint in putting screws back in without stripping them. 1) put the screw back in the hold. 2) gently turn it counter-clockwise like you are loosening it again. (Do not press down on the screw, let the weight of the screwdriver be the only pressure) When you feel/hear a little click, stop. That is the screw thread falling into the correct groove. 3) Turn it clockwise to tighten the screw.. you should feel NO resistance until the screw is fully seated. If you do, repeat step 2 again until you hear/feel the drop of the screw. This works when putting in any screw, not just the ones on this phone. Repeat this same process for each screw in this step and step 4 above.
-
-
-
Inserta la punta de un spudger en una muesca en la parte inferior de la placa madre.
-
Con cuidado haz palanca para soltar la placa madre del marco y de los clips del borde.
-
Usa un spudger para apartar cualquier cable flexible así como también asegurarte que ningún módulo adjunto a la placa madre (como la cámara frontal) se suelte del marco.
-
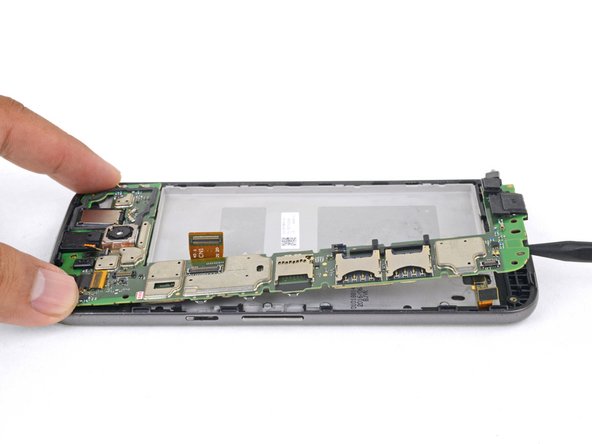
Levanta la placa madre del marco y remuévela.
When reassembling, make sure the protective film over front camera opening is removed before putting that camera back in or you will be taking it apart again to remove it.
-
-
-
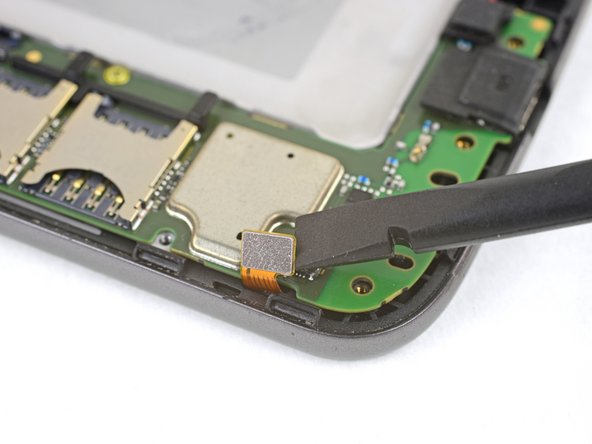
Para remover la toma de auriculares y transferirla al marco nuevo, inserta la punta de un spudger en el puerto de auriculares y tuerce hacia abajo para separar la toma del marco.
-
Remueve la toma de auriculares.
Unless I got a defective or incomplete replacement part (LCD screen and digitizer assembly), you must also remove the little headphone jack wire that you disconnected in step 18 and transfer it into the new assembly. It is stuck on the assembly quite well.. I used some alcohol (just like you used on the battery) to loosen the glue. It pulls straight towards the earpiece you will remove in step 22.
Wie beim Kommentar von 2018, fehlte auch bei mir das Verbindungsstück im neuen Rahmenteil, kein großes Ding, aber dies fehlt hier in der Beschreibung
-
-
-
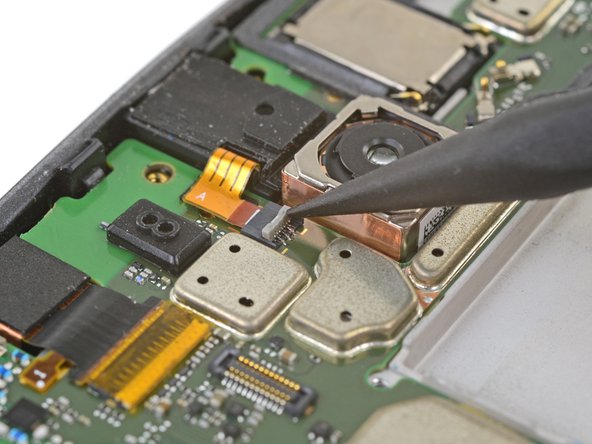
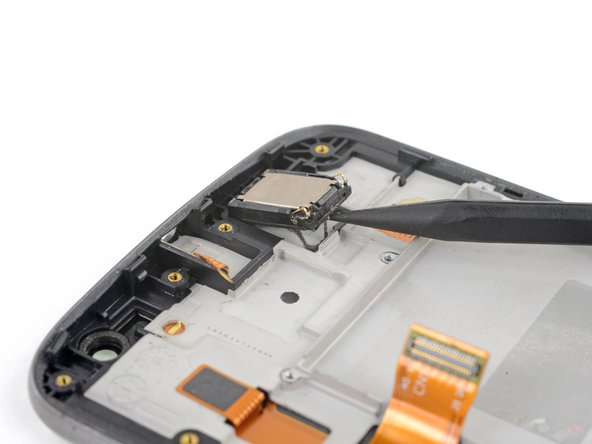
Para remover el altavoz auricular para transferirla al marco nuevo, inserta la punta de un spudger en la parte inferior del altavoz.
-
Haz palanca hacia arriba para separar el altavoz auricular del marco.
Den Lautsprecher musste ich in meinem Fall nicht ausbauen, da ich einen neuen schon auf dem Ersatzrahmen montiert bekommen hatte
-
-
-
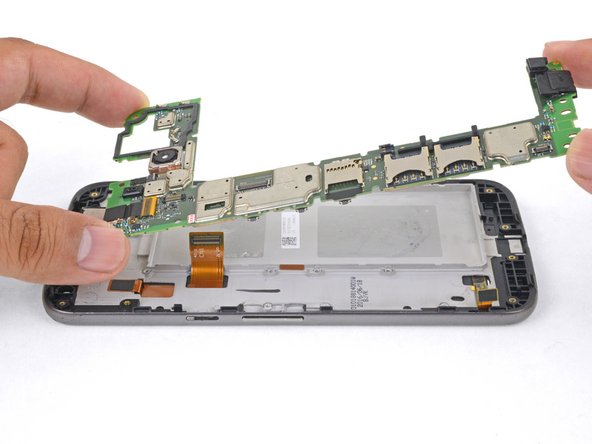
Solo queda el ensamblaje de pantalla LCD y digitalizador (con marco).
-
Compara tu parte nueva de reemplazo con la parte original. Podrías tener que transferir componentes restantes o remover adhesivos de la parte nueva antes de instalarla.
Vom alten Rahmen mussten noch die Buttons für Einschalten und Lautstärke rausgelöst und in den neuen Rahmen eingeklickt werden
-


Para volver a ensamblar tu dispositivo, sigue estas instrucciones en orden inverso.
Lleva tus residuos electrónicos a un centro de reciclaje certificado.
¿La reparación no salió como lo habías planificado? Fíjate en nuestra comunidad de respuestas de Motorola Moto G4 Plus para ayuda en resolución de problemas.
Cancelar: No complete esta guía.
27 personas más completaron esta guía.
Un agradecimiento especial a estos traductores:
93%

¡ Mariana Roca nos está ayudando a reparar el mundo! ¿Quieres contribuir?
Empezar a traducir ›


Un comentario
Why are the display/ LCD screen of any smartphone damaged?