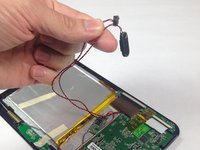
Saltar al contenido principal

Ematic eGlide 4 Side Button Array Replacement

Qué necesitas

  1. Ematic eGlide 4 Side Button Array Replacement, Rear Panel: paso 1, imagen 1 de 1
    • Remove the 4.6mm Phillips #00 screw at the base of the device.

  2. Ematic eGlide 4 Side Button Array Replacement: paso 2, imagen 1 de 1
    • Slide the rear panel away from the base parallel to the screen.

  3. Ematic eGlide 4 Side Button Array Replacement: paso 3, imagen 1 de 2 Ematic eGlide 4 Side Button Array Replacement: paso 3, imagen 2 de 2
    • Carefully remove the speakers from the rear panel.

    • Pull the speakers off of the rear panel.

  4. Ematic eGlide 4 Side Button Array Replacement, Side Button Array: paso 4, imagen 1 de 1
    • Remove the 3 Phillips #00 4.5 mm screws from the side button array.

  5. Ematic eGlide 4 Side Button Array Replacement: paso 5, imagen 1 de 2 Ematic eGlide 4 Side Button Array Replacement: paso 5, imagen 2 de 2
    • Slide the grey ribbon wire connector clip away from the ribbon wire port on the motherboard using the pointed tip of a spudger. This process will unclip the wire from the motherboard to release connection.

    • You do not need to fully disconnect the ribbon wire clip from the ribbon wire port: the clip will stay attached in a loose fit.

    • Remove the ribbon wire from the ribbon wire port on the motherboard.

  6. Ematic eGlide 4 Side Button Array Replacement: paso 6, imagen 1 de 1
    • Remove the side button array from the device.

Conclusión

To reassemble your device, follow these instructions in reverse order.

Una persona más ha completado esta guía.

Bailey Hughes

Miembro Desde 03/22/15

617 Reputación

6 Guías creadas

Equipo

Baylor, Team 5-8, Williams Spring 2015 Miembro de Baylor, Team 5-8, Williams Spring 2015

BU-WILLIAMS-S15S5G8

3 Miembros

6 Guías creadas

0 comentarios

Agregar Comentario

Ver Estadísticas:

Ultimas 24 horas: 0

Ultimos 7 días: 1

Ultimos 30 días: 11

Todo El Tiempo: 114