Saltar al contenido principal

Eee Pad Transformer Prime TF201 External Portion of the Lock Button Replacement

Qué necesitas

  1. Eee Pad Transformer Prime TF201 External Portion of the Lock Button Replacement, Opening Your Device: paso 1, imagen 1 de 1
    • Power down your device.

    • Place the small suction cup on a corner of the screen and lightly pull up to expose a seam between the screen and case.

  2. Eee Pad Transformer Prime TF201 External Portion of the Lock Button Replacement: paso 2, imagen 1 de 3 Eee Pad Transformer Prime TF201 External Portion of the Lock Button Replacement: paso 2, imagen 2 de 3 Eee Pad Transformer Prime TF201 External Portion of the Lock Button Replacement: paso 2, imagen 3 de 3
    • Insert the plastic opening tool into the seam near the corner of the device.

    • Slowly slide the tool around the perimeter of the device, gradually prying up the screen.

    • It is normal to hear snaps as the spring clips holding the screen in place are released.

    • It is also normal to hear adhesive separating, as a small amount is used to help secure the screen.

  3. Eee Pad Transformer Prime TF201 External Portion of the Lock Button Replacement: paso 3, imagen 1 de 3 Eee Pad Transformer Prime TF201 External Portion of the Lock Button Replacement: paso 3, imagen 2 de 3 Eee Pad Transformer Prime TF201 External Portion of the Lock Button Replacement: paso 3, imagen 3 de 3
    • When the screen is free of all spring clips and adhesive, slowly open the device like a clam shell with the hinge being the left hand side of the device.

    • Do not completely separate the screen from the case by more than a few inches, as they are still connected by three orange ribbon cables.

    • Safely place the device back on the table by laying the screen face down.

    • There will be some slight overlapping of the back of the case over the screen.

  4. Eee Pad Transformer Prime TF201 External Portion of the Lock Button Replacement: paso 4, imagen 1 de 2 Eee Pad Transformer Prime TF201 External Portion of the Lock Button Replacement: paso 4, imagen 2 de 2
    • Disconnect the ribbon cable by placing a plastic opening tool under the black plastic tab that is on the opposite side of the port as the ribbon cable.

    • Pry upward until the black tab moves 90 degrees, and gently pull the ribbon cable out of the port.

  5. Eee Pad Transformer Prime TF201 External Portion of the Lock Button Replacement: paso 5, imagen 1 de 1
    • Place a plastic opening tool under the white plastic tab on one of the ribbon cable ports.

    • Pry upward until the black tab moves 90 degrees, and gently pull the ribbon cable out of the port.

    • Repeat the previous process to remove the other ribbon cable.

  6. Eee Pad Transformer Prime TF201 External Portion of the Lock Button Replacement: paso 6, imagen 1 de 1
    • Remove the battery (secured by six screws and a white wire connector) by following the removal portion of this battery replacement guide.

    • The device that we wrote this guide for did not come with a battery, so we cannot include it in our own guide steps.

    • The battery is removed during all repairs to protect against short circuits, shocks, and internal damage to the device.

  7. Eee Pad Transformer Prime TF201 External Portion of the Lock Button Replacement, Internal Lock and Volume Button: paso 7, imagen 1 de 1
    • Orient your device so that the lock and volume buttons and the attached components are on the top left.

  8. Eee Pad Transformer Prime TF201 External Portion of the Lock Button Replacement: paso 8, imagen 1 de 2 Eee Pad Transformer Prime TF201 External Portion of the Lock Button Replacement: paso 8, imagen 2 de 2
    • Remove the two 2.5mm screws using a Phillips #00 screwdriver.

  9. Eee Pad Transformer Prime TF201 External Portion of the Lock Button Replacement: paso 9, imagen 1 de 3 Eee Pad Transformer Prime TF201 External Portion of the Lock Button Replacement: paso 9, imagen 2 de 3 Eee Pad Transformer Prime TF201 External Portion of the Lock Button Replacement: paso 9, imagen 3 de 3
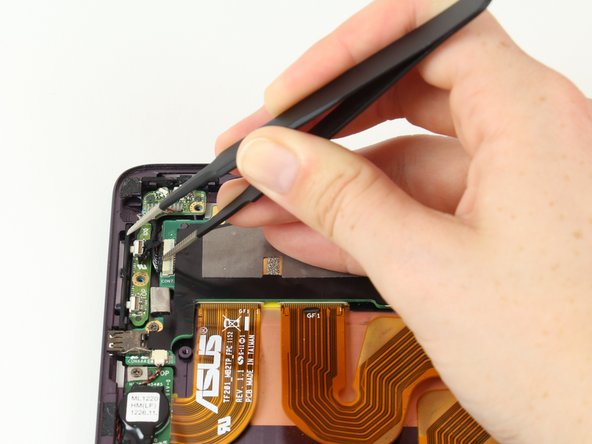
    • Use tweezers to pull back the strip of black tape covering the connection between the electronic portion of the lock and volume buttons and the motherboard.

    • Push the black part out of the white part of the connection using tweezers.

  10. Eee Pad Transformer Prime TF201 External Portion of the Lock Button Replacement: paso 10, imagen 1 de 1
    • The electronic portion of the lock and volume buttons should now be free to move. Lift it gently using tweezers, and set it aside.

  11. Eee Pad Transformer Prime TF201 External Portion of the Lock Button Replacement, External Lock Button: paso 11, imagen 1 de 3 Eee Pad Transformer Prime TF201 External Portion of the Lock Button Replacement, External Lock Button: paso 11, imagen 2 de 3 Eee Pad Transformer Prime TF201 External Portion of the Lock Button Replacement, External Lock Button: paso 11, imagen 3 de 3
    • Press down on the lock button from the outside of your device using your finger.

    • Use tweezers to pull the lock button upwards from the inside of the device, while keeping your finger pressed from the outside.

    • Pull the lock button free from the device and set it aside.

Conclusión

To reassemble your device, follow these instructions in reverse order.

Una persona más ha completado esta guía.

Elaina Ryan

Miembro Desde 10/06/16

435 Reputación

4 Guías creadas

Equipo

Cal Poly, Team 10-1, Livingston SU 2016 Miembro de Cal Poly, Team 10-1, Livingston SU 2016

CPSU-LIVINGSTON-SU16S10G1

1 Miembro

6 Guías creadas

0 comentarios

Agregar Comentario

Ver Estadísticas:

Ultimas 24 horas: 0

Ultimos 7 días: 0

Ultimos 30 días: 0

Todo El Tiempo: 352