Saltar al contenido principal

Disassembling HP Pavilion 11 x360 Bottom Case

Sólo Prerrequisito
Esta guía solo debería usarse como prerrequisito para otras guías. Por tanto, estará incompleta.

Qué necesitas

  1. Disassembling HP Pavilion 11 x360 Bottom Case, Remove Screws: paso 1, imagen 1 de 2 Disassembling HP Pavilion 11 x360 Bottom Case, Remove Screws: paso 1, imagen 2 de 2
    • Use the spudger to pry off the two rubber feet near the hinge of the laptop. This will reveal two hidden 9mm screws.

    • You must remove eleven screws.

    • Four 9mm screws with the PH0 screwdriver.

    • Seven 6mm screws with the PH0 screwdriver.

  2. Disassembling HP Pavilion 11 x360 Bottom Case, Remove Backing: paso 2, imagen 1 de 3 Disassembling HP Pavilion 11 x360 Bottom Case, Remove Backing: paso 2, imagen 2 de 3 Disassembling HP Pavilion 11 x360 Bottom Case, Remove Backing: paso 2, imagen 3 de 3
    • Use the spudger to pry the corners of the laptop near the display hinges.

    • Pry around the seam of the laptop with the plastic opening tool until the backing begins to pull apart.

    • When you lift the bottom cover, there is a cable connected between the motherboard and the bottom cover. Be careful not to pull the cable loose!

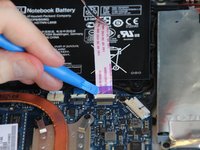
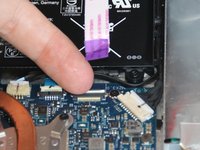
  3. Disassembling HP Pavilion 11 x360 Bottom Case, Detach Cable: paso 3, imagen 1 de 2 Disassembling HP Pavilion 11 x360 Bottom Case, Detach Cable: paso 3, imagen 2 de 2
    • Use the plastic opening tool to lift the white tab up at the connection.

    • Pull the cable outwards.

Conclusión

To reassemble your device, follow these instructions in reverse order.

Una persona más ha completado esta guía.

Austin

Miembro Desde 01/22/15

574 Reputación

1 Guía escrita

Equipo

Cal Poly, Team 19-9, Maness Winter 2015 Miembro de Cal Poly, Team 19-9, Maness Winter 2015

CPSU-MANESS-W15S19G9

Miembros de 4

12 Guías creadas

0 comentarios

Agregar Comentario

Ver Estadísticas:

Ultimas 24 horas: 0

Ultimos 7 días: 3

Ultimos 30 días: 14

Todo El Tiempo: 239