Saltar al contenido principal

Disassembling ASUS Eee pc 1008Ha

Qué necesitas

  1. Disassembling ASUS Eee pc 1008Ha, Disassembling ASUS Eee pc 1008Ha: paso 1, imagen 1 de 2 Disassembling ASUS Eee pc 1008Ha, Disassembling ASUS Eee pc 1008Ha: paso 1, imagen 2 de 2
    • Turn off the computer.

    • Disconnect the charging cable from the computer.

    • Failure to unplug the cable could result in electric shock.

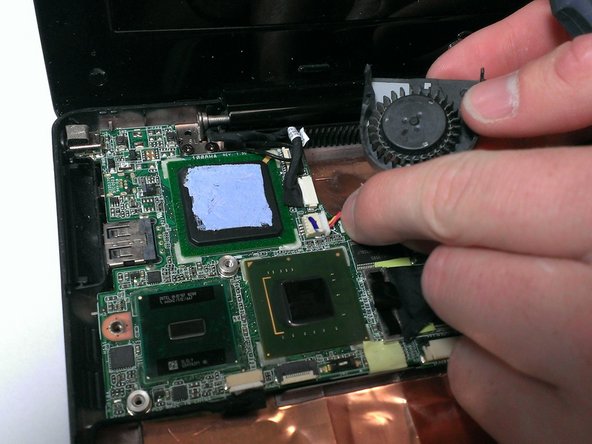
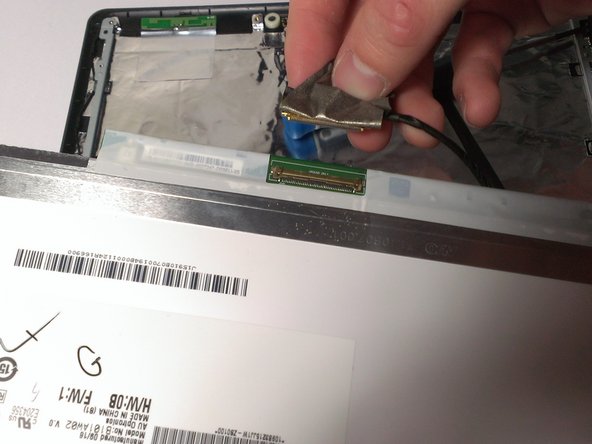
    • Top Panel: Use a Plastic Opening Tool to carefully pry the top panel from the base.

  2. Disassembling ASUS Eee pc 1008Ha: paso 2, imagen 1 de 3 Disassembling ASUS Eee pc 1008Ha: paso 2, imagen 2 de 3 Disassembling ASUS Eee pc 1008Ha: paso 2, imagen 3 de 3
    • Keyboard: Lift the side of the keyboard gently and disconnect the attached ribbon located underneath the keyboard.

    • Place your index finger in the hole on the right side of the keyboard tray and lift the tray gently.

  3. Disassembling ASUS Eee pc 1008Ha: paso 3, imagen 1 de 3 Disassembling ASUS Eee pc 1008Ha: paso 3, imagen 2 de 3 Disassembling ASUS Eee pc 1008Ha: paso 3, imagen 3 de 3
    • Battery: Use your fingers to lift the battery and gently disconnect the wires from the base.

  4. Disassembling ASUS Eee pc 1008Ha: paso 4, imagen 1 de 2 Disassembling ASUS Eee pc 1008Ha: paso 4, imagen 2 de 2
    • Heat sink: Use a Phillips head screwdriver to unscrew the screws that connect the heat sink to the fan.

    • Use a Flathead Screwdriver to gently lift the copper heat sink and use your fingers to remove it from the laptop.

  5. Disassembling ASUS Eee pc 1008Ha: paso 5, imagen 1 de 2 Disassembling ASUS Eee pc 1008Ha: paso 5, imagen 2 de 2
    • Fan: Unscrew the screws that secure the fan.

    • Use your fingers to lift the fan and pull the white plug carefully from the motherboard.

  6. Disassembling ASUS Eee pc 1008Ha: paso 6, imagen 1 de 1
    • USB header card: Use the Phillips head screwdriver to unscrew the 3 screws from the USB header card.

  7. Disassembling ASUS Eee pc 1008Ha: paso 7, imagen 1 de 1
    • Use your fingers to pull the USB header card from the side of the device chassis. (The USB header card will remain attached by wires.)

  8. Disassembling ASUS Eee pc 1008Ha: paso 8, imagen 1 de 2 Disassembling ASUS Eee pc 1008Ha: paso 8, imagen 2 de 2
    • Screen: Hold the USB header card in one hand.

    • Use your other hand to unscrew the 4 screws (2 on each side) that attach the screen to the base.

  9. Disassembling ASUS Eee pc 1008Ha: paso 9, imagen 1 de 1
    • Use your fingers to hold the screen and carefully disconnect it from the right side of the base.

    • Loosen the screen from the left side of the base.

  10. Disassembling ASUS Eee pc 1008Ha: paso 10, imagen 1 de 2 Disassembling ASUS Eee pc 1008Ha: paso 10, imagen 2 de 2
    • Use a Flathead Screwdriver to pry off the chits from the front panel. (The chits are the small black rubber caps.)

    • Unscrew the screws that connect the front panel of the screen.

  11. Disassembling ASUS Eee pc 1008Ha: paso 11, imagen 1 de 1
    • Slide the Plastic Opening Tool under the edge of the screen bezel to release the front panel of the screen.

  12. Disassembling ASUS Eee pc 1008Ha: paso 12, imagen 1 de 3 Disassembling ASUS Eee pc 1008Ha: paso 12, imagen 2 de 3 Disassembling ASUS Eee pc 1008Ha: paso 12, imagen 3 de 3
    • Unscrew the screws from the edge of the screen.

    • Use your fingers to hold the screen and remove it from the base. (Wires will still be attached between the screen and the motherboard.)

  13. Disassembling ASUS Eee pc 1008Ha: paso 13, imagen 1 de 3 Disassembling ASUS Eee pc 1008Ha: paso 13, imagen 2 de 3 Disassembling ASUS Eee pc 1008Ha: paso 13, imagen 3 de 3
    • Use your fingers to remove the adhesive tape located on the back of the screen near the wire connection.

    • Disconnect the wire from the screen.

Conclusión

To reassemble your device, follow these instructions in reverse order.

2 personas más completaron esta guía.

Leo

Miembro Desde 04/18/13

183 Reputación

1 Guía escrita

Equipo

Cal Poly, Team 21-52, Johann Spring 2013 Miembro de Cal Poly, Team 21-52, Johann Spring 2013

CPSU-JOHANN-S13S21G52

4 Miembros

11 Guías creadas

0 comentarios

Agregar Comentario

Ver Estadísticas:

Ultimas 24 horas: 3

Ultimos 7 días: 13

Ultimos 30 días: 66

Todo El Tiempo: 14,768