Saltar al contenido principal

Digitac Jazz Ultratab C725 Battery Replacement

Qué necesitas

  1. Digitac Jazz Ultratab C725 Battery Replacement, Battery: paso 1, imagen 1 de 3 Digitac Jazz Ultratab C725 Battery Replacement, Battery: paso 1, imagen 2 de 3 Digitac Jazz Ultratab C725 Battery Replacement, Battery: paso 1, imagen 3 de 3
    • Locate the four 3.5 mm Philips head screws. There are two screws on top and 2 screws on the bottom.

    • Remove four screws with the Phillips #00 screwdriver.

    • Avoid damage to the threads by removing the screws with the least amount of force possible. Damaging could make it difficult to remove the screw.

  2. Digitac Jazz Ultratab C725 Battery Replacement: paso 2, imagen 1 de 3 Digitac Jazz Ultratab C725 Battery Replacement: paso 2, imagen 2 de 3 Digitac Jazz Ultratab C725 Battery Replacement: paso 2, imagen 3 de 3
    • Flip your device so that the long side without the buttons is facing you.

    • Insert the plastic opening tool between the silver back plate and the screen. From the corner of the device on either side, pry the seam of the device about 1 inch.

    • With the plastic opening tool, pry the screen apart from the back plate.

    • Keep prying the screen apart from the back plate until they are separated.

    • With the plastic opening tool, if necessary, pry part the remaining seams of the device.

    • After the screen is loose, pull the screen towards you. Lift it to prevent damage to the buttons.

  3. Digitac Jazz Ultratab C725 Battery Replacement: paso 3, imagen 1 de 2 Digitac Jazz Ultratab C725 Battery Replacement: paso 3, imagen 2 de 2
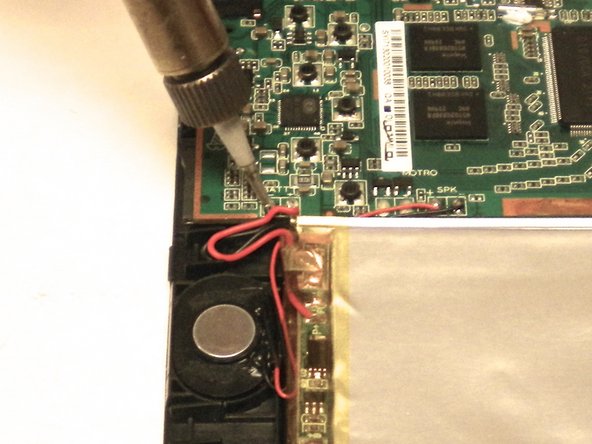
    • Use a soldering iron to melt the solder that connects the battery wires to the motherboard.

    • Pull the wires once the solder is melted.

  4. Digitac Jazz Ultratab C725 Battery Replacement: paso 4, imagen 1 de 3 Digitac Jazz Ultratab C725 Battery Replacement: paso 4, imagen 2 de 3 Digitac Jazz Ultratab C725 Battery Replacement: paso 4, imagen 3 de 3
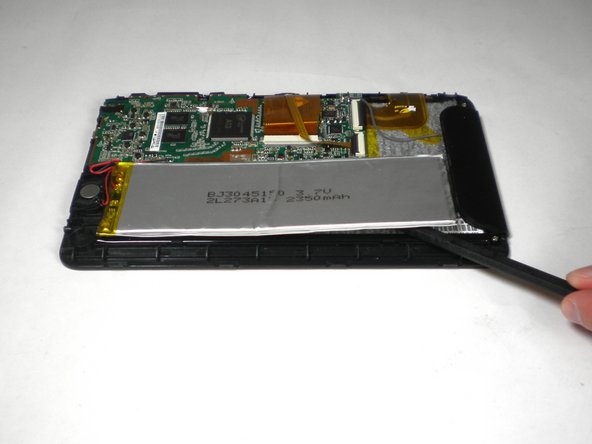
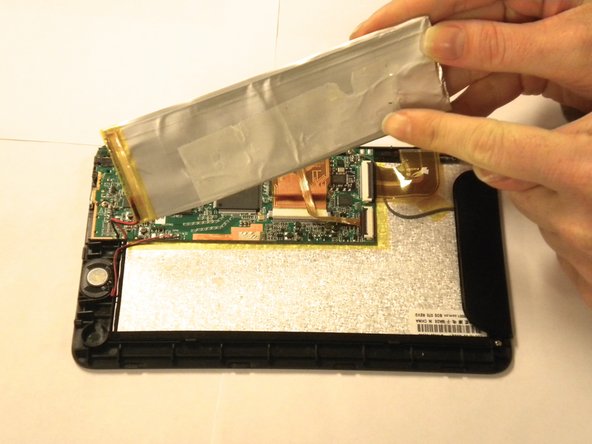
    • Peel up one of the long edges of the battery.

    • With the flat side of the Spudger insert it underneath the battery.

    • Weaken the strength of the adhesive by sweeping back and forth along the battery.

    • Pull the battery out of the device once it is loose.

    • A damaged battery is a fire hazard. Avoid damaging the battery at all costs.

Conclusión

To reassemble your device, follow these instructions in reverse order.

2 personas más completaron esta guía.

Seth York

Miembro Desde 01/20/15

355 Reputación

3 Guías creadas

Equipo

USF Tampa, Team 11-6, Blackwell Winter 2015 Miembro de USF Tampa, Team 11-6, Blackwell Winter 2015

USFT-BLACKWELL-W15S11G6

2 Miembros

5 Guías creadas

0 comentarios

Agregar Comentario

Ver Estadísticas:

Ultimas 24 horas: 0

Ultimos 7 días: 0

Ultimos 30 días: 1

Todo El Tiempo: 636