Saltar al contenido principal

Digiland 10.1'' DL1016 Motherboard Replacement

Qué necesitas

  1. Aviso: los pasos 1-2 provienen de una guía que está marcada como "En progreso".

    Digiland 10.1'' DL1016 Motherboard Replacement, Digiland 10.1'' DL1016 Remove Backing: paso 1, imagen 1 de 2 Digiland 10.1'' DL1016 Motherboard Replacement, Digiland 10.1'' DL1016 Remove Backing: paso 1, imagen 2 de 2
    • Use an opening pick and an opening tool to pry the backing off the back of the tablet.

    • You may need some force when doing this and if needed use a metal spudger.

  2. Digiland 10.1'' DL1016 Motherboard Replacement: paso 2, imagen 1 de 2 Digiland 10.1'' DL1016 Motherboard Replacement: paso 2, imagen 2 de 2
    • Gently lift the backing off.

  3. Digiland 10.1'' DL1016 Motherboard Replacement, Digiland 10.1'' DL1016 Disconnect LCD Connectors: paso 3, imagen 1 de 3 Digiland 10.1'' DL1016 Motherboard Replacement, Digiland 10.1'' DL1016 Disconnect LCD Connectors: paso 3, imagen 2 de 3 Digiland 10.1'' DL1016 Motherboard Replacement, Digiland 10.1'' DL1016 Disconnect LCD Connectors: paso 3, imagen 3 de 3
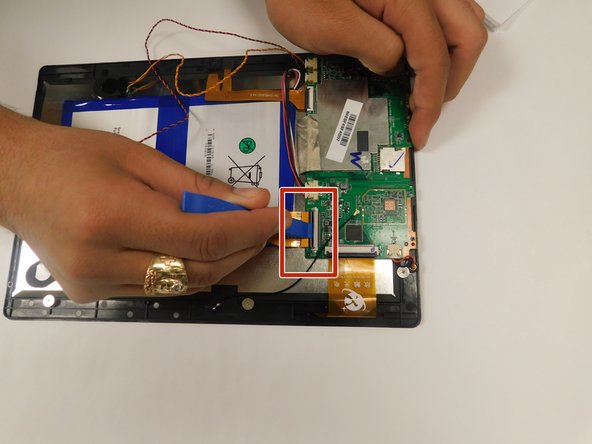
    • Pull back the black flaps on the ZIF cable connectors.

    • Pull the ribbon cables out of the connectors.

  4. Aviso: el paso 4 proviene de una guía que está marcada como "En progreso".

    Digiland 10.1'' DL1016 Motherboard Replacement, Digiland 10.1'' DL1016 Disconnect Wires going off the Motherboard: paso 4, imagen 1 de 2 Digiland 10.1'' DL1016 Motherboard Replacement, Digiland 10.1'' DL1016 Disconnect Wires going off the Motherboard: paso 4, imagen 2 de 2
    • Gently pull the wiring back.

    • You may need to use a metal spudger to lift the wire connector off the back of the screen.

  5. Digiland 10.1'' DL1016 Motherboard Replacement, Power Button: paso 5, imagen 1 de 1
    • Disconnect the black cable off the motherboard.

    • Remove the four 1.5mm Phillips #000 screws from the motherboard.

  6. Digiland 10.1'' DL1016 Motherboard Replacement: paso 6, imagen 1 de 2 Digiland 10.1'' DL1016 Motherboard Replacement: paso 6, imagen 2 de 2
    • Make sure the ribbon cables are free or unconnected so the motherboard is able to be moved.

    • Use a metal spudger to slide underneath the motherboard and push it up so it's unstuck from the tablet.

    • Lift up the motherboard and place it somewhere that is clean and kept safe.

  7. Digiland 10.1'' DL1016 Motherboard Replacement, Motherboard: paso 7, imagen 1 de 1
    • Once you have followed all steps simply replace the motherboard to fix your RAM

Conclusión

To reassemble your device, follow these instructions in reverse order. When following the Prerequisite Guide for Replacing the Power Button ONLY go to step 7.

Virginia Tapia

Miembro Desde 08/26/19

386 Reputación

3 Guías creadas

Equipo

Gateway, Team S1-G2, Saknee Fall 2019 Miembro de Gateway, Team S1-G2, Saknee Fall 2019

GCC-SAKNEE-F19S1G2

4 Miembros

5 Guías creadas

0 comentarios

Agregar Comentario

Ver Estadísticas:

Ultimas 24 horas: 0

Ultimos 7 días: 6

Ultimos 30 días: 10

Todo El Tiempo: 524