Introducción
- Deconstruir el teclado iMac
- Limpiar la membrana de PCB
- Reparar cualquier conexión defectuosa
- Re-construir el teclado.
Qué necesitas
-
-
Necesitará 1 bolígrafo conductivo y un destornillador pequeño
-
-
-
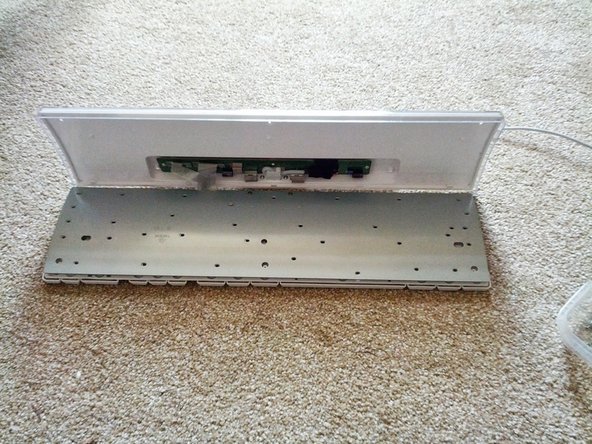
Una vez que haya retirado todos los tornillos del soporte de metal, levante con cuidado y tire de todos los elementos superiores del teclado hacia atrás, dejando el soporte de la tecla blanca en el suelo.
-
Coloque suavemente el soporte de la tecla blanca a un lado, no lo incline o podría perder algunos de los nódulos clave.
-
Coloque el soporte de metal de nuevo en el retenedor del teclado como en la imagen 2. A continuación, doble suavemente la membrana nuevamente en su lugar.
-
En esta etapa, si puede ver cualquier residuo líquido o suciedad en la membrana, use un paño ligeramente humedecido para limpiar o algunas toallitas para bebés.
-
No use líquido para encendedores, trementina o removedor de esmalte de uñas. Cualquier cosa como esta podría destruir la membrana.
-
Una vez que creas que tienes suciedad o residuos, puedes sacarlos de la membrana de PCB, dejar que se seque y pasar a la fijación de las llaves.
-
-
-
-
Recoge uno de los nódulos de goma de la pieza del teclado blanco que ponemos a un lado.
-
Conecte el teclado a una PC / MAC, y usando esto en los diversos puntos clave, puede presionar suavemente en la emulación de una tecla
-
Presione cada tecla alrededor de cualquier tecla rota para descubrir dónde está el problema.
-
-
-
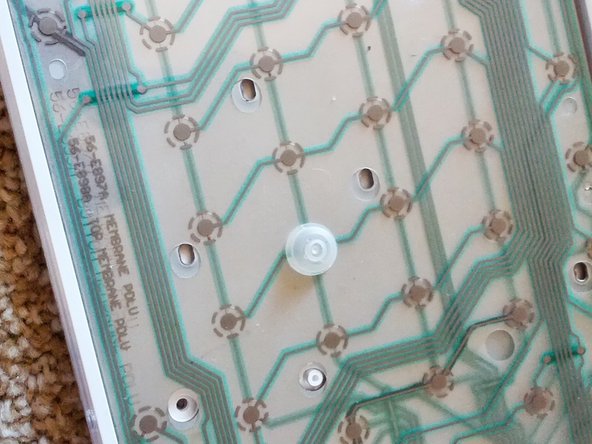
Hay 3 membranas de plástico, las pulsaciones de teclas se crean mediante los puntos de la capa superior presionando contra los puntos inferiores.
-
entre las capas superior e inferior hay una pieza de plástico transparente.
-
La clave para reparar las llaves rotas es encontrarlas, luego seguir la línea verde de cada llave rota hasta la siguiente llave que funcione.
-
Una vez que encuentre una clave que funcione en la misma línea verde que su línea rota, puede ...
-
Traza una línea con tu pluma conductiva para conectar la llave rota y que funciona. Recuerde, solo en la misma línea verde. Si cruzas líneas, tus llaves no funcionarán correctamente.
-
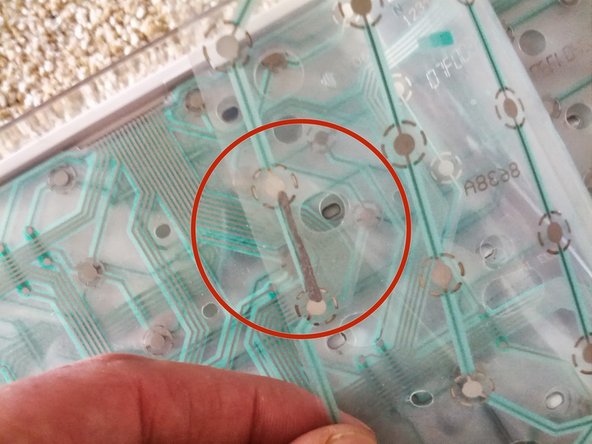
Puedes ver las líneas oscuras en mis imágenes conectando las llaves rotas. En algunos casos, he rasguñado suavemente la cubierta verde para exponer el cable debajo, y conecté mis llaves a eso en vez de dibujar una larga línea desordenada.
-
A menudo, la clave no funciona sin dibujar líneas en la membrana superior e inferior de PCB.
-
Ambas partes usarán rutas ligeramente diferentes, así que recuerde seguir sus líneas verdes con cuidado.
-
-
-
Una vez que esté seguro de haber ordenado todas las llaves rotas, devuelva su llavero blanco ... Suavemente, revise todos los pequeños nódulos de goma que están en su lugar en las llaves.
-
Con cuidado, lleve el resto del teclado a la parte superior del teclado blanco y doble la membrana sobre la parte superior de las teclas.
-
Coloque con cuidado el soporte de metal en la parte superior de la membrana. Verificando que no has desalojado ninguno de los nódulos de goma.
Aligning the membrane, keeping the nodules in place, and finally the metal backing is very very challenging. There doesn't seem to be an straightforward way to do this! I'm about to give up and call this a loss.
I didn't give up and eventually got everything lined up and put back together!
-


Cancelar: No complete esta guía.
38 personas más completaron esta guía.
Un agradecimiento especial a estos traductores:
100%


Estos traductores nos están ayudando a reparar el mundo! ¿Quieres contribuir?
Empezar a traducir ›

20 comentarios
Nice description, thanks!
At step 6, I think it is worth reminding to not forget to put back the tiny LED device before bringing the membrane and metal holder,
as one may very easily either fall down at step 3... or forget to replace it before screwing back all the 30 screws!
Doing and un-doing is always working, I know...!
And between the LED leads and the white plastic there should be an even tinier conductive pad, which serves to improve electrical contact between the LED and the membrane. The pad sits in a small recess in the white plastic and the LED leads fit into two grooves on the membrane side of the pad. This part is easy to lose during disassembly, so be mindful of it!
I have this keyboard and decided to clean it. Unfortunately I did clean the main plastic key holder under sink water. That was a bad idea as water soaked the entire menbrane. Now only the keypad and some other keys works, the rest is dead. Any chance to recover it fully?
just open it again and dry it out and then try again. the water is causing shorts between connections
This is a very good guide. I had one spill after another and a few keys on left side no longer worked. I cleaned the keyboard and left it disassembled to dry out for a week. I was hoping a simple cleaning would help. It didn’t. Since conductive pens are a bit pricey in Canada I decided to test by using tiny bits of foil where I knew I had a faulty key or break to be sure a pen would work. With the foil I can get most of the keys to work but not all. Do you think a pen will produce better results or is it done ?
I think the pen should work. Note what the author said about possibly needing to scrape the insulation off a lead before connecting. Try that and the foil should give a positive indication.
Note the author’s comment about possibly having to scrape off the insulation on a lead before applying conductive ink. Same advice should make a difference on your foil test.
Broken leads or dirt accumulation are the most likely reasons for this keyboard to fail. Other failures (decoder chip, USB interface) would show much more drastic symptoms than a few lost keys.
You mentioned that conductive pens are a bit pricey in Canada. I found a CAIG Circuitwriter Conductive Pen on the peg at MicroCenter @$19.99. Price tag covered instructions. Once I was ready to try it, I downloaded instructions, first for the Chemtronics CircuitWorks Conductive Pen (5 minutes dry tack-free, conductive in 30 minutes). Realized my attempt wasn’t tack-free, so I looked further and found the instructions from the package online. Allow 24 hours to dry, cure with 40W bulb @6” 4 hours. Not the same! Also noticed the store UPC covers a Radio Shack UPC. If this has a shelf life of up to 2 years before purchase, how fresh is it?
Just now I tried to find the item online at MicroCenter in order to give this information and the only ink they advertise is Bare Conductive Electronic Paint — $11.99. Much better price, and shouldn’t be much more for you.
On my keyboard, the first screws on the outside are hex head, not cross head. I don’t have an Allen wrench that small, but I was able to find a Torx T5 wrench that would fit inside the Allen head. Thinking about using my BluFixx liquid plastic kit to make a real Allen wrench head for it, but this is working for now.
My keyboard also has the hex head on the outside. The T5 worked well.
Were you able to repair your keyboard trace ? I was able to repair all the problematic keys except the spacebar. All the keys around the spacebar are working perfectly, no other breaks on the traces and no lines crossed. I spent a full month staring at it!
El Pa -
After getting the correct instructions, I found that the CAIG pen is very hard to squeeze, resulting in unsteady, heavy line. Any pen should probably be shaken with an engraver of similar tool, especially if it’s getting old (Chemtronics claims a freshness date — look for one!). My first repair was successful, allowing me to test for other breaks. No need to use the rubber cups; pressing on the top membrane with a finger will contact the bottom membrane.
Breaks were very hard to see; used Ohmmeter to find lands that should be connected. Also hard to remove insulation without removing trace as well (no green paint on top). Maybe need to scratch fine line along trace with X-Acto knife to get through to conductor, without going to the side?
Next break is on top membrane; much harder to test or stabilize while drying. About ready to persuade wife to settle for used or generic replacement. :-P
It would be helpful to specify exactly what screwdrivers to use on what screws. Also, there was nothing shown here about how to disconnect the keyboard from the white plastic base: they are connected with two ribbon cables, and I wish you had shown the proper way to disconnect. WHere do you pull, and in what direction?
OK, completed! Except … where was THIS supposed to go? http://shsmedia.com/temp2/A1048_part.jpg
Im pretty sure this goes behind the ”Don't forget to screw back in the front faceplate for the white keyholder.”
The puzzle of leftover parts. After disaassembling and reassembling the A1048, THIS was leftover. Where does it go? http://shsmedia.com/temp2/A1048_part.jpg
It goes over the S curve in the USB cable and serves to retain the cable around the three strain relief posts.
In case it's helpful for others, like myself, working on one of these in 2022, yes, if you zoom into the 3rd pic in Step 6 above, you can see the piece in place over the USB cable just inside the keyboard.
anyone can help me, i have this keyboard but after i decide to cleaning, the tiny LED is missing, can u guys help me to know the type and the size of LED ?
I need to find the torns that used in the back plate, I lost a lot of them so I need to find size and type
Yeah, I found the led having completely overlooked it in the dismantling process, but goodness knows where the little conductive pad went, or even what it looks like!!