Introducción
Puede que hayas oído muchas cosas acerca del Fairphone 2: la pequeña empresa holandesa ha revolucionado el mercado con su teléfono asequible, modular y libre de conflicto. Y una vez más, somos uno de los primeros en poner nuestras manos en su último dispositivo. Cuando desmontamos el Fairphone original, nos complació por su modularidad y fácil acceso. Hoy, estamos entusiasmados por ver qué nos depara su dispositivo de segunda generación y diseñado responsablemente. ¡Únete a nosotros mientras nos unimos al movimiento!
¿Quieres información exclusiva de las últimas tecnologías? Búscanos en Facebook, Twitter, e Instagram para mantenerte al tanto de las últimas noticias en el mundo de la reparación.
Qué necesitas
-
-
Aquí tenemos la segunda generación del Fairphone. Ha evolucionado en tamaño y también en estilo:
-
Pantalla LCD de 5'' y resolución 1080p (446 ppi) con protección Gorilla Glass 3
-
Qualcomm Snapdragon 801
-
2 GB de RAM tipo LPDDR3
-
Almacenamiento de 32 GB, expandible mediante la ranura para tarjetas MicroSD
-
Batería de ión-litio extraíble de 2420 mAh
-
Cámara trasera de 8 MP
-
Android 5.1 Lollipop
-
-
-
Con un tamaño de 143 x 73 x 11 mm, el Fairphone 2 es definitivamente un tamaño más grande que el de la primera generación.
-
Con un peso de 168 g (la caja pesa 20 gramos), el Fairphone 2 es sólo 6 gramos más pesado que el de primera generación.
-
Ya podemos divisar dos ranuras SIM po debajo de la caja transparente. ¡Bravo por la flexibilidad!
-
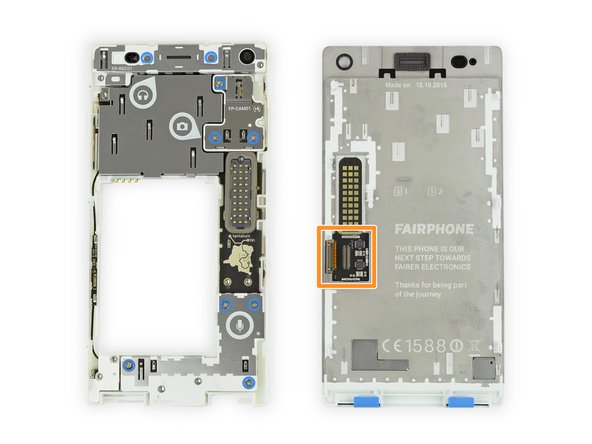
¿Qué es esto? ¿Un conector de cinco clavijas que pareciera no conectarse a nada?Estaremos investigando esto más adelante.
-
Este teléfono está cariñosamente etiquetado "Diseñado para ser abierto"¡Música para nuestros oídos!
-
-
-
El primer ítem en nuestra agenda es la caja trasera translúcida. Es ceñida y segura, pero sale sin necesidad de usar herramientas.
-
¿Dónde está todo el adhesivo? ¿Es esto un sueño? Cachetazo. No, definitivamente no es un sueño.
-
"Remover la batería antes de liberar la pantalla" ¿Es esto un consejo de desmontaje acerca de la batería?
-
Nada me hace más feliz que cuando los fabricantes incluyen instrucciones de reparación con su dispositivo, ni que hablar cuando la incluyen en el dispositivo.
The picture is misleading. You cannot remove the cover as a whole, it has two pieces that must come separately.
Hi Aloïs, at the time we did this teardown the back cover was one-piece. It was the first issue ever of the Fairphone 2. A teardowns is not a guide and therefore does not represent the proper way for disassembly or replacing a part. We are planning to update the actual back cover guide to the two-piece version soon. Stay tuned
-
-
-
Como en los viejos tiempos, sacamos la batería y .... eso es todo. No hay pegamento, no hay tapones, no hay drama.
-
Hasta la batería usa contactos de muelles en vez de conectores a presión cubiertos con soportes como los que ya nos habíamos acostumbrados a ver. ¡Podemos cambiar baterías como lo hacíamos en el 2005!
-
Esta útil celda de ión de litio de 3.8 V está clasificada con 2420 mAh con una clasificación de energía de 9.2 Wh.
-
-
-
La falta de tornillos visibles nos tuvo un poquito preocupados, pero no por mucho gracias a estos clips convenientemente etiquetados.
-
El ensamblaje de pantalla se remueve simplemente al voltear los interruptores y deslizar el panel hacia afuera.
-
En el marco medio encontramos un conjunto de clavijas pogo, sus contrapartes están en la parte trasera del ensamblaje de pantalla.
-
Inmediatamente debajo de las almohadillas de contacto en el ensamblaje de pantalla, sacamos el escudo de metal y vemos donde la pantalla conecta a la placa breakout.
Hi
I just tried pulling out the screen and I must add that it's not that simple to do it safely...
The assembly is quite tough, you must give a good amount of strength to disassemble the screen from the board. My technique was to take in my 2 hands the body and to use a strong flat surface (a table is OK) to help me sliding the screen.
The brackets are very resisting.
At least it won't be too easy to tear it apart ^^
You are right. The display is mounted very well.
The steps and descriptions of the teardown aren't meant to be read as replacement guides.
You will find more information and pictures in the display replacement guide over here:
Reemplazo de ensamblaje de pantalla del Fairphone 2
(don't forget to unlock both sliders)
I saw a very useful tip on youtube, which comes from the Fairphone support: Give the phone a soft massage, push the display against the chassis forwards and backwards several times, only one or two milimeters, and after a short time it will move. I did that wearing latex gloves, because they have a very good friction and I didn't have to give to much pressure on the display, and in the end it was quite easy to remove.
hello,
I'm currently designing a modular laptop concept for a project at university and I'm trying to get my hands on some of the pogo / spring loaded contact connectors which they use in this.
Does anyone have any recommendations for where to find some?
Can't help with that, but must mention that that's pretty cool.
The wikipedia article on Pogo pins has links to manufacturers: https://en.wikipedia.org/wiki/Pogo_pin
I guess you find them in Huaqiangbei ( Shenzen, China)
-
-
-
-
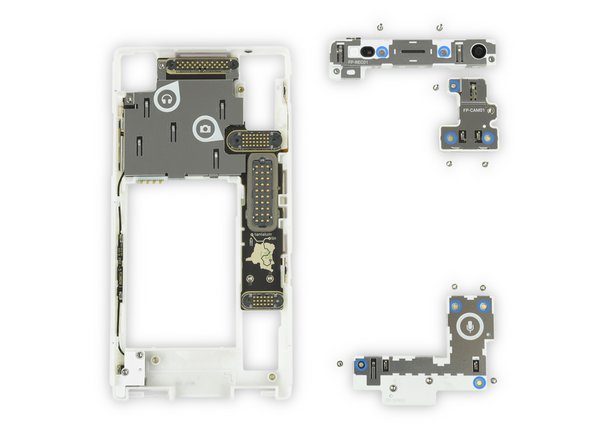
Y voilà, tenemos el marco principal con tres módulos individualmente extraíbles. Cada icono pequeño nos indica qué hacen:
-
Toma de auricular, altavoz auricular y módulo de cámara frontal
-
Módulo de cámara trasera
-
Módulo de micrófono
-
También descubrimos un mapa pequeño orgullos que nos muestra las fuentes del tántalo y estaño libre de conflictos usados en el teléfono.
-
-
-
Es hora de llegar a los tornillos y ver cuán tan reparable es realmente el Fairphone 2.
-
Tomamos nuestro destornillador confiable Phillips #0 y removemos fácilmente todos los tres módulos.
-
Debajo de los módulos, encontramos otro nivel de contactos de muelle—no hay un cable flexible o conector a presión a la vista.
-
-
-
Estos módulos están sujetados entre sí con tornillos Torx T5—presumiblemente para evitar que el usuario casual se meta más adentro—pero aun siguen siendo fáciles de abrir.
-
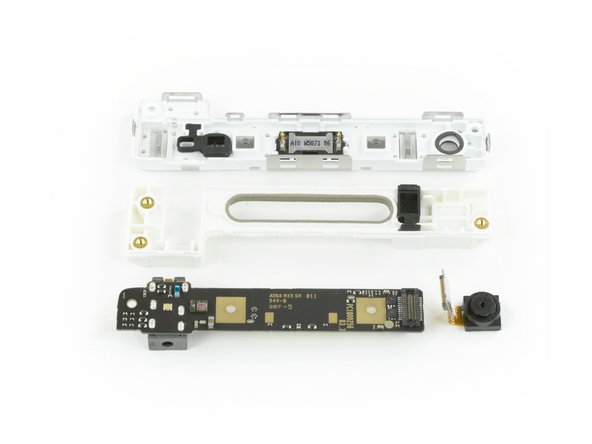
Comenzamos con el módulo superior: la cámara frontal sale gracias a un simple conector de cable flexible.
-
Los contactos de muelle alimentan el altavoz auricular haciéndolo fácil de reemplazar también.
-
La toma de auriculares, el componente final, está soldada a la placa. Afortunadamente, no queda nada mayor, así que una placa de reemplazo debería ser bastante asequible.
-
-
-
Próximo, el módulo de cámara trasera.
-
Con suerte, esta unidad podría actualizarse años más tarde, a lo Proyecto Ara. Crucemos los dedos.
-
La cámara de por sí es una cámara CMOS de 8 megapixeles con un sensor de 1/3.2 y una apertura de ƒ/2.2.
-
Este módulo está construido como los otros: una caja de plástico alrededor de un componente genérico, conectado a una interfaz pogo vía un cable flexible y conector.
-
-
-
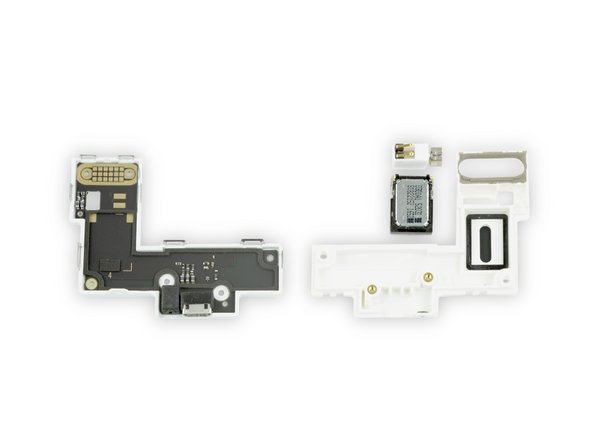
Un módulo más para abrir —si bien solo está marcado con un icono de micrófono, hay en realidad bastantes componentes allí.
-
El motor de vibración y el altavoz están conectados por contactos de muelle—más partes fáciles de remover. ¡Bravo!
-
El puerto USB y el micrófono están soldados a la placa—no necesariamente algo malo, ya que un puerto USB requiera algo de rigidez adicional y tiene significativamente más clavijas que un altavoz.
-
-
-
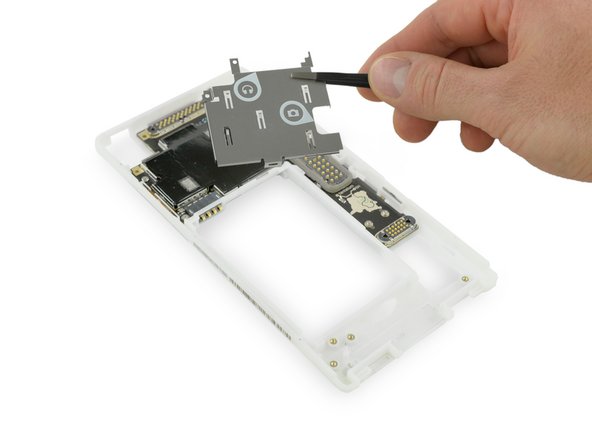
Ha llegado la hora de ahondarnos en el corazón de Fairphone 2.
-
La placa de escudo de metal, repleta de iconos útiles, sale primero, revelando un disipador de calor todavía ocultando los bits interesantes.
-
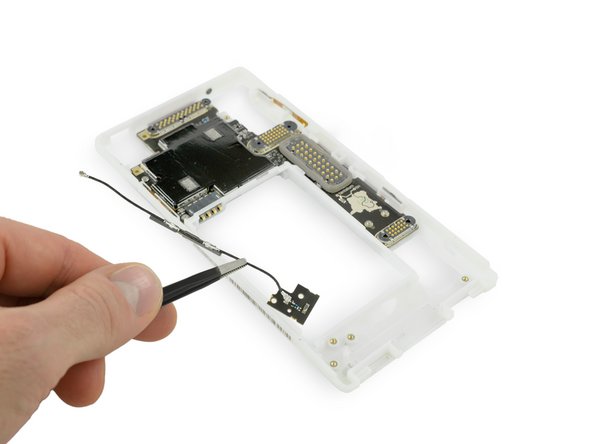
A lo largo del camino, encontramos un cable RF que envía señales de radio a lo largo del lado del marco hasta la antena principal, y lo arrancamos.
What kind of tool do i use to open the 2 screws?
Those are Torx T-5
Da mein Handy baden gegangen ist, sieht man am linken, unteren Federkontkat rote Farbe, wohl ein Indikator für den Wasserschaden im Innern, kann man als “Anfänger/Nichtskönner” diesen selbst beheben, wenn man die Metallabschirmung abschraubt oder macht man dann diesen Hitzeverteiler kaputt?
-
-
-
Bien ¿no es esto una belleza? Nos encanta el marco plástico transparente que nos muestra todos los botones y todas las antenas integrada que se conectan a la placa madre a través de contactos de muelle.
-
Y más abajo en la fila, encontramos esas cinco clavijas pogo que vimos antes. Esto es en realidad una interfaz de dispositivo de USB 2.0 con entrada de potencia—lista para expansiones futuras y cajas más elegantes.
I've had SIM card and SD card sockets go wrong on me before so I was hoping these would be replaceable without throwing away the entire core unit. No such luck it seems. It would have been cool if these had been embedded in the frame instead. I guess that would imply a lot of spring connectors though.
Ist schon Einiges diese Bilder. Leider vermisse ich die klassische Art von iFixit mit Angabe der Schauben und der heiklen Stellen.
Grund: Ich erhielt ein FP 2 mit defektem erstem Slot. Diesen wollte ich reparieren, aber beim Anblick der geklebten gedruckten Leitungen (Antene?) von aussen habe ich es sein gelassen. War mit zu heikel, da ich nicht wusste, ob sie fest mit der Platine verbunden sind. Also habe ich diese “letzte” Platine nicht entfernt, um zu den Slots zu gelangen, die von der weissen Abdeckung geschützt sind. Hier in diesem Beitrag ist auch nichts angegeben, wie man die Platine entfernt. Ich hoffte, wenn ich an die Slots von hinten komme, dass ich die vermutlich verbogenen Kontakte mit Vorsicht wieder zurechtbiegen könnte.
-
-
-
Y ahora la sección técnica.
-
Samsung KLMBG4WEBC 32 GB eMMC NAND Flash
-
Qualcomm WCN3680B Wi-Fi 802.11ac Bluetooth Combo (según información del equipo de Fairphone)
-
Acelerómetro + Giroscopio de 6 ejes ST Microelectronics LSM330DLC
-
-
-
En la parte trasera encontramos:
-
Samsung K3QF2F20EM 2 GB LPDDR3 RAM, encima de Qualcomm Snapdragon 801 MSM8974AB
-
Receptor RF Qualcomm WTR1625L (similar al iPhone 6)
-
Módulo amplificador de potencia de banda múltiple, modo múltiple RF Micro Device RF7389EU
-
Administrador de potencia de rastreo envolvente Qualcomm QFE1100
-
Qualcomm PM8841 PMIC
-
Audio Codec Qualcomm WCD9320
-
-
-
Puntaje de reparabilidad del Fairphone 2: 10 de 10 (10 es lo más fácil de reparar)
-
La LCD y el cristal de cobertura están fusionados, lo que simplifica la extracción, pero aumenta significativamente el costo de reemplazo.
-
Los componentes que fallan más a menudo, la batería y pantalla, pueden ser reemplazados sin herramientas.
-
Los módulos internos están sujetados con tornillos Phillips #0 y conectores de muelle simples.
-
Todos los botones y cables son fácilmente accesibles. Los contactos de muelle permiten actualizaciones futuras e intercambio fácil de componentes.
-
Además de los iconos dentro del teléfonos y las instrucciones, el Fairphone 2 te envía documentación de reparación integrada.
-
Los módulos individuales pueden abrirse y pueden reemplazarse muchos componentes individuales.
I would have given this a 9/10, and 10/10 if the glass and LCD could be replaced separately, as the glass is a very common point of breakage in drops, as well as being susceptible to scratching. Knowing that replacing damaged glass will not result in the cost of an entire LCD assembly definitely gives a bit more peace of mind. A 9/10 reparability score is still very good though.
i disagree. for now a perfect 10 score is fair,.
it might warrant a drop in point in the future if a better phone comes out, but for now Repairability Score of 10 is a valid point, as it is the easiest to repair compared to other phone.
milkboy -
I disagree, the fusion of display and front glass has a good reason. By removing the air gap between the LCD and the front glass, they can reduce the Light reflections in this surfaces by a good amount.
So I wouls give this Phone a 10 out of 10.
Thoth -
Just to be fair, I believe the idea is to make the phone so robust that the glass is unlikely to get cracked in the first place. Cracked screens are absurdly common because it doesn't hurt the manufacturer to make them fragile. LCD faults are also pretty common though. If you reduce the smashed glass rate to lower than the LCD fault rate, then the risk tradeoff looks much better. And so the phone is designed so that you can drop it from 6 feet without smashing the glass, something I wouldn't suggest trying with an iPhone.
At least that's the idea. Nothing short of real-life statistics will prove it true or false.
I agree, the fused front assembly should make it a 9/10.
but they are fused by design and repairability doesn't involve that. You could maybe give it a 7/10 or 8/10 on modular design but it shouldn't affect repairability score which we're concerned with here.
By that logic even phone gets 10/10 because it's a single module and you can replace the whole thing.
From the overall design, I'm expecting this phone to be very user repairable, but also pretty unreliable.
For most users that is a pretty negative trade off.
alex -
Hi, the fusion between the LCD ans the screen is understandable but FP should offer discount the price for those who send back the broken screen units for refurbishing.
I think a 10/10 is warranted because a 9/10 would put it in the same class as many lesser phones.
But being a happy owner I'm potentially bias.
Ist es denn möglich einen einzelnen Prozessor (Schritt 14) zu tauschen und wo würde ich den bekommen?
Hanno
Da der Prozessor am Motherboard verbaut ist, würde dies einen Tausch des Boards bedeuten. Lediglich den Chip zu tauschen (auslöten und wieder einlöten) würde einen sehr großen bis technische fast unmöglichen Aufwand für einen normalen Verbraucher bedeuten. Ob die Chip-Architektur kompatibel ist mit den restlichen Komponenten ist eine ganz andere Frage.
Is it technically possible to extract the nand flash without damaging it from one Fairphone (totally dead) and to put it into another working Fairphone ? I need this in order to recover the otherwise lost pictures from the dead phone…
If yes, could you please give me some tips / advice on how to do it properly ?
Thank you in advance !
Yes this absolutely is possible! You ideally would need an reflow oven but an heatgun should work too. Look up how to reball/reflow chips for more info.
t h -
-


Un agradecimiento especial a estos traductores:
87%

Estos traductores nos están ayudando a reparar el mundo! ¿Quieres contribuir?
Empezar a traducir ›

Equipo

20 comentarios
Hi people, I am a volunteer in the Repair Café of Deventer and we are very excited about the new Fairphone2 because it showcases what we are working for: Repairable design. We are with over 300 Repair Café's in Holland now and promoting the Fairphone is one of the things I like to do. I cannot wait to receive mine, should be end of this month. So I can take it to Paris on the 12th Decmber for the big Climate March. Super glad and proud with Fiarphone, they deserve 10/10 score all the way!
Aside from making the phone thinner, fusing the display and digitizer eliminates the issue of dust infiltration (specks of crap under the glass that just can't be cleaned off) which is a warranty/service concern on devices where the two are separate. The combination is also more rigid, providing a subjectively better (firmer) "feel" when the user taps the screen. It's also, all else equal, more resilient against impact or drop damage. From an engineering standpoint, the case can easily be made that these advantages outweigh the potentially increased repair cost, especially since the fused glass is less likely to break to begin with.
Hey iFixit, there is a dead link in step 6 (Desmontaje del Fairphone 2 link in the word 'map'). We changed our site so that is probably the reason. Can you fix it?
Thanks!
@Riqz: The GPS is in the Core module.
@Mgehrking: It can, but you have to research yourself where there is coverage with which carrier. Do realise we do not ship outside Europe (also not for after sales support). https://fairphone.zendesk.com/hc/en-us/a...
Esmée - Fairphone Customer Support
The dead link is now fixed. Thanks for the tip! :)
The Philips #1 Screwdriver didn't work that well, I had to use a flat 1.4mm driver to remove the screws. Maybe better to recommend using a #00?
Victor
Is there going to be a US LTE variant available anytime soon? Me want!
I'm unable to get beyond step #4 - I flipped the blue switches but I can't slide the screen out. Too bad there is no real-life Fairphone community nearer to me than London (I'm in Leamington Spa in Warwickshire). I would so much rather have a hands-on demonstration than attempt to follow a video.
Hello louisaradice, a teardown is not meant for repairs. You might want to look at the display assembly guide for that. There are also additional comments on step 4 to get the display off. Here you go: Reemplazo de ensamblaje de pantalla del Fairphone 2
I have looked at Fairphone 2 Display Assembly Replacement but I'm still none the wiser. Try as I can, I still can't slide the screen out.
Louisaradice, Have you looked at Fairphone's screen replacement video guide on YouTube? It's also possible that your clips have somehow jammed? If you are still unable to replace the display I suggest posting a question inn our Answers forum, and take photos of the clips to share with our users. Hopefully we can help you troubleshoot!
Hello,
my Mother's phone has fallen in the water. How can I diagnose which module(s) have to be replaced?
Hello Francesco,
first, make sure it is completly dry. You should have removed the battery immediately after the dive.
you can remove all three modules. Then clean the contacts with alcohol.
Then WITHOUT the modules (just screen and core) try start the phone.
If its boots up replace one module at a time then check again.
For futher help: check the fairphone forum https://forum.fairphone.com/
pa sch -
Hi, Do you know the spec of the antenna, and where I can order another one? Thanks!
Mine does also very often NOT connect to a telephone network (either 2G, 3G or 4G), all other phones I tried are much better (at the same location and with the same network provider). Would changing the antenna resolve this (I mean, how likely does such a simple part become defective)?
Ist schon Einiges diese Bilder. Leider vermisse ich die klassische Art von iFixit mit Angabe der Schauben und der heiklen Stellen.
Grund: Ich erhielt ein FP 2 mit defektem erstem Slot. Diesen wollte ich reparieren, aber beim Anblick der geklebten gedruckten Leitungen (Antene?) von aussen habe ich es sein gelassen. War mit zu heikel, da ich nicht wusste, ob sie fest mit der Platine verbunden sind. Also habe ich diese “letzte” Platine nicht entfernt, um zu den Slots zu gelangen, die von der weissen Abdeckung geschützt sind. Hier in diesem Beitrag ist auch nichts angegeben, wie man die Platine entfernt. Ich hoffte, wenn ich an die Slots von hinten komme, dass ich die vermutlich verbogenen Kontakte mit Vorsicht wieder zurechtbiegen könnte.
Im Teardown findest du solche Angaben generell nicht. Allerdings haben wir tatsächlich keinen Guide um das Motherboard zu entfernen. Hier im Bild lässt sich erkennen, dass es mit Torx Schrauben befestigt ist (ich schätze Größe T4 oder T5). Viel Erfolg
Now that the FairPhone 5 came out with a new 10/10 score, with more modularity than ever, I would be curious to know what the score of the FP2 would be if released today.
Wow! That is one ugly looking brick of a phone!
The cheap looking plastic and design would make me stay way clear of it, even if offered to take itself apart.before repairs.
I find it hard to believe that there really is a market for something like this... What's the price?
Victor Szulc - Contestar
I'm not too sure what makes this black rectangle any uglier than the rest available for purchase. The clear back is something of a turn-off, personally, but that's hardly a difficult thing to remedy.
Dave Davidson -
The price is 529.38€. The back cover is also available in black matte, black translucent, blue matte, blue translucent.
Julian Andres Klode -
a) Beauty is in the eye of the beholder, so you finding this phone ugly is uninteresting. b) If you prefer to continue using a 'beautiful' phone like an iPhone or Samsung, then you understand nothing about the fairphone project.
Doc Brown -
I totally love the idea and engineering behind this phone. They even noted how almost all consumers buy a rubberized case after they buy a phone, so they built that right in. That save $30 right there.
I would buy one in a second if it worked well on American phone frequencies. For all it’s modular design, they didn’t make the radio modular or global which is the only failing I can see.
The original comment optimizes what is wrong with the phone market today. There isn’t a single high end phone made today that has a removable battery (except this one) or slide out keyboard. Things I miss from my old G1. They all worry about aesthetics rather than repair-ability and battery life. Sure, it’s obvious why the phone manufacturers don’t want these devices to be easily repaired, built in obsolescence. It’s the consumers acting like sheeple parroting the manufactures promotional material that really disappoints.
Ben Zack - Contestar
The main problem is not the phone companies but the people who will spend $1,300.00 for the latest models. These new units do not make phone calls any better or you internet service any faster than what is available. Yes they may have a lot of fancy bells and whistles. But in the end they are just cell phones. Now I must admit I do like the camera/ video cability, but do not buy them for that. ITS A PHONE. And my old flip phone will do the job just as well as the latest Apple IPhone.
tjhoodless - Contestar