Introducción
En caso de que no te hayas enterado, ha llegado una nueva Switch: la consola Nintendo Switch Lite, y viene con menos para que te cueste menos. También llega en algunos colores nuevos y de moda, que sólo nos distraen momentáneamente, antes de que recordemos que estamos aquí para un desmontaje. Agarra tus herramientas y vamos a desmontar la nueva Switch Lite.
YouTube? Instagram? Twitter? Facebook? Haz tu elección y danos un clic, y estamos en contacto con todos los desmontajes futuros. Y si un newsletter es más su estilo, también lo hacemos.
Qué necesitas
Resumen del Video
-
-
¡Apareció una Switch Lite salvaje! ¿Qué dice el Nintendex al respecto?
-
Procesador Custom NVIDIA Tegra
-
Pantalla LCD táctil capacitiva de 5,5" incorporada con una resolución de 1280 × 720
-
32 GB de almacenamiento interno (hasta 2 TB de almacenamiento adicional mediante tarjeta microSDHC o microSDXC)
-
802.11 a/b/g/n/ac Wi-Fi, Bluetooth 4.1, NFC, puerto USB tipo C (sólo para cargar) y conector de audio de 3.5 mm
-
Acelerómetro y giroscopio integrados
-
Batería recargable de iones de litio con capacidad para 3.0 - 7.0 horas de juego.
-
Evolucionado con controladores no desmontables
-
-
-
Antes de empezar, encendemos nuestro X-ray Game Genie, cortesía de nuestros amigos de Creative Electron.
-
En comparación con los teléfonos inteligentes modernos, hay mucho bisel en este dispositivo, por lo que nuestro fondo de pantalla del desmontaje puede no ser suficiente. Tal vez si también hiciéramos una piel...
-
-
-
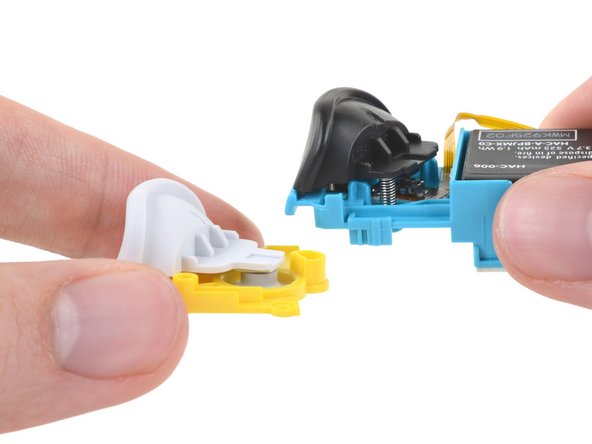
Tiramos muy fuerte de los controles con la esperanza de anotar dos nuevos Joy-Con amarillos brillantes, pero por desgracia, no se separan.
-
Parece que se necesitará un desmontaje más tradicional.
-
Sin embargo, los controles integrados incluyen un verdadero D-pad .
-
Otros cambios exteriores: han sacado el blaster IR de la Joy-Con derecha , y los altavoces han migrado de la parte delantera (OG Switch) a la parte inferior (Switch Lite).
-
El modelo Lite también carece de la pata de apoyo original del interruptor, lo que lo convierte en el interruptor más aerodinámico de la historia
-
-
-
El camino está bloqueado por tornillos intransitables (de tres puntos). No podemos seguir avanzando hasta que encontremos y adquiramos la herramienta especial.
-
Hoy no hay misiones secundarias que distraigan, estamos en una misión y hemos traído todas las herramientas necesarias para vencer al juego. ¡Te elegimos a ti, Destornillador Y00!
-
Bajo la tapa trasera encontramos: otra tapa. Sigamos adelante.
-
Observamos aquí que el lector de tarjetas SD está ahora permanentemente conectado a la placa principal - mientras que en el antiguo Switch, ya lo habíamos eliminado en este punto.
-
La modularidad es generalmente buena para la reparación, así que esto es un pequeño paso atrás desde nuestro punto de vista.
-
Echemos un vistazo debajo del escudo metálico y veamos por primera vez las partes internas en el espectro de luz visible.
-
-
-
-
Aquí nos tomamos un momento para volar la tapa de nuestra Switch revisada para el 2019 y hacer algunas comparaciones de Lite.
-
El cambio más importante: la batería de Lite ya no está al revés. Esto por sí solo hace que nuestro desmontaje valga la pena el precio de entrada.
-
Cuando se trata de otros cambios, aquí hay dos verdades y una mentira: (1) La batería es físicamente más pequeña y se encuentra junto a un tubo termosifón bifásico de calibre más ligero. (2) La toma de auriculares se ha vuelto completamente modular. (3) La goma de mascar que asegura el disipador de calor tiene ahora sabor a cereza.
-
Al meternos con la batería, encontramos... ¿una toalla de papel mojada? Tal vez alguien estaba tratando de limpiar todo este pegajoso adhesivo de batería.
-
Esta batería de 13.6 Wh es todo lo que necesitas para 3-7 horas de juego, según Nintendo. Esto es más de lo que podría obtener la Switch original y su batería de 16 Wh (pero menos que la Switch actualizada, que puede durar hasta 9 horas).
You should add the dimension of the battery among other parts. I am finding it very hard to find this information.
I don’t know how you removed the battery on this thing, but I destroyed a few tools prying the bigger off. Plus the battery itself got bent beyond repair where I had to order a new one. Whether the water made the adhesive extra sticky I don’t know. (When I found the Switch, it had water damage)
The battery is definitely pretty difficult to remove. It just takes time and patience! Our guide details the process: Reemplazo de la batería de Nintendo Switch Lite
-
-
-
Un hardware más eficiente no sólo prolonga la vida útil de la batería, sino que también reduce el calor residual. Así que no nos sorprende ver a esta Switch empaquetando un disipador de calor y un ventilador de tamaño reducido.
-
Otra pequeña diferencia: los gatillos anteriores L y R se presionan directamente contra un botón de una placa de circuito impreso, pero los nuevos gatillos cambian a una llave tipo membrana. Esto podría ayudar con la protección contra el ingreso, y definitivamente da a los gatillos una distancia de actuación más agradable.
-
Los controladores de los altavoces parecen ser los mismos que en la Switch original, pero todas las carcasas son nuevas.
-
No sólo se disparan ahora hacia abajo, sino que también se han expandido hacia el espacio que antes ocupaban las dos baterías Joy-Con. Aunque no hemos hecho una prueba de sonido cara a cara, nos sorprendería que la Lite no saliera airosa.
-
-
-
Si apartamos una placa de mini-joycon dedicada, llegamos a una fuente de controversia reciente en la Switch: el joystick.
-
Inicialmente, estos joysticks se parecen bastante a los joysticks Switch 2019 cuando abrimos sus estuches, pero el diseño de los cierres alrededor de los bordes es un poco diferente y el estuche es más fácil de abrir en general.
-
Con la esperanza de encontrar algún tipo de mejora relacionada con la deriva, abrimos los conjuntos de joystick Switch Lite (arriba) y 2019 Switch (abajo) y los colocamos para deleite de tu vista.
-
Las cosas en el interior no parecen inmediatamente muy diferentes, pero notamos algunas nuevas rutas de trazas, un botón de click más estrecho, y deslizadores metálicos ligeramente más anchos.
Ich habe die neue Version der analog sticks genauer unter die Lupe genommen, sie mit meinem problembehafteten verglichen und dabei etwas festgestellt. Ich habe es in einem Tweet zusammengefasst
Just replaced my left joystick, I didn’t even take off the main heatshield to disconnect the battery (had been dead for awhile). The ribbon cables went back in easily with a drop of de-oxit for lubrication. This is a smart design because the left joystick gets much more abuse than the right. PROTIP: The ribbon cables are all fixed in place via a clasp that must be lifted up first. Failure to do so will damage the ribbon cables and your board. The riskiest part of this repair is losing screws. PH000 and Y00 drivers are needed. About a 30 minute repair for a first timer.
-
-
-
Al retirar la placa, observamos que el almacenamiento flash, que antes era modular, ahora también está soldado. (Los intercambios de almacenamiento DIY en la Switch original no funcionaban, pero al menos eran físicamente posibles.)
-
Lado A de este carpincho de silicona:
-
Nvidia ODNX10-A1 (SoC basado en Tegra X1, presumiblemente un riff personalizado en la variante T210B01)
-
2x Samsung K4U6E3S4AM-MGCJ LPDDR4X DRAM 16 Gb (4 GB en total)
-
Samsung KLMBG2JETD-B041 32 GB de almacenamiento flash eMMC
-
Controlador ST Microelectronics ST21NFCD NFC y controlador de pantalla táctil FingerTip
-
Códec de audio Realtek ALC5639
-
Cypress CYW4356X 802.11ac Wi-Fi + Bluetooth 5.0 SoC
You mention the Cypress chip to be Bluetooth 5.0, but list in the tech specs as Bluetooth 4.1. Which is it?
Nintendo’s official specs for the Switch Lite say BT 4.1. The Cypress chip is an off-the-shelf design that may have some un-utilized capabilities.
Is it possible to resolder ram chips with highrler capacity to boost a performance?
-
-
-
Vamos a darle la vuelta a ese carpincho para ver más chips:
-
Microcontrolador ST Microelectronics STM32F038C6 de 32 bits con flash de 32 KB
-
B1913 GCBRG HAC STD T1056719A1 MCU seguro (probable)
-
CI de administración de energía MAX77620HEWJ de Maxim Integrated
-
Controlador de suministro de energía Rohm BM92T10MWV-Z USB-C
-
Gestión de carga de batería BQ24193 de Texas Instruments
-
Medidor de carga de la batería Maxim Integrated MAX17050
-
Ricoh RP602Z330C Regulador reductor-elevador de 1,5 A
深蓝色框框里的芯片是什么芯片?
Maxim Integrated MAX17050 Battery Charge Meter.
-
-
-
Entonces, ¿cómo le va a la consola Switch Lite?
-
Un poco de calor y curiosidad es todo lo que se necesita para persuadir al conjunto de la pantalla desde el marco, hasta ahora todo bien.
-
Con un poco más de convicción, el digitalizador/pantalla se separa de la pantalla. ¡Éxito! El registro de la línea Switch permanece intacto.
I’d say IPS would made sense since in whatever posture the Switch Lite fell to ground the screen won’t be directly contacted (joysticks and buttons acts like a cushion layer), it does not appear often to encounter a fractured screen so swapping to IPS gives better visual experience and more chassis space(for batteries?)
Given that the majority of replacements are screen-related, this is a really poor explanation. What about the gasket? The adhesive? You didn’t touch on that at all - and it’s SUPER important to get right.
As stated in the banner at the top of the page, these are not instructions. Our hardware teardowns are intended to give a first look at the device and assess it for repairability, and that’s all. Step-by-step repair guides will come later! You can use this document for reference, but it’s not meant to be exhaustive.
la verdad es que en el desmontaje y separacion no os habeis esmerado pero nada de nada, una foto de un despiece que ademas no tiene ni un resto de pagamento y creo que no va aser tan facil como decis y menos el volver a montar, como se monta? que adhesivo? no queda nada nada claro nada.
I agree with the posters above - it’s the most important and dangerous step (separating the screen from the digitizer) and they choose to go with “something magic happens here”! Disappointing and frustrating.
Looking at replacing a LCD, is the LCD glued to the glass or just adhesive around the edge?
It’s just a strip of black adhesive all the way around - not glue. Just warm it up with a heat gun or hair dryer and carefully peel apart the LCD and digitizer. That said, if you’re replacing a broken LCD it might be easier just to get the complete LCD+digitizer assembly (the digitizer is cheap).
-
-
-
Liviana para la billetera, con características livianas y con diseño liviano también.
-
La modularidad es definitivamente una característica hecha para esta Switch dietética, carente de controladores intercambiables, almacenamiento y bandeja de tarjeta SD.
-
Una pantalla sin fusibles y un digitalizador son un buen augurio, así como un lector de tarjetas de juego y un conector para auriculares reemplazables.
-
No tan genial como la Switch, y no tan sobredotada como el 3DS, esta Lite parece encajar a la perfección. Pero ¿qué pasa con la puntuación de la reparabilidad?
-
- Los tornillos, en lugar de adhesivo, aseguran la mayoría de los componentes.
- Muchos componentes, incluyendo los joysticks, el ventilador y la toma para auriculares, son modulares y se pueden reemplazar de forma independiente.
- La batería, aunque fuertemente pegada, puede ser reemplazada poco después de retirar la carcasa trasera.
- El digitalizador y la pantalla no están fusionados, pero están firmemente pegados en su lugar.
- El almacenamiento flash y el lector de tarjetas SD están ahora soldados directamente a la placa madre.
- Los poco comunes tornillos de tres puntas dificultan todas las reparaciones.


Consideraciones Finales
Calificación de Reparabilidad


(10 es lo más fácil de reparar)
Un agradecimiento especial a estos traductores:
93%


Estos traductores nos están ayudando a reparar el mundo! ¿Quieres contribuir?
Empezar a traducir ›
34 comentarios
The L and R triggers on the old style joycons pressed onto a fragile PCB mounted tactile switch, and were both fragile and a common point of failure. The new ones will hopefully be more robust, especially important as now they are part of the main unit and not a replaceable accessory.
Ethan…..first of all why is it important that you posted first? Second of all, you said, “Looks like the Switch Lite is based off of the original Switch.” Really, Ethan? You think? Sorry for the sarcasm but c’mon man, how is your comment helping?
You are getting waeker and weaker. No exact descripton or OEM of the fan. Boy that’s weak for because the bearing of the fan can be an issue over time too. Sleevebearings would be horror for a unit like this. I hope it is ball or hydrodynamic. This fan has to run high speeds becaus of its small diameter.
So now this begs the question, can you reuse the joycons from the OG switch, remove the buttons and place them into the lite?
Say if you wanted a different color for your buttons, seems the triggers are a nono since they use a different button system but what about a,b,x,y,+,- ect?
awful teardown guide, please give better details regarding screw placement, etc
The top of the teardown explicitly says it’s not a service guide. iFixit does have separate guides on Switch repair.
You might find the repair guides more helpful, they highlight all the screws and everything :)
Probably -
Just bought a turquoise lite and it comes with standard phillips screws
The four screws on the top and bottom of the switch lite’s case are PH000, while the 4 on the back are Y00. Look again. The screws inside are all PH000 as well.
walczyk -
Would anyone know where one could source the ‘dedicated mini-joycon board’? They seem to be the one part you cannot find anywhere.
How easy would it be for a total novice to take this apart for the purposes of re-painting the switch? I was thinking about taking it apart and doing a custom paint job on it but wanted to see if anyone else has tried it before I give it a go.
I'm a total novice and did this its very straight forward just don't get the screws mixed up and be mindful of ribbon cables also have the right tools otherwise you will strip the
Does anyone know where to get a replacement fan for the lite (in the UK). Mine sounds like its grating rocks most of the time.
Can someone point me in the direction of which ribbon connectors/sockets are for which function?
I took my boys apart to replace a snapped analogue stick and now it has sound and come on but the screen is blank, not even back-lit, and I'm not sure where I need to go next to troubleshoot it.
Took mine apart today and there are three ribbon cables that come from the screen two are under the gamecard slot those are for picture and backlight the power runs to the otherside near the battery
I’m just curious in respect to future repairability of my own switch lite - if I was to theoretically crack it open and replace the right stick (since that’s the only one that’s shown any issues whatsoever with my original set of joycons, also very pleased to see that one at least looks reasonably easy to get at) - would I need to replace the thermal compound? Or would it be fine if I just put it all back together as is?
I think it might be fine/preferable to leave/reuse the purple goop between the heatpipe and the topmost shield, as that seems to be quite a bit more spreadable than usual thermal paste used on computers.
For the blue/greyish goop between the heatsink and the SoC shield, and between the SoC shield and the SoC, you might be able to scoop up some of the excess goop that seeped out that are still kinda liquid, and slap it back on to the chip die and copper part of the shield. Though decent thermal paste aren’t all that expensive.
If you were to break a corner of the game card reader (brother decided to rip instead of gently unscrew a stripped screw), where could we get a replacement card reader? My understanding is that the switch lite and switch have different game card reader parts.
I for one disagree with this repairability score. If you’re fixing any handheld electronic and you don’t have access to a tri-wing screwdriver, you are probably just new to fixing these things. Every Nintendo handheld since the original gameboy has had them and apple adopted the use of the same bit in their very popular iPhone 7 (albeit a tad smaller). Also the adhesive on the digitizer comes off like butter with a guitar pick and some heat. Getting a new digi on without taking out the MB is an exercise in futility so that is a bit annoying, but overall I think this handheld is pretty easy to work on all things considered.
agreed regarding the Y0 driver bits, your toolkit should have them and if they don’t then you are gonna be ordering replacement parts anyway…
walczyk -
Broke my power/volume flex cable trying to put it back into the connector, anyone know when i can get a replacement, if at all?
omg that sucks, how would you break it putting it back in? I don’t know if mine is fully inserted, but de-oxit helped. BTW I found them on ebay for $7 just google something “Nintendo “Switch Lite” Power Volume Button Ribbon Flex Cable” and do not buy the non switch-lite version since they are different.
walczyk -
Why are there NO videos or howtos that show the trick in separating the digitizer from the LCD? I’ve disassembled everything but I’m stuck at that point. My LCD is good - just the digitizer is scratched and I don’t want to crack the LCD separating it from the digitizer. What’s the trick? Just a heat gun and careful prying? Note the Switch is different from the Lite - in the Switch the LCD and digitizer are not glued together, so it’s simple to replace just one. Not in the Lite tho. Any suggestions?
Okay, I took the plunge and tried separating the LCD and digitizer - it worked! The trick is to use a heat gun to heat one end of the digitizer side and then very carefully and slowly bend/peel it back from the LCD. There is a thin frame (about 2 mm wide) of black adhesive that goes all the way around. Once you’ve pulled them apart you’ll need to peel off that adhesive strip and move it to the new digitizer (if that’s what you’re replacing). Reattach the digitizer to the Switch Lite frame (reuse or use new clear adhesive if necessary), and then carefully align and stick the LCD to the backside of the digitizer. Then just reassemble everything and you’re good to ho.
¿sonde podré encontrar la tarjeta del joycon, la que aparece en la imagen uno del paso 7? vivo en Guatemala, de preferencia si la puedo conseguir en Latino américa, muchas gracias por su respuesta
japanese versions have only phillips screws
I’m interested in whether or not it is possible to add some kind of rumble motors (small, slim profile, like used in mobile phones) to the Switch Lite, there seems to be space inside the casing but does anyone know if there is an output on the board that could be used? Tied into the speakers somehow perhaps?
Also, I can’t see a NFC antenna anywhere in this tear down, yet it’s on the right stick as per the joy-cons. Is it just missing from the tear down or is it physically built into the right stick this time around?
What chip can I replace to restore video? I get audio, but no video. And No, its NOT the backlight or backlight cable/connector.
Does anyone know where exactly the NFC touch point is? I couldn’t see it in any of the pictures.
I would love it if there was an update to this video to replace the wifi antenna, as I can see the connections, but it glanced over on the video. Because this is essential to it's operation, that would be a great thing to inclue.
Is there a guide without all the cringe pokemon references? Preferably one where the first two steps are actually steps.
Harley Stout - Contestar
This isn’t a guide, this is a teardown.
Duck -