Introducción
El Google Pixel 3 XL está vestido con su uniforme más reciente: cristal en la parte trasera y una muesca en la parte frontal. Pero vamos a ir más allá de la nueva fachada brillante para una mirada más cercana en el interior. ¡Y hay una sola forma de llegar allí, con un desmontaje!
¿Buscando actualizaciones de los desmontajes más nuevos y más brillantes? Fíjate en nuestro Facebook, Instagram, o Twitter para los más recientes. Para recibir desmontajes directamente en tu bandeja de entrada, subscríbete a nuestro boletín de noticias.
Qué necesitas
-
-
Investiguemos la tecnología que hay debajo del exterior nuevo con muesca del Pixel 3 XL.
-
Pantalla OLED 6.3 pulgadas con resolución QHD+ 1440 × 2960 (523 ppi) y Gorilla Glass 5.
-
Procesador de ocho núcleos de 64 bits Qualcomm Snapdragon 845 (2.5 GHz + 1.6 GHz) con 4 GB LPDDR4x RAM
-
Cámara principal OIS de 12.2 MP, ƒ/1.8, con foco automático de detección de fase de doble pixel, cámaras selfie doble de 8.1 MP.
-
Almacenamiento integrado de 64 GB o 128 GB.
-
Carga inalámbrica Qi
-
Resistencia al agua IP68
-
Android 9.0 Pie
-
-
-
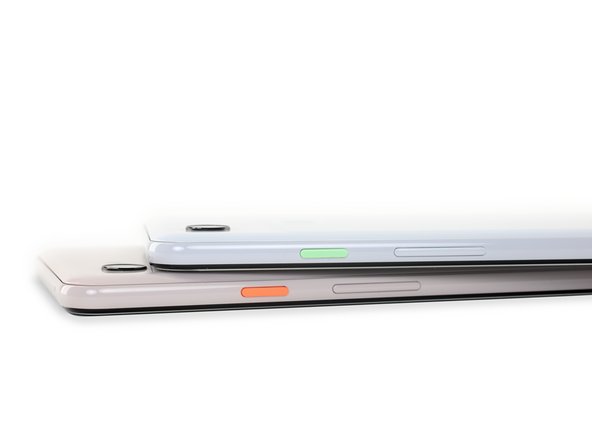
Antes de sumergirnos, veamos el exterior elegante del Pixel 3 XL al lado de su hermano más pequeño.
-
La nueva parte trasera de estos teléfonos se ve mucho como la tapa híbrida de las últimas dos generaciones, pero esta vez es todo una única pieza de cristal (con un acabado mate parcial)
-
Mirando la parte frontal, espiamos una cámara extra situada encima de ambas pantallas.
-
Es así. Mientras los demás han puesto más cámaras en la parte trasera, Google ha cambiado y agregó una cámara ultra ancha (equivalente 19 mm) al lado de la cámara de ángulo ancho existente (equivalente 28 mm)
-
Exclusivo del Pixel 3 XL , hay una muesca pequeña de moda que nos saluda al dar vuelta el teléfono.
-
-
-
Los altavoces frontales en ambos Pixel 3 dejan el marco de aluminio libre de cualquier rejillas de altavoz.
-
Apilados, es obvio que uno de estos teléfonos es un poco más XL que el otro, pero no hay mucha diferencia de otra manera.
-
El puerto de carga USB-C, ranura para tarjeta SIM, y los botones de encendido al estilo de los 80están presentes en ambos teléfonos.
-
-
-
Ahora que ya hemos visto el exterior, es hora de dirigirnos adentro.
-
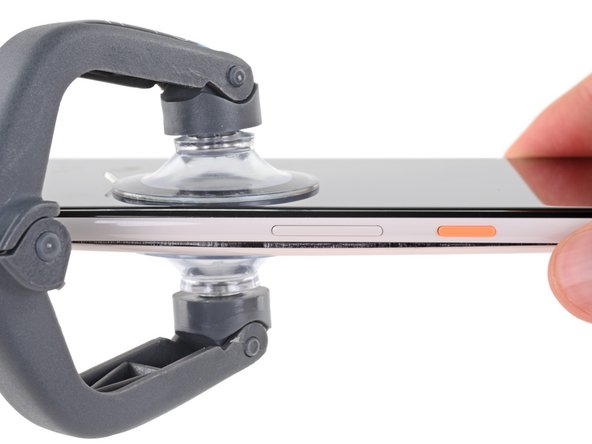
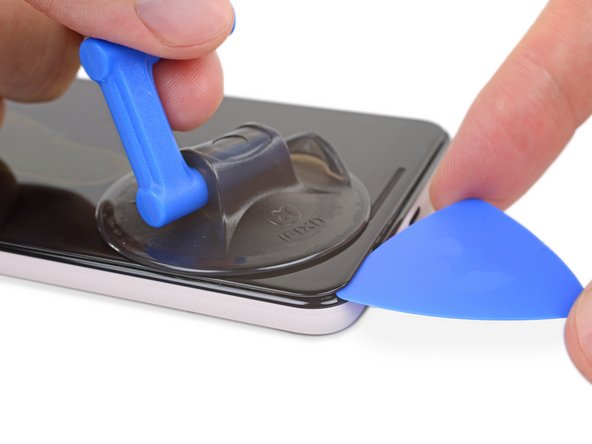
La experiencia nos dice que un poco de succión y corte es todo lo que necesitamos para persuadir que se abra la pantalla, pero cuando esto no funciona, sacamos nuestras armas.
-
Parece que el Pixel 3 XL todavía usa adhesivo de espuma, pero es mucho más obstinado que la facilidad de reparación que vimos el año pasado.
-
Sacamos nuestro confiable iSclack, esperando separar el ensamblaje de pantalla, pero la tapa posterior sale se rinde primero.
-
-
-
Luego de luchar con el adhesivo más de lo esperado, ¡estamos dentro!
-
Afortunadamente, el cable del sensor de huellas digitales es lo suficientemente largo como para evitar que se rompa con abridores demasiado entusiastas.
-
La vista en el interior es prácticamente lo que esperábamos: una nueva y brillante plataforma de carga inalámbrica, una batería, una placa, un par de cámaras y un sensor de huellas digitales que se encuentra en la tapa trasera.
-
Un poco menos esperado son las cubiertas de metal sobre la placa madre y una bandeja SIM oculta en algún lugar debajo del ensamblaje del altavoz.
-
¿Google pensó que nos asustarían con algunos tornillos? Bueno, adivina qué: vinimos preparados con una punta Torx para estos tornillos y otras 111 puntas por si acaso.
-
-
-
La tendencia adhesiva resistente continúa, manteniendo la bobina NFC a la potencia de Pixel. ¡Pero nosotros espiamos un respiro!
-
La batería está asegurada con un adhesivo de liberación elástica relativamente fácil de reparar. ¡Así que tienes al menos una oportunidad de ser removido fácilmente, si tu técnica es correcta!
-
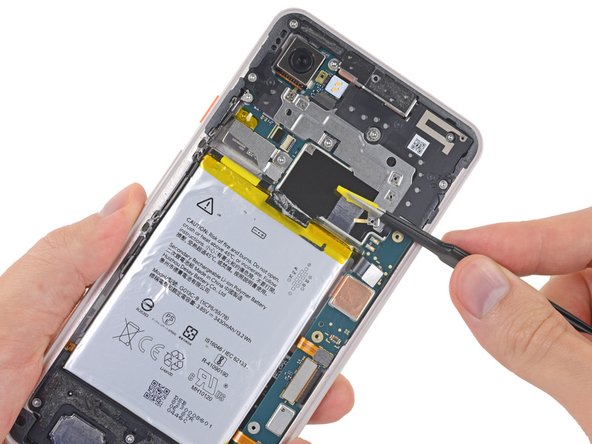
¡Recurrimos al uso de hilo dental para sacar la batería y cortamos accidentalmente un cable plano frágil que se oculta debajo! Prevenido es estar preparado, un manual de reparación nos hubiera ayudado en este campo.
-
Dejando a un lado las pruebas adhesivas, la batería del 3 XL es de 13.2 Wh. eEso es en realidad un poco menos delos 13.6 Wh del Pixel 2 XL, y aproximadamente el mismo que el 13.28 Wh original del Pixel XL.
-
El Pixel 3 XL todavía le sigue ganando al iPhone XS Max (12.08 Wh) y se acerca mucho al Galaxy S9+ (13.48).
-
-
-
-
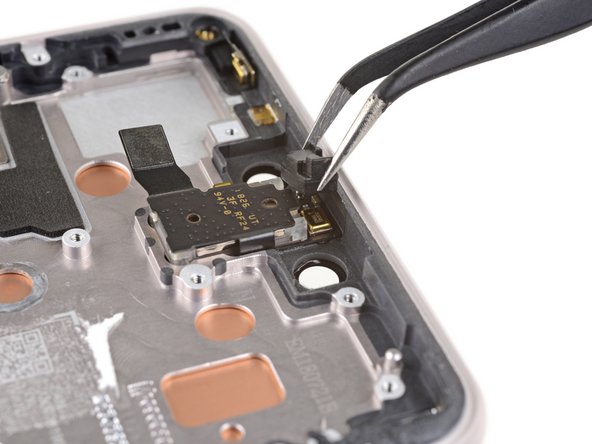
Sobre el cráter donde una vez estuvo la batería, removemos una antena que protege la placa madre
-
En el extremo sur del teléfono, combatimos un poco más de adhesivo para liberar lo que parece ser otro escudo.
-
¡Otra trampa! Este escudo es en realidad la carcasa del altavoz, que acabamos de dividir por la mitad tratando de acceder a los componentes que se encuentran debajo.
-
-
-
Con sus escudos ya abajo, por fin podemos echar un vistazo a la nueva placa madre de Pixel.
-
A medida que sale la placa madre, no podemos dejar de notar la generosa ayuda de pasta térmica en su parte inferior, para transferir el calor desde los chips de trabajo más duro al marco de metal.
-
Parece que hay mucha pasta, pero el hardware poderoso produce un montón de calor.
Step 7 shows an antenna plastic near the top of the phone and Step 8 shows the two coax that run to the bottom of the handset. Looks like part of that plastic antenna shown in Step 7 near the top is for BT/Wifi on the button side of the PCB, then there are 4 antennas on the other side of the board (two coax, two gold contacts up to that plastic antenna part). I’m wondering if there is any indicators what antennas are used for what inside the handset. Thoughts?
-
-
-
Todo este pegamento nos ha cansado. Sentémonos a observar algunos chips:
-
Micron 8JE77G9WGH 4 GB LPDDR4X DRAM sobre Qualcomm Snapdragon 845
-
Almacenamiento de flash universal 64 GB Skhynix H28S7Q302BMR
-
Núcleo visual Google SR3HX Pixel (como en el Pixel 2 XL)
-
Transceptor RF Qualcomm SDR845
-
Qualcomm QPM2622 y QPM2642
-
Rastreo envolvente Qualcomm QET410040MHz
-
Qualcomm PMI8998 PMIC
-
-
-
Quizá algunos más:
-
Chip de seguridad Google H1C2M Titan M
-
Receptor de carga inalámbrica Qi IDT P9221
-
Codec audio Aqstic Qualcomm WCD9340
-
Módulos receptores de diversidad Qualcomm QDM3620, QDM3670, QDM3671.
-
CI de administración de potencia Qualcomm PM845
-
Qualcomm PM845
-
Qualcomm PM845
Can you identify which audio amplifiers they use?
Can any one tell where i get wifi ic
-
-
-
Extraemos cuidadosamente la cámara de gran angularque está ligeramente adherida al marco.
-
En la parte posterior, Google está apostando nuevamente a que AI puede ayudar a un solo sensor a hacer el trabajo de dos.
-
Basado en las primeras críticas, parece ser cierto. Se rumorea que se trata de un sensor Sony IMX363 ligeramente mejorado; el resto depende de Pixel Visual Core.
What is that component that’s left in the middle? Looks like there’s a flex on it, too, so wouldn’t that also need to be removed?
-
-
-
La placa hija sale sin problemas, con el puerto USB-C, la bandeja de la tarjeta SIM y algunos hardware de antena.
-
El motor de vibración es un poco más reacio a abandonar su hogar, pero nuestro Halberd Spudger puede ser muy persuasivo.
-
Los medidores de tensión salen tan consentidas como siempre.
-
-
-
En nombre de la ciencia, optamos por desmantelar nuestra pantalla para aprender de dónde vino. Sus defensas son fuertes, pero no son rival para el calor, la paciencia y una actitud positiva.
-
Redoble de tambores por favor .... ¡es un Samsung! Los rumores estaban por todos lados, pero parece que Google va con los paneles confiables AMOLED de Samsung este año.
-
Los paneles de Samsung deberían ser un poco más confiables que los del año pasado, pero desafortunadamente, este también viene con un proceso de reparación al estilo de Samsung.
-
Por último, pero no menos importante, un chip de pantalla sentado solo en el cable de la pantalla
-
Controlador táctil Samsung S6SY761X (como en el S9+)
-
-
-
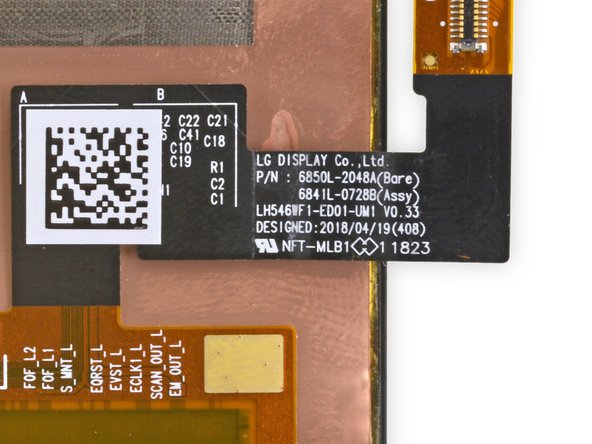
Actualización del desmontaje: ya que preguntaron, hemos diseccionado la pantalla en el Pixel 3 también. ¿Adivinen qué? Esta es de pantalla LG.
-
Se rumorea que LG ha estado trabajando arduamente para mejorar su tecnología móvil OLED; tenemos curiosidad por ver cómo les va a su nueva pantalla este año.
That mesh speaker cover looks like a major weak point. Not a lot of extra material or glue holding it in place.
-
-
-
Aquí están todas las partes bonitas que están en el Pixel.
-
¿Hambriento de más golosinas desmontables? ¡El equipo de video está aquí para complacerte con el desmontaje de video de Pixel 3!
-
Parece que el Pixel ha estado saliendo con la problemática línea Galaxy, dejándola con ensamblajes de antenas de aspecto familiar, una batería resistente y una pantalla difícil de reemplazar, ¡fabricada por el mismo Samsung!
-
No solo el intercambio de una pantalla rota requiere un desmontaje completo del teléfono, sino que también hay que pensar en la parte posterior. El cristal trasero del Pixel 2 XL cubre el 20% del teléfono; el panel trasero del Pixel 3 XL es 100% agrietable. Eso no augura nada bueno para la reparabilidad ...
-
- Los únicos tornillos son los sujetadores estándar T3 Torx.
- El adhesivo de liberación fácil de reparar sujeta la batería.
- Las juntas tóricas y los adhesivos para la impermeabilización complican las reparaciones, pero hacen que las reparaciones difíciles por daños de líquidos sean menos probables
- Las reparaciones de la pantalla son mucho más difíciles que los modelos anteriores, ya que requieren un desmontaje completo del teléfono.
- Para dar servicio a cualquier componente, deberás desarticular cuidadosamente (y luego pegar de nuevo) el panel posterior de vidrio


Consideraciones Finales
Calificación de Reparabilidad


(10 es lo más fácil de reparar)
Un agradecimiento especial a estos traductores:
75%

¡ Mariana Roca nos está ayudando a reparar el mundo! ¿Quieres contribuir?
Empezar a traducir ›
43 comentarios
It’s been rumored that the front stereo speakers are louder and more crisp than the 2XL. Is there a visual size difference in the speakers themselves?
The new speaker housing looks a little bigger and might be sealed better than the old one. I’m no speaker expert though, so I’m not sure how much of a difference the new design makes, or if the driver is just better.
To be clear, are BOTH the Pixel 3 and 3XL using Samsung screens? Please say yes.
I came to ask the same question, so I'm subscribing to hear the answer!
Surprise: it’s a LG panel! We’ve added step 14 to reflect this. Thank you for all your patience!
FingerprintCard FPC 1075 fingerprintsensor in a Crucialtec modul…No chance to get a Goodix sensor in a Pixel mobil.
is there a notification led?
Unfortunately, no.
Parker, are you with ifixit? I was hoping to hear from the horses mouth so to speak, since there have been conflicting reports. Some reported around the 10th that people from google said there was, then as of the 14th everyone has been saying no. this is our best chance of getting a reliable answer.
There's no LED. Been using it for a few days now, no sign at all of any LED indicators. I'd really suggest using the always on display for notifications.
Are both front facing speakers the same size on the Pixel 3 XL?
It definitely doesn't feel like it based on normal usage. The bottom one is more bass heavy/responsive and louder, while the top one is quieter and sounds different. Definitely not the same speaker.
NFC comments are completely wrong
-step 6: this is not a NFC antenna, but wireless charging
-step 5: you can see NFC antenna on upper part with two pins connection to motherboard, around “swiss cross”
-step 10: NFC IC NXP PN81B03, between yellow and red IC
Tom,
You are totally right! We definitely bungled that. Thank you for catching the mistake!
Can you tell which audio amplifiers are used?
There is no mention of eSIM MCU as in Pixel 2 or in iPhone Xs whereas the tech spec mentions eSIM support?
Yup, there's esim support because Google wants to support their own Project Fi service.
Got my xl last Friday was working good, I wasn’t having the problems others are. So last night I decided to charge it using a wireless charger that I used on my Samsung S9+ , It showed charging and was working fine wake up and my pixel is now dead! WTF plugged it into charger that comes with it nothing, try reset process nothing. Anyone else with this problem?
I can’t answer to your troubles with it not coming on, but while the Samsung chargers show it’s charging, they do not in fact actually charge the device to my disappointment, and probably many others that are switching from Samsung. Best guess is that the Qi chips are requiring something specific found in the Google Pixel Stand and without it, it doesn’t charge correctly. I tried my Samsung Wireless Charger with the same indication of charging that you got but the device was still losing power so I just set up the Pixel stand for charging. I would recommend, if you haven’t yet, just leave it plugged in for an hour and see if you can get it to turn on, if not, take it back to the store you got it from and replace it.
Does the pixel have video out via USB c?
Yup! You'll need a compatible adapter though.
is the pin hole on the top of the phone a mic? and could I have done damage if they put the sim card tray pin into that hole or is the mic off set from the hole?
The pinhole on top is a mic. I actually did the same thing and stuck the SIM tool inside!! Embarrassing to admit… The microphone seems to still function, however when I look into the hole it looks like I tore the foam dust shield.
Would be great to know how much damage we did, anyone have info on this? It's hard to see what the microphone design is from the teardown.
I did exactly the same looking for a clue on here as to what I have damaged. All seems to be working fine, but there was a definite pop sound as the tool went in
Thanks! I've been curious what's going on inside my phone
My top speaker grill is dented. Based on the teardown, does a dented speaker grill affect the IP rating?
It depends on if the seal around the speaker grille is torn. As a reality precaution, the older the phone gets, the less it’s likely to retain its IP rating.
Dear all, would it be possible to have a higher resolution picture on the Murata chipset (Murata 1QB SS8601001)? Is this the part number or the serial number? I have been trying to look up the specs but I could not find them in the Murata web site. If there are someone that could help me find a brochure or web page with the specs it would be very much appreciated. Best
Wallpaper for 3 XL?
The earpiece speaker is affixed in place with adhesive, but is removable.
Any chance you all would be able to identify the fpc connector on the motherboard for the fingerprint sensor?
Hi Benjamin,
This is the FPC connector for the fingerprint sensor. It’s actually a ZIF socket. Also, Pixel 3 XL guides are in progress and will be available within the next few weeks!
how you dismantle the display of pix 3xl? it has aa thick adhesive on the back?
Hi Kevin,
We have a guide for the display—you can find it here.