Introducción
Si hay alguna información errónea, házmelo saber, o si sientes que quieres añadir algo a esta guía ¡siéntete libre de hacerlo!
Si algo se rompió en tu ratón, entonces te recomendaría conseguir uno nuevo debido a que las partes son difíciles de conseguir.
Si tienes habilidades de soldadura decentes y sabes cómo conseguir las partes que necesitas, ¡siéntete libre de hacer una guía!
Los botones derecho e izquierdo del ratón son interruptores Omron.
No estoy seguro de cuál interruptor usa el botón central del ratón. Parece ser un interruptor genérico de botón micro montado en superficie.
¡¡¡PRECAUCIÓN!!!
SÉ CUIDADOSO
SÉ PACIENTE y TRABAJA LENTAMENTE mientras desensamblas.
Hay partes delicadas dentro del ratón.
Qué necesitas
-
-
¡Empecemos!
-
Primero, dale la vuelta.
-
Encuentra dos tornillos Torx. Usa un destornillador Torx T6 para desatornillarlos. Yo usé un destornillador de punta plana pequeño para desatornillarlos porque no tenía un destornillador Torx T6.
-
-
-
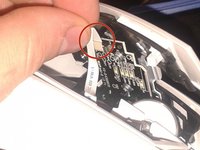
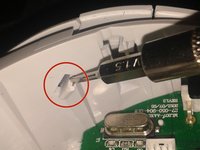
Presiona hacia abajo en el lugar que estoy señalando aquí. Debería separarse con bastante facilidad.
-
Para abrirlo con las manos desnudas, sostén el M65 con el cable USB hacia abajo y fuerza la superficie superior del M65 hacia arriba con la palma de la mano, luego tira del borde trasero del M65 hacia arriba con los dedos "en forma de gancho" de la misma mano.
-
-
-
-
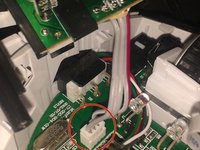
Hay dos tornillos que sujetan la placa de circuito impreso en su lugar. Uno es más largo que el otro. El CORTO va hacia donde estoy señalando. El tornillo largo sujeta un cable de conexión a tierra. Mueve el cable a un lado mientras retira la placa.
-
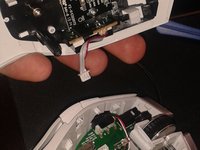
Hay un cable plano que estoy señalando y que puedes sacar. Hay algunos cables multicolores que están enchufados a la placa. Muévelo hacia afuera. Muévelo hacia un costado cuando saques la placa.
-
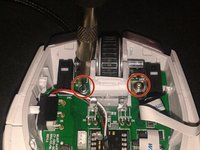
Ahora saca la placa de circuito impreso junto con la rueda de desplazamiento. Debería haber más tornillos que sujetan el metal al plástico. Afloja esos tornillos si quieres.
-
Los laterales se desarman. Para poder quitar los laterales, debes sacar la placa base. Hay dos pestillos en el lado izquierdo y cuatro en el lado derecho. El lado izquierdo también tiene dos tornillos que lo sujetan al resto del cuerpo.
-


Para ensamblar tu dispositivo, sigue estas instrucciones en orden inverso.
Para ensamblar tu dispositivo, sigue estas instrucciones en orden inverso.
Cancelar: No complete esta guía.
43 personas más completaron esta guía.
Un agradecimiento especial a estos traductores:
100%


Estos traductores nos están ayudando a reparar el mundo! ¿Quieres contribuir?
Empezar a traducir ›

30Guía Comentarios
Dude, thank you so much for posting this. I broke the scroll wheel and I used this to disassemble the body to get it. If you could post a guid in how to actually fix the scroll wheel for anyone else that would be awesome.
Great guide! I only had a little bit of trouble reassembling it. The top part is hard to "click back" into the rest of the body. I finally did it, but couldn't notice what made them snap together.
I'd note something else too: I detached the TOP of the ribbon cable and it was a pain to attach it back, as you have to hold the 'lid' too and holding everything is awkward. What made it easier was to remove the PCB fixed by 2 screws in the 'lid', then attach the ribbon cable and then screw the PCB back into place.
Cheers!
P.S.: Xe Roy, you might have to unscrew the body PCB to lift it from the rest of the body. Else the scroll wheel is stuck and impossible to remove.
It's at the front, in-front of the left and right clicks, 1 latch in-front of each mouse buttons, like the ones on the side panels. Sliding the top part forward in place and then snapping on the back kinda helped.
Yeah you’re totally right. It was quite easy to take off but much harder to put on. I think I found the latch, so i tried to take some pictures, but I would say it’s not so much about putting the mouse forward but starting at a high enough angle so the hole on the top clicks with the hole on the on the mouse.
So you have to get the latch in the hole at the top of the mouse first then once thats in the rest should click into place. But yeah, you can’t get it back on if you start at the back.
Here are the pictures: https://imgur.com/a/mqLrKZ9
Caleb -