Introducción
This guide will walk you through the process of replacing the headphone jack in a Dell XPS 15 9510 laptop. If your headphone jack is loose, produces static, only plays sound in one ear, or is completely non-functional, replacing it can restore proper audio output.
Before beginning, power off the laptop and disconnect it from any power source to prevent electrical damage. This repair involves opening the device and handling small internal components, so work carefully to avoid damaging nearby connectors or circuits.
Qué necesitas
-
-
Remove eight 3 mm screws from the underside of the case using a T5 Torx screwdriver.
-
-
-
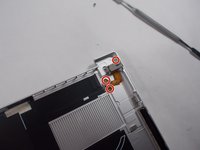
Use a Phillips #00 screwdriver to remove the three screws securing the headphone jack back to the panel.
-
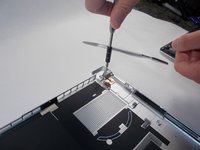
Gently lift the headphone jack slightly to ensure it is free from the panel, but do not force it out.
-


Once the new headphone jack is installed and the laptop is reassembled, test the audio by plugging in headphones and playing sound from different applications. If issues persist, check the connector to ensure it is securely attached.
Once the new headphone jack is installed and the laptop is reassembled, test the audio by plugging in headphones and playing sound from different applications. If issues persist, check the connector to ensure it is securely attached.

Equipo

UMass Dartmouth, Team 1-3, Mellen Spring 2022 Miembro de UMass Dartmouth, Team 1-3, Mellen Spring 2022
UMASSD-MELLEN-S22S1G3
3 Miembros
5 Guías creadas