Introducción
Like any laptop, the Dell XPS 15 9500's fans keep crucial components cool and functional. If your laptop's performance has become increasingly sluggish, or you notice that you could probably fry an egg on the heatsink, odds are there's an issue with your fans.
First, check if the fans are spinning while your laptop's powered on. If they're spinning, check the blades for any buildup of dust or debris, and clean them appropriately.
If the fans aren't spinning whatsoever, they've likely reached the end of their lifespan, and it's time to replace them.
Before beginning, power off and unplug your laptop.
Qué necesitas
-
-
Remove the eight 3.0 mm screws from the bottom panel with a T5 Torx screwdriver.
-
-
-
-
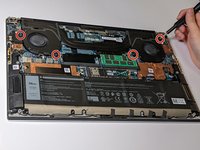
Use a Phillips #00 screwdriver to remove the two 4.0 mm screws screws from each fan (four screws total).
-


To reassemble your device, follow these instructions in reverse order.
To reassemble your device, follow these instructions in reverse order.
Cancelar: No complete esta guía.
Una persona más ha completado esta guía.

Equipo

UC Santa Barbara, Team A-1, Bator Winter 2022 Miembro de UC Santa Barbara, Team A-1, Bator Winter 2022
UCSB-BATOR-W22SAG1
4 Miembros
4 Guías creadas