Saltar al contenido principal

Dell VRC100-R Motherboard Replacement

Qué necesitas

  1. Dell VRC100-R Motherboard Replacement, Battery: paso 1, imagen 1 de 3 Dell VRC100-R Motherboard Replacement, Battery: paso 1, imagen 2 de 3 Dell VRC100-R Motherboard Replacement, Battery: paso 1, imagen 3 de 3
    • Orient your controller so that the black ring is on the bottom and the buttons are facing away from yourself.

    • Place your thumb on the small arrow that is on the controller's battery cover and firmly push upwards.

    • Slide the cover off and separate it from the controller.

  2. Dell VRC100-R Motherboard Replacement: paso 2, imagen 1 de 2 Dell VRC100-R Motherboard Replacement: paso 2, imagen 2 de 2
    • Remove the right battery by pushing the positive end down and pulling the battery out toward yourself.

    • Repeat the procedure for the left battery.

  3. Dell VRC100-R Motherboard Replacement, Joystick: paso 3, imagen 1 de 3 Dell VRC100-R Motherboard Replacement, Joystick: paso 3, imagen 2 de 3 Dell VRC100-R Motherboard Replacement, Joystick: paso 3, imagen 3 de 3
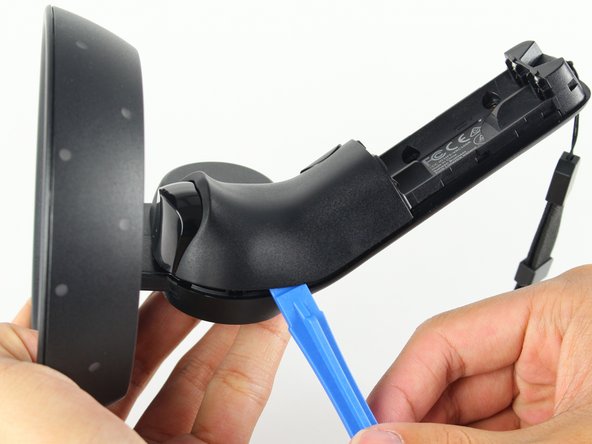
    • Hold the joystick down with your left thumb to make space for the plastic opening tool.

    • Insert the plastic opening tool into the circle above the joystick and pry upwards to lift the front panel.

    • Slide the plastic opening tool around the perimeter until you can lift the front panel.

    • You may hear a popping noise when you pry off the front panel.

  4. Dell VRC100-R Motherboard Replacement: paso 4, imagen 1 de 2 Dell VRC100-R Motherboard Replacement: paso 4, imagen 2 de 2
    • Grab the joystick and pull away from the controller to remove it.

  5. Dell VRC100-R Motherboard Replacement, Daughterboard: paso 5, imagen 1 de 2 Dell VRC100-R Motherboard Replacement, Daughterboard: paso 5, imagen 2 de 2
    • Remove one 6mm Phillips #0 screw.

  6. Dell VRC100-R Motherboard Replacement: paso 6, imagen 1 de 2 Dell VRC100-R Motherboard Replacement: paso 6, imagen 2 de 2
    • Turn your controller over and orient it so that the thin side is on the top.

    • Remove four 4mm Phillips #0 screws.

  7. Dell VRC100-R Motherboard Replacement: paso 7, imagen 1 de 2 Dell VRC100-R Motherboard Replacement: paso 7, imagen 2 de 2
    • Turn your controller 90 degrees clockwise and insert a blue plastic opening tool into the crease of the back panel.

    • Push down on the end of the plastic opening tool closest to you to lift the panel up.

    • Slide the plastic opening tool around the perimeter of the back panel until you can remove it.

    • You may hear loud popping noises as the back panel separates from the controller.

  8. Dell VRC100-R Motherboard Replacement: paso 8, imagen 1 de 2 Dell VRC100-R Motherboard Replacement: paso 8, imagen 2 de 2
    • Remove four 4mm Phillips #0 screws.

  9. Dell VRC100-R Motherboard Replacement: paso 9, imagen 1 de 3 Dell VRC100-R Motherboard Replacement: paso 9, imagen 2 de 3 Dell VRC100-R Motherboard Replacement: paso 9, imagen 3 de 3
    • Use the tip of the blue plastic opening tool or your fingernail to gently flip-up the white locking flap.

    • Make sure to only lift the flap and not the connector socket because the socket easily breaks off.

    • Grab the blue cable and pull away from the socket.

    • To reinstall, insert the blue cable into the connector and close the flap on the black line.

  10. Dell VRC100-R Motherboard Replacement: paso 10, imagen 1 de 3 Dell VRC100-R Motherboard Replacement: paso 10, imagen 2 de 3 Dell VRC100-R Motherboard Replacement: paso 10, imagen 3 de 3
    • Use the tip of a spudger or your fingernail to gently flip-up the small white flap holding the orange ribbon cable.

    • Make sure to only lift the flap and not the connector socket because the socket easily breaks off.

    • Grab the orange cable and pull away from the socket.

    • To reinstall, insert the orange cable into the connector and close the flap on the white line.

  11. Dell VRC100-R Motherboard Replacement: paso 11, imagen 1 de 2 Dell VRC100-R Motherboard Replacement: paso 11, imagen 2 de 2
    • Place two fingers on the perimeter of the daughterboard and lift it away from the controller.

  12. Dell VRC100-R Motherboard Replacement, Motherboard: paso 12, imagen 1 de 2 Dell VRC100-R Motherboard Replacement, Motherboard: paso 12, imagen 2 de 2
    • Remove two black 6mm Phillips #0 screws.

  13. Dell VRC100-R Motherboard Replacement: paso 13, imagen 1 de 2 Dell VRC100-R Motherboard Replacement: paso 13, imagen 2 de 2
    • Pinch the black ring on the top of your controller and pull toward yourself to disconnect it.

    • The ring may slightly pop as it disconnects from the controller body.

  14. Dell VRC100-R Motherboard Replacement: paso 14, imagen 1 de 2 Dell VRC100-R Motherboard Replacement: paso 14, imagen 2 de 2
    • Grab the black and red wires attached to the motherboard and wiggle the connector out of the socket.

  15. Dell VRC100-R Motherboard Replacement: paso 15, imagen 1 de 2 Dell VRC100-R Motherboard Replacement: paso 15, imagen 2 de 2
    • Remove three 3mm Phillips #0 screws.

  16. Dell VRC100-R Motherboard Replacement: paso 16, imagen 1 de 2 Dell VRC100-R Motherboard Replacement: paso 16, imagen 2 de 2
    • Insert your finger underneath the black plastic "V" and scoop up to remove it.

  17. Dell VRC100-R Motherboard Replacement: paso 17, imagen 1 de 2 Dell VRC100-R Motherboard Replacement: paso 17, imagen 2 de 2
    • Remove two 4mm Phillips #0 screws.

  18. Dell VRC100-R Motherboard Replacement: paso 18, imagen 1 de 1
    • Pinch the orange ribbon cable and pull toward yourself to remove the motherboard.

Conclusión

To reassemble your device, follow these instructions in reverse order.

Una persona más ha completado esta guía.

Steven Pineda

Miembro Desde 04/16/18

881 Reputación

3 Guías creadas

Equipo

Cal Poly, Team S18-G3, Livingston Spring 2018 Miembro de Cal Poly, Team S18-G3, Livingston Spring 2018

CPSU-LIVINGSTON-S18S18G3

4 Miembros

5 Guías creadas

4 comentarios

Thanks, using this as a tear down guide.

Gamerz Crafted - Contestar

Hi, do anyone know where this motherboard can be purchased?

John Franco - Contestar

does anybody know where I can buy the ribbon cable, between the two boards. in Step 10

Tim Bury - Contestar

where can i buy the motherboard?

José Yoctán Leyva Román - Contestar

Agregar Comentario

Ver Estadísticas:

Ultimas 24 horas: 0

Ultimos 7 días: 0

Ultimos 30 días: 0

Todo El Tiempo: 1,439