Qué necesitas
-
-
Using a plastic scribe, pry the keyboard trim to release it from the computer. Lift up to remove the keyboard trim from the computer.
-
-
-
-
Lift the battery bay and remove the screw that secures the keyboard to the computer.
-
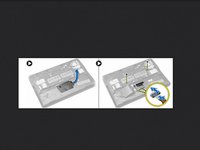
Perform the following steps as shown in the illustration:a.Lift the latch that secure the keyboard cable to the computer [1].b.Disconnect the keyboard cable the computer [2]
-
Flip the computer and remove the screws that secure the keyboard to the computer
-
Perform the following steps as shown in the illustration:a.Slide the keyboard from the computer [1].b.Lift the keyboard from the computer [2].
-
-
-
Remove the screws that secure the palmrest assembly and flip the computer.
-
Perform the following steps as shown in the illustration:a.Disconnect the cable from the computer.b.Lift the latch that secures the keyboard cable to the computer [1].c.Disconnect the keyboard cable [2].d.Disconnect the touch cable from the computer [3].e.Unroute the cables from the slot [4].
-
Remove the screws that secure the palmrest assembly to the front of the computer. Pry the edges and lift the palmrest assembly from the computer
-


To reassemble your device, follow these instructions in reverse order.
To reassemble your device, follow these instructions in reverse order.

Equipo
