Saltar al contenido principal

Dell Latitude E6510 Hard Drive Replacement

Qué necesitas

  1. Dell Latitude E6510 Hard Drive Replacement, Battery: paso 1, imagen 1 de 1
    • Unlock the two latches on the back by sliding them inwards.

  2. Dell Latitude E6510 Hard Drive Replacement: paso 2, imagen 1 de 2 Dell Latitude E6510 Hard Drive Replacement: paso 2, imagen 2 de 2
    • Slide the battery out from the laptop.

  3. Dell Latitude E6510 Hard Drive Replacement, Hard Drive: paso 3, imagen 1 de 2 Dell Latitude E6510 Hard Drive Replacement, Hard Drive: paso 3, imagen 2 de 2
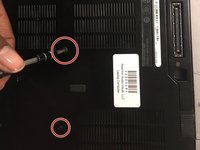
    • After removing the battery, unscrew the four 3 mm screws on the back plate using a Phillips #1 screwdriver.

    • The back plate does not need to be removed. Removed only for a clear view.

  4. Dell Latitude E6510 Hard Drive Replacement: paso 4, imagen 1 de 2 Dell Latitude E6510 Hard Drive Replacement: paso 4, imagen 2 de 2
    • The hard drive should slide out of the laptop. However, if not, use a spudger to pry the hard drive out of the laptop.

Conclusión

To reassemble your device, follow these instructions in reverse order.

Una persona más ha completado esta guía.

Kolin Doyle

Miembro Desde 11/06/17

500 Reputación

4 Guías creadas

Equipo

Baylor, Team S8-G4, Johnson Fall 2017 Miembro de Baylor, Team S8-G4, Johnson Fall 2017

BU-JOHNSON-F17S8G4

1 Miembro

4 Guías creadas

0 comentarios

Agregar Comentario

Ver Estadísticas:

Ultimas 24 horas: 0

Ultimos 7 días: 8

Ultimos 30 días: 30

Todo El Tiempo: 3,936