Qué necesitas
-
-
Disconnect AC power adaptor
-
Push battery release tabs inwards.
-
Slide the battery out of the computer.
-
-
-
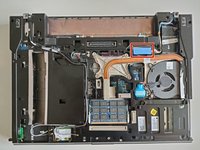
Remove the two 4.8mm Phillips screws securing the plastic lids.
-
Slide the plastic lids of the case
-
-
-
-
Grab the plastic pull tab secured to the display data cable lock and pull the display data cable connector straight up from its socket.
-
De-route the display data cable from the channel.
-
-
-
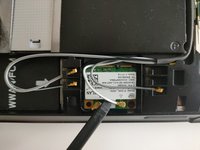
Using spudger lift and disconnect Wi-Fi antenna cable.
-
De-route the Wi-Fi antenna cable from it's channel.
-
-
-
Open your laptop so the display is perpendicular to the upper case.
-
Place your opened MacBook on a table as pictured.
-
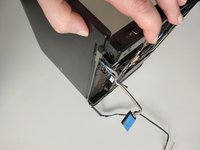
While holding the display and upper case together with your left hand, remove the two 4.8 mm Phillips screws from the display brackets.
-
Grab the upper case with your right hand and rotate the display slightly away from the upper case. Lift the display away from the upper case, minding any brackets or cables that may get caught.
-


To reassemble your device, follow these instructions in reverse order.
To reassemble your device, follow these instructions in reverse order.
2 comentarios
How to fix the flickering of screen in Dell latitude E6400
I would start with resetting the connectors on motherboard side and then on the screen side. Then I would try replacing cables. Anything above that would require multimeter knowledge. Always start from cheapest to more expensive.