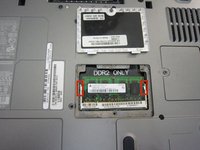
Saltar al contenido principal

Dell Latitude D610 RAM Replacement

Qué necesitas

  1. Dell Latitude D610 RAM Replacement, Battery: paso 1, imagen 1 de 2 Dell Latitude D610 RAM Replacement, Battery: paso 1, imagen 2 de 2
    • Remove the 3.9 mm Phillips #1 screw from the battery compartment.

  2. Dell Latitude D610 RAM Replacement: paso 2, imagen 1 de 3 Dell Latitude D610 RAM Replacement: paso 2, imagen 2 de 3 Dell Latitude D610 RAM Replacement: paso 2, imagen 3 de 3
    • Locate the laptop battery release button lock

    • Push the battery release in the direction of the arrow, and pull upward.

  3. Dell Latitude D610 RAM Replacement: paso 3, imagen 1 de 1
    • Remove the battery from its compartment.

  4. Dell Latitude D610 RAM Replacement, RAM: paso 4, imagen 1 de 3 Dell Latitude D610 RAM Replacement, RAM: paso 4, imagen 2 de 3 Dell Latitude D610 RAM Replacement, RAM: paso 4, imagen 3 de 3
    • Remove the 3.9mm Philips #1 screw holding the panel for the RAM.

  5. Dell Latitude D610 RAM Replacement: paso 5, imagen 1 de 2 Dell Latitude D610 RAM Replacement: paso 5, imagen 2 de 2
    • Lift and remove the panel.

  6. Dell Latitude D610 RAM Replacement: paso 6, imagen 1 de 3 Dell Latitude D610 RAM Replacement: paso 6, imagen 2 de 3 Dell Latitude D610 RAM Replacement: paso 6, imagen 3 de 3
    • Using two fingers, push the silver ends away from the RAM until the RAM is released.

  7. Dell Latitude D610 RAM Replacement: paso 7, imagen 1 de 3 Dell Latitude D610 RAM Replacement: paso 7, imagen 2 de 3 Dell Latitude D610 RAM Replacement: paso 7, imagen 3 de 3
    • Lift the RAM from its slot.

    • Remove the RAM completely.

Conclusión

To reassemble your device, follow these instructions in reverse order.

6 personas más completaron esta guía.

Jordan Barham

Miembro Desde 01/26/14

459 Reputación

3 Guías creadas

Equipo

Cal Poly, Team 6-24, Maness Winter 2014 Miembro de Cal Poly, Team 6-24, Maness Winter 2014

CPSU-MANESS-W14S6G24

4 Miembros

5 Guías creadas

Un comentario

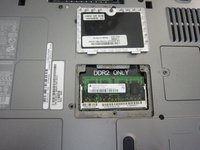
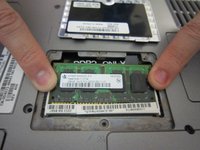
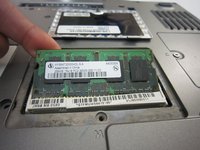
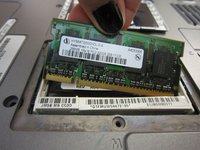
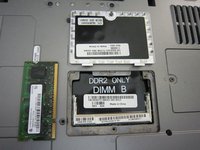
This model has two RAM slots. The second one is under the keypad. Carefully remove the bezel at the top of the keypad, remove the two screws holding the keypad down, then remove the keypad to expose the second slot. This RAM slot is a little bit more difficult to get to than the one on the back of the laptop, but is still very easy to access and change out.

Chris Kelley - Contestar

Agregar Comentario

Ver Estadísticas:

Ultimas 24 horas: 1

Ultimos 7 días: 2

Ultimos 30 días: 8

Todo El Tiempo: 1,641