Saltar al contenido principal

Dell Inspiron 15R Keyboard Replacement

Qué necesitas

  1. Dell Inspiron 15R Keyboard Replacement, Battery: paso 1, imagen 1 de 1
    • Turn the device over and locate the battery.

  2. Dell Inspiron 15R Keyboard Replacement: paso 2, imagen 1 de 2 Dell Inspiron 15R Keyboard Replacement: paso 2, imagen 2 de 2
    • Place thumbs on each latch and push outwards.

  3. Dell Inspiron 15R Keyboard Replacement: paso 3, imagen 1 de 1
    • Push and slide the battery away from you.

  4. Dell Inspiron 15R Keyboard Replacement, Keyboard: paso 4, imagen 1 de 3 Dell Inspiron 15R Keyboard Replacement, Keyboard: paso 4, imagen 2 de 3 Dell Inspiron 15R Keyboard Replacement, Keyboard: paso 4, imagen 3 de 3
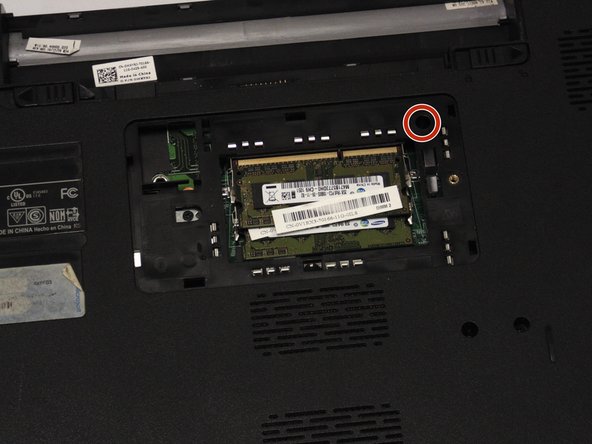
    • Locate the RAM compartment and the screw on the right hand side. Remove the cover.

  5. Dell Inspiron 15R Keyboard Replacement: paso 5, imagen 1 de 2 Dell Inspiron 15R Keyboard Replacement: paso 5, imagen 2 de 2
    • Locate and remove the 2.5 mm x 5 mm screw on the upper right hand side of the compartment.

  6. Dell Inspiron 15R Keyboard Replacement: paso 6, imagen 1 de 1
    • Turn the device around and open it up.

  7. Dell Inspiron 15R Keyboard Replacement: paso 7, imagen 1 de 2 Dell Inspiron 15R Keyboard Replacement: paso 7, imagen 2 de 2
    • Using your index finger, push down on the F1 and F7 keys.

  8. Dell Inspiron 15R Keyboard Replacement: paso 8, imagen 1 de 2 Dell Inspiron 15R Keyboard Replacement: paso 8, imagen 2 de 2
    • Using your index finger, push down on the x icon and Home keys.

  9. Dell Inspiron 15R Keyboard Replacement: paso 9, imagen 1 de 3 Dell Inspiron 15R Keyboard Replacement: paso 9, imagen 2 de 3 Dell Inspiron 15R Keyboard Replacement: paso 9, imagen 3 de 3
    • Locate the keyboard lining (between the black and silver).

    • Place your spudger between the keyboard lining behind the F1 and F7 keys and pull up.

  10. Dell Inspiron 15R Keyboard Replacement: paso 10, imagen 1 de 2 Dell Inspiron 15R Keyboard Replacement: paso 10, imagen 2 de 2
    • Place your spudger between the keyboard lining behind the x icon and Home keys and pull up.

  11. Dell Inspiron 15R Keyboard Replacement: paso 11, imagen 1 de 2 Dell Inspiron 15R Keyboard Replacement: paso 11, imagen 2 de 2
    • Carefully pull and turn the keyboard over.

  12. Dell Inspiron 15R Keyboard Replacement: paso 12, imagen 1 de 2 Dell Inspiron 15R Keyboard Replacement: paso 12, imagen 2 de 2
    • Lift the black lever.

  13. Dell Inspiron 15R Keyboard Replacement: paso 13, imagen 1 de 2 Dell Inspiron 15R Keyboard Replacement: paso 13, imagen 2 de 2
    • Remove the keyboard cable

Conclusión

To reassemble your device, follow these instructions in reverse order.

Una persona más ha completado esta guía.

Equipo

0 comentarios

Agregar Comentario

Ver Estadísticas:

Ultimas 24 horas: 0

Ultimos 7 días: 5

Ultimos 30 días: 6

Todo El Tiempo: 1,324