Esta versión puede contener ediciones incorrectas. Cambie a la última instantánea verificada.
Qué necesitas
-
-
Localiza el interruptor de liberación de la batería en la parte inferior del portátil.
-
-
Este paso está sin traducir. Ayuda a traducirlo
-
Remove the two 4.00 mm Phillips #1 screws from the battery tray.
-
-
Este paso está sin traducir. Ayuda a traducirlo
-
Insert the flat end of a spudger into the slot on the right side of the central control cover and pry it up.
-
Carefully pull the central control cover up along its edges.
-
-
Este paso está sin traducir. Ayuda a traducirlo
-
Peel back the silver tape securing the ribbon cable to the cover.
-
Pull the small brown latch on the ribbon cable connector out.
-
Disconnect the ribbon cable to completely free the central control cover.
-
-
Este paso está sin traducir. Ayuda a traducirlo
-
Remove the two 5.75 mm Phillips #1 screws securing the keyboard to the laptop.
-
Gently slide the keyboard towards the display until the tabs on its front side are free.
-
-
Este paso está sin traducir. Ayuda a traducirlo
-
Use a spudger to gently lift the ribbon cable retaining flap.
-
Disconnect the ribbon cable.
-
Shift the keyboard sideways enough to free one side from it's retaining tab. Then lift the keyboard away from the laptop.
-
-
-
Este paso está sin traducir. Ayuda a traducirlo
-
Remove/loosen the eight 4.80 mm Phillips #1 screws securing the bottom panel.
-
The screws may only need to be loosened, as they are generally retained by plastic washers.
-
Remove the bottom panel.
-
-
Este paso está sin traducir. Ayuda a traducirlo
-
Disconnect the five antennas from their respective cards.
-
De-route the antennas from their routing retainers.
-
-
Este paso está sin traducir. Ayuda a traducirlo
-
Remove the two 5.70 mm Phillips #1 screws securing the display assembly to the bottom case half.
-
-
Este paso está sin traducir. Ayuda a traducirlo
-
Use the flat end of a spudger to push the camera connector out of its socket. Alternate pushing on either side to evenly remove the connector.
-
Carefully release the connector from its retaining tabs.
-
-
Este paso está sin traducir. Ayuda a traducirlo
-
Push the antenna wires up through their hole in the bottom case half.
-
Release the antennas from their retaining tabs on the upper case.
-
-
Este paso está sin traducir. Ayuda a traducirlo
-
Disconnect the flat LCD ribbon cable by pulling it up by the tab.
-
Free the ribbon cable from its retaining clips.
-
-
Este paso está sin traducir. Ayuda a traducirlo
-
Remove the four 3.45 mm Phillips #1 screws securing the display assembly to the laptop chassis.
-
Remove the display assembly from the laptop.
-
-
Este paso está sin traducir. Ayuda a traducirlo
-
Remove the nine 5.75 mm Phillips #1 screws on the bottom side of the laptop.
-
Remove the two 5.70 mm Phillips #1 screws on the top side of the laptop.
-
-
Este paso está sin traducir. Ayuda a traducirlo
-
Use a spudger to pull the touch pad connector latch towards the ribbon cable.
-
Pull the ribbon cable out of the connector.
-
-
Este paso está sin traducir. Ayuda a traducirlo
-
Use a spudger to pull the device status LED connector latch towards the ribbon cable.
-
Disconnect the device status LED ribbon cable.
-
-
Este paso está sin traducir. Ayuda a traducirlo
-
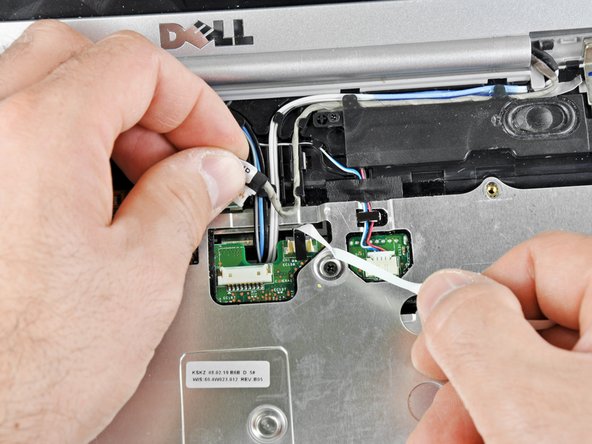
Release the ribbon cable in the upper left corner of the laptop from its retaining tabs.
-
Use a spudger to unplug the speaker connector at the top center of the laptop.
-
De-route the speaker wires from their retaining tabs.
-
-
Este paso está sin traducir. Ayuda a traducirlo
-
Use the flat end of a spudger to begin lifting the upper case at its front edge.
-
Lift the front edge of the case up until it comes free.
-


Cancelar: No complete esta guía.
7 personas más completaron esta guía.
