Saltar al contenido principal

Dell Inspiron 14-5447 Motherboard Replacement

Qué necesitas

  1. Dell Inspiron 14-5447 Motherboard Replacement, Battery: paso 1, imagen 1 de 1
    • Flip the laptop upside down to access the battery.

  2. Dell Inspiron 14-5447 Motherboard Replacement: paso 2, imagen 1 de 2 Dell Inspiron 14-5447 Motherboard Replacement: paso 2, imagen 2 de 2
    • Remove the two black 5.70mm Phillips#0 screws on the case's back.

    • Insert a plastic opening tool into the small slit, centered between the removed screws, and pry open the back cover

  3. Dell Inspiron 14-5447 Motherboard Replacement: paso 3, imagen 1 de 2 Dell Inspiron 14-5447 Motherboard Replacement: paso 3, imagen 2 de 2
    • Remove the two 5.70mm Phillips #0 screws that secure the battery in place on its left side .

    • Treat the battery with care - puncturing or bending may cause damage to the battery and may result in fire or injury.

  4. Dell Inspiron 14-5447 Motherboard Replacement: paso 4, imagen 1 de 2 Dell Inspiron 14-5447 Motherboard Replacement: paso 4, imagen 2 de 2
    • Use the black, plastic flap on the left side to pull the battery out.

    • Slowly lift the flap up and the battery should slide out.

  5. Dell Inspiron 14-5447 Motherboard Replacement, Keyboard: paso 5, imagen 1 de 3 Dell Inspiron 14-5447 Motherboard Replacement, Keyboard: paso 5, imagen 2 de 3 Dell Inspiron 14-5447 Motherboard Replacement, Keyboard: paso 5, imagen 3 de 3
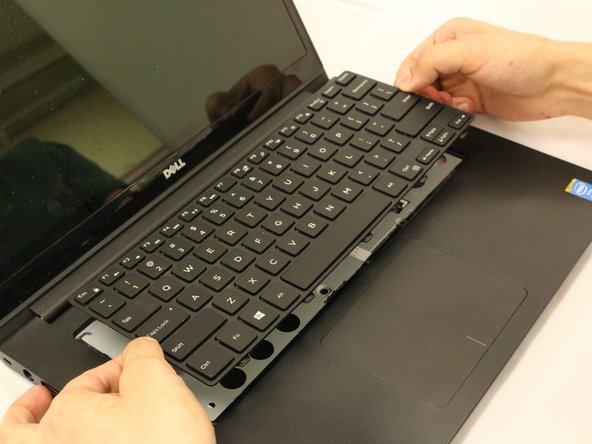
    • Locate the five small slits at the top of the keyboard.

    • Using a plastic opening tool, carefully pry each slit to loosen the keyboard.

    • Slide the keyboard towards the screen at an angle for removal.

    • Be cautious when lifting the keyboard because there are secured, fragile wires connected underneath it.

  6. Dell Inspiron 14-5447 Motherboard Replacement: paso 6, imagen 1 de 2 Dell Inspiron 14-5447 Motherboard Replacement: paso 6, imagen 2 de 2
    • If the keyboard is not lifted with caution, damage to the cables may occur.

    • Lift the keyboard and flip it onto the mouse-pad.

  7. Dell Inspiron 14-5447 Motherboard Replacement: paso 7, imagen 1 de 3 Dell Inspiron 14-5447 Motherboard Replacement: paso 7, imagen 2 de 3 Dell Inspiron 14-5447 Motherboard Replacement: paso 7, imagen 3 de 3
    • Locate the two cable connectors. These connectors secure the cables to the laptop with small, securing flaps.

    • To release the cables, take each flap and flip them upwards to the unlocking position.

    • Pull both the cables out after unlocking and set aside the keyboard.

  8. Dell Inspiron 14-5447 Motherboard Replacement, Wi-Fi Card: paso 8, imagen 1 de 2 Dell Inspiron 14-5447 Motherboard Replacement, Wi-Fi Card: paso 8, imagen 2 de 2
    • Locate the Wifi card on the top left of the laptop.

    • Use the tweezers to release the black and white cables.

  9. Dell Inspiron 14-5447 Motherboard Replacement: paso 9, imagen 1 de 1
    • Remove one silver 2.9mm Phillips #1 screw which secures the WiFi card.

  10. Dell Inspiron 14-5447 Motherboard Replacement: paso 10, imagen 1 de 1
    • The Wi-Fi card should slide out of the black socket.

    • Use tweezers to push the white part of the Wi-Fi card up towards the top of the device to remove.

    • Remove the card with the tweezers.

  11. Dell Inspiron 14-5447 Motherboard Replacement, Fan: paso 11, imagen 1 de 1
    • Locate the fan system in the top right corner.

  12. Dell Inspiron 14-5447 Motherboard Replacement: paso 12, imagen 1 de 2 Dell Inspiron 14-5447 Motherboard Replacement: paso 12, imagen 2 de 2
    • Look along the wide line of white cable until you find the tab insert.

    • Remove the thick white cable crossing over the fan, using the blue spudger shown, to flip the securing flap holding down the cable.

  13. Dell Inspiron 14-5447 Motherboard Replacement: paso 13, imagen 1 de 2 Dell Inspiron 14-5447 Motherboard Replacement: paso 13, imagen 2 de 2
    • Move the cable over to the side to reveal the fan screws.

    • Remove the two black 5.70 mm screws from the fan.

  14. Dell Inspiron 14-5447 Motherboard Replacement: paso 14, imagen 1 de 2 Dell Inspiron 14-5447 Motherboard Replacement: paso 14, imagen 2 de 2
    • Use tweezers to remove the small cable attached to the fan.

  15. Dell Inspiron 14-5447 Motherboard Replacement: paso 15, imagen 1 de 2 Dell Inspiron 14-5447 Motherboard Replacement: paso 15, imagen 2 de 2
    • Using the opening tool, pry the fan out.

    • Remove the fan slowly to prevent damage to any wires or cables connected to the device.

  16. Dell Inspiron 14-5447 Motherboard Replacement: paso 16, imagen 1 de 1
    • Now that the fan is removed, be sure to clean the area under the fan to prevent overheating.

  17. Dell Inspiron 14-5447 Motherboard Replacement, Motherboard: paso 17, imagen 1 de 1
    • Locate the Toshiba hard drive.

  18. Dell Inspiron 14-5447 Motherboard Replacement: paso 18, imagen 1 de 2 Dell Inspiron 14-5447 Motherboard Replacement: paso 18, imagen 2 de 2
    • Locate and unscrew the black (5.70mm) screws on the top left and bottom right of the Hard drive.

    • Lift up the hard drive from the right side with caution as wires are connected to this unit.

    • Holding the right side the hard drive and and with the other hand on the black connector (left side). Pull apart from each other carefully.

  19. Dell Inspiron 14-5447 Motherboard Replacement: paso 19, imagen 1 de 1
    • Unscrew the five (5.70 mm) screws in the gray plating

    • Unscrew the two black (2.50mm) screws underneath the area where the battery would be.

  20. Dell Inspiron 14-5447 Motherboard Replacement: paso 20, imagen 1 de 1
    • Locate the two black (8.70mm) screws at the laptop's hinges and unscrew.

  21. Dell Inspiron 14-5447 Motherboard Replacement: paso 21, imagen 1 de 3 Dell Inspiron 14-5447 Motherboard Replacement: paso 21, imagen 2 de 3 Dell Inspiron 14-5447 Motherboard Replacement: paso 21, imagen 3 de 3
    • Locate the black plug connector next to the fan.

    • Using tweezers, gently pull the metallic part of the plug from its input.

    • Remove and loosen the wire from the gray plating.

  22. Dell Inspiron 14-5447 Motherboard Replacement: paso 22, imagen 1 de 2 Dell Inspiron 14-5447 Motherboard Replacement: paso 22, imagen 2 de 2
    • Flip the laptop back over and open it.

    • Unscrew the six black (5.70 mm) screws from under the keyboard.

    • Locate the ends of the white cables and flip the white securing flaps upwards.

    • Remove the cables from inside the connectors.

  23. Dell Inspiron 14-5447 Motherboard Replacement: paso 23, imagen 1 de 3 Dell Inspiron 14-5447 Motherboard Replacement: paso 23, imagen 2 de 3 Dell Inspiron 14-5447 Motherboard Replacement: paso 23, imagen 3 de 3
    • Using the blue spudger pry the gray plastic plating off. Be mindful of the openings along the top side between the hinges.

    • The gray plating cover is secured extremely tightly. Be careful not to break any parts of it as you pry. Note also that the black parts which serve to cover the hinges are also a part of this gray playing, and should come off with it.

  24. Dell Inspiron 14-5447 Motherboard Replacement: paso 24, imagen 1 de 1
    • Locate the motherboard.

  25. Dell Inspiron 14-5447 Motherboard Replacement: paso 25, imagen 1 de 2 Dell Inspiron 14-5447 Motherboard Replacement: paso 25, imagen 2 de 2
    • Slip the Wi-Fi card wires (black and white pair) out from under the yellow translucent tape.

    • Peel back the yellow translucent tape at the bottom of the motherboard which secured the hard drive connector.

  26. Dell Inspiron 14-5447 Motherboard Replacement: paso 26, imagen 1 de 3 Dell Inspiron 14-5447 Motherboard Replacement: paso 26, imagen 2 de 3 Dell Inspiron 14-5447 Motherboard Replacement: paso 26, imagen 3 de 3
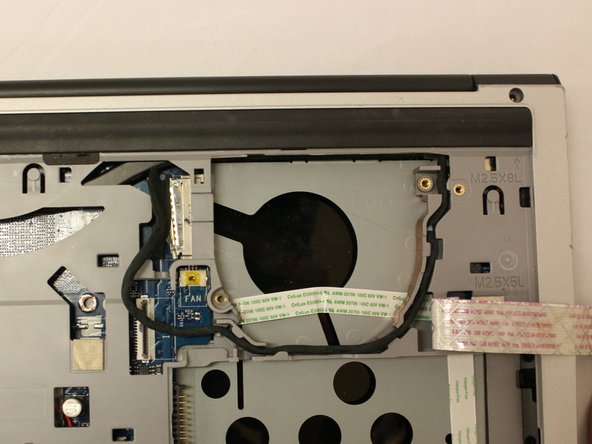
    • Locate the heat-sink. This will be a black metal bar at the top of the laptop, which covers the motherboard.

    • Unscrew the four metallic-colored (2.9mm) screws securing the heat-sink.

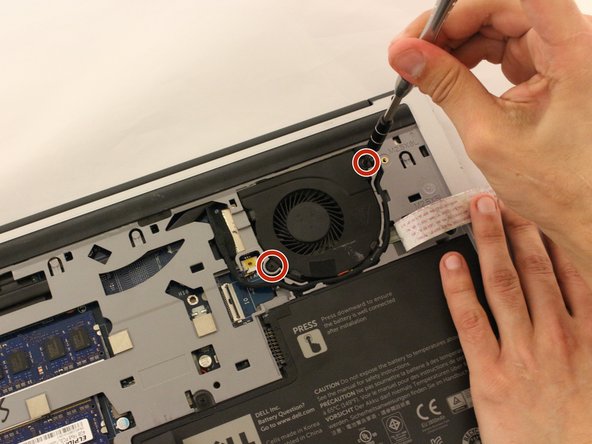
    • Locate and unscrew the top two black (5.70mm) screws, which secure the motherboard to the base of the laptop.

    • Lift the heatsink, and set aside.

  27. Dell Inspiron 14-5447 Motherboard Replacement: paso 27, imagen 1 de 2 Dell Inspiron 14-5447 Motherboard Replacement: paso 27, imagen 2 de 2
    • Locate the small wire plug on the bottom left of the motherboard.

    • Gently remove the wire plug with tweezers.

  28. Dell Inspiron 14-5447 Motherboard Replacement: paso 28, imagen 1 de 2 Dell Inspiron 14-5447 Motherboard Replacement: paso 28, imagen 2 de 2
    • To remove, slowly lift upwards on the left side of the mother board and pull to the right. Wiggling it around may help loosen from the USB connectors on the left side.

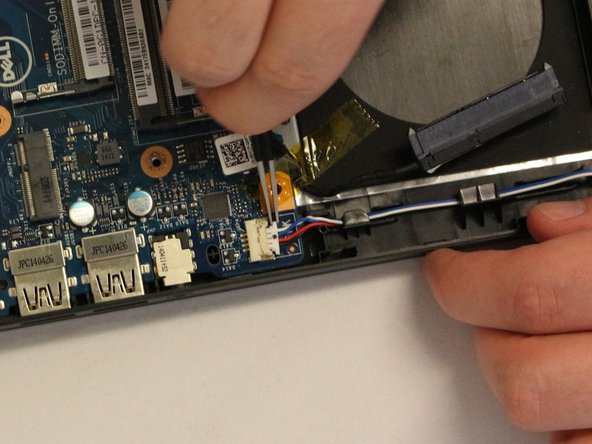
    • Lift the motherboard up slowly, and flip it upside down. Remove the white wire plug on the underside of the motherboard.

    • This plug is secured very tightly. The rectangular mark in the top is meant to be pushed down with a tool before it can actually be unplugged- you may need to lay the motherboard on a flat surface and call for assistance so that one person can focus on pushing down on the rectangular tightener, and one person can pull.

Conclusión

To reassemble your device, follow these instructions in reverse order.

2 personas más completaron esta guía.

0 comentarios

Agregar Comentario

Ver Estadísticas:

Ultimas 24 horas: 1

Ultimos 7 días: 1

Ultimos 30 días: 8

Todo El Tiempo: 2,239