Saltar al contenido principal

Esta guía ha sufrido modificaciones. Revisa la última versión sin revisar.

Dell Inspiron 13-7373 Motherboard Replacement

Qué necesitas

  1. Dell Inspiron 13-7373 Motherboard Replacement, Back Cover: paso 1, imagen 1 de 3 Dell Inspiron 13-7373 Motherboard Replacement, Back Cover: paso 1, imagen 2 de 3 Dell Inspiron 13-7373 Motherboard Replacement, Back Cover: paso 1, imagen 3 de 3
    • Before you begin, be sure to turn off your laptop and unplug it from the outlet.

    • Remove the ten 7.5mm Phillips #00 screws from the bottom of the laptop.

    • Use an opening tool to remove the bottom half of the case from the laptop.

  2. Dell Inspiron 13-7373 Motherboard Replacement, Battery: paso 2, imagen 1 de 1
    • Use a Phillips screwdriver to remove the four screws holding the battery in place.

  3. Dell Inspiron 13-7373 Motherboard Replacement: paso 3, imagen 1 de 2 Dell Inspiron 13-7373 Motherboard Replacement: paso 3, imagen 2 de 2
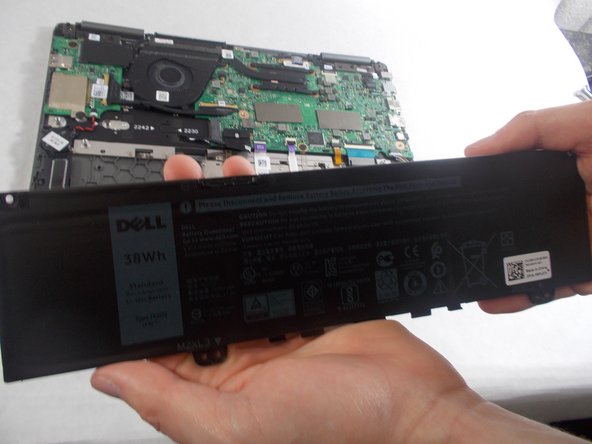
    • Pull the plastic tab on the battery cable to disconnect the cable from the battery.

  4. Dell Inspiron 13-7373 Motherboard Replacement: paso 4, imagen 1 de 2 Dell Inspiron 13-7373 Motherboard Replacement: paso 4, imagen 2 de 2
    • Remove the battery from the laptop.

  5. Dell Inspiron 13-7373 Motherboard Replacement, Fan: paso 5, imagen 1 de 1
    • Remove the two screws holding the cover for the fan.

  6. Dell Inspiron 13-7373 Motherboard Replacement: paso 6, imagen 1 de 1
    • Unplug the connector holding the fan’s wires.

    • Remove the fan from the laptop.

  7. Dell Inspiron 13-7373 Motherboard Replacement, Network Card: paso 7, imagen 1 de 1
    • Use the Phillips #00 screwdriver to remove the single screw holding in the network card.

    • Remove the network card from the laptop.

  8. Dell Inspiron 13-7373 Motherboard Replacement, Daughterboard: paso 8, imagen 1 de 1
    • Use the Phillips #00 screwdriver to remove the two 1mm screws holding in the daughterboard.

    • Remove the metal piece holding in the daughterboard.

    • Disconnect the two cable connectors from the daughterboard.

    • If the cables are stuck, gently wiggle them until they disconnect.

  9. Dell Inspiron 13-7373 Motherboard Replacement: paso 9, imagen 1 de 1
    • Remove the daughterboard.

  10. Dell Inspiron 13-7373 Motherboard Replacement, Motherboard: paso 10, imagen 1 de 1
    • Remove the seven 2mm screws securing the motherboard.

  11. Dell Inspiron 13-7373 Motherboard Replacement: paso 11, imagen 1 de 3 Dell Inspiron 13-7373 Motherboard Replacement: paso 11, imagen 2 de 3 Dell Inspiron 13-7373 Motherboard Replacement: paso 11, imagen 3 de 3
    • Release the IO Board Cable.

    • Release the Touchpad cable.

    • Release the keyboard back-light cable.

    • Release the keyboard cable.

    • Release the eDP cable.

    • Release the dc-in cable.

    • Release the cable for the LED charging indicator by gently pulling up on the connector.

  12. Dell Inspiron 13-7373 Motherboard Replacement: paso 12, imagen 1 de 1
    • Gently lift up on the motherboard to remove it.

Conclusión

To reassemble your device, follow these instructions in reverse order.

Una persona más ha completado esta guía.

John Egan

Miembro Desde 10/25/19

437 Reputación

3 Guías creadas

Equipo

0 comentarios

Agregar Comentario

Ver Estadísticas:

Ultimas 24 horas: 0

Ultimos 7 días: 7

Ultimos 30 días: 17

Todo El Tiempo: 1,230