Esta versión puede contener ediciones incorrectas. Cambiar a la última instantánea verificada.
Qué necesitas
-
Este paso está sin traducir. Ayuda a traducirlo
-
Remove the four screws with a Torx T8 screwdriver to access the back con board.
-
-
Este paso está sin traducir. Ayuda a traducirlo
-
Remove three screws using a Phillips #00 screwdriver.
-
-
Este paso está sin traducir. Ayuda a traducirlo
-
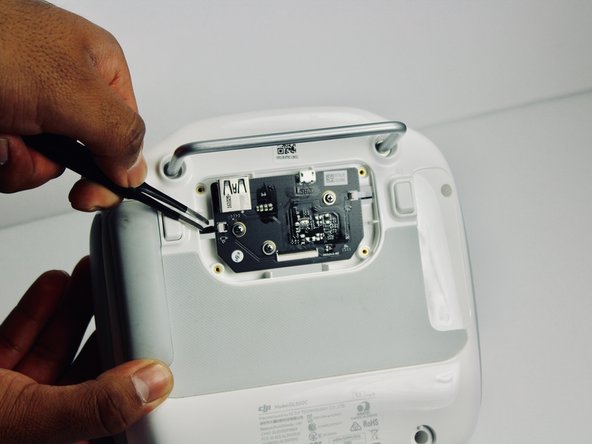
With tweezers, gently remove the large con board tab.
-
Use your hands to remove the two small clips. Pull out from the socket, in a horizontal direction.
-
-
-
Este paso está sin traducir. Ayuda a traducirlo
-
Peel off the rubber grips to access the screw holes.
-
Remove the back board and set it aside.
-
-
Este paso está sin traducir. Ayuda a traducirlo
-
Pull apart the back plastic panel.
-
Once the back panel is off, you will have access to the motherboard.
-
-
Este paso está sin traducir. Ayuda a traducirlo
-
Remove the three PH0 screws securing the PCB to the remote.
-
-
Este paso está sin traducir. Ayuda a traducirlo
-
Remove each of the three ribbon cables from their tabs by pulling in a horizontal direction away from the socket.
-
Remove the Back Con Board.
-


Equipo

Linn Benton Community College, Team S1-G4, Johnson Fall 2018 Miembro de Linn Benton Community College, Team S1-G4, Johnson Fall 2018
LBCC-JOHNSON-F18S1G4
3 Miembros
12 Guías creadas