Saltar al contenido principal

Creative Ziio 7" Left Speaker Replacement

Qué necesitas

  1. Creative Ziio 7" Left Speaker Replacement, Back Panel: paso 1, imagen 1 de 3 Creative Ziio 7" Left Speaker Replacement, Back Panel: paso 1, imagen 2 de 3 Creative Ziio 7" Left Speaker Replacement, Back Panel: paso 1, imagen 3 de 3
    • Remove the back panel by using the plastic opening tool to carefully pry around the panel's edges.

    • The volume control button and the top power button may fall out during this step.

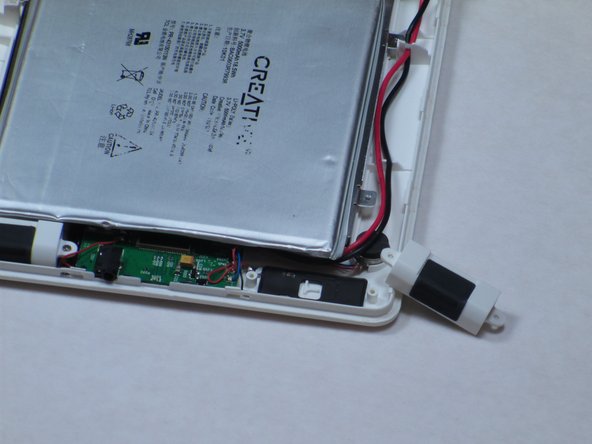
  2. Creative Ziio 7" Left Speaker Replacement, Left Speaker: paso 2, imagen 1 de 1
    • The left speaker is directly below the battery and on the side with the main red and black wires.

    • Unscrew the two 4mm Philips #00 screws using a Philips Screwdriver.

  3. Creative Ziio 7" Left Speaker Replacement: paso 3, imagen 1 de 2 Creative Ziio 7" Left Speaker Replacement: paso 3, imagen 2 de 2
    • Once the screws are removed, discard the broken speaker.

    • Replace the broken speaker with new left speaker.

Conclusión

To reassemble your device, follow these instructions in reverse order.

Una persona más ha completado esta guía.

Kyle

Miembro Desde 04/16/13

111 Reputación

2 Guías creadas

Equipo

Cal Poly, Team 14-10, Maness Spring 2013 Miembro de Cal Poly, Team 14-10, Maness Spring 2013

CPSU-MANESS-S13S14G10

4 Miembros

13 Guías creadas

0 comentarios

Agregar Comentario

Ver Estadísticas:

Ultimas 24 horas: 0

Ultimos 7 días: 2

Ultimos 30 días: 2

Todo El Tiempo: 324