Saltar al contenido principal

Cobra 29 LTD Classic Power Port Replacement

Qué necesitas

  1. Cobra 29 LTD Classic Power Port Replacement, Power Cable: paso 1, imagen 1 de 2 Cobra 29 LTD Classic Power Port Replacement, Power Cable: paso 1, imagen 2 de 2
    • Turn the power switch, the leftmost knob, counterclockwise to off.

  2. Cobra 29 LTD Classic Power Port Replacement: paso 2, imagen 1 de 2 Cobra 29 LTD Classic Power Port Replacement: paso 2, imagen 2 de 2
    • Turn the device around and firmly pull the power cable plug to remove it from the radio.

  3. Cobra 29 LTD Classic Power Port Replacement, Antenna Cable: paso 3, imagen 1 de 2 Cobra 29 LTD Classic Power Port Replacement, Antenna Cable: paso 3, imagen 2 de 2
    • Unscrew the securing cap counterclockwise from the antenna connector.

  4. Cobra 29 LTD Classic Power Port Replacement: paso 4, imagen 1 de 2 Cobra 29 LTD Classic Power Port Replacement: paso 4, imagen 2 de 2
    • Gently pull the antenna cable to remove it from the back of the radio.

  5. Cobra 29 LTD Classic Power Port Replacement, Microphone: paso 5, imagen 1 de 2 Cobra 29 LTD Classic Power Port Replacement, Microphone: paso 5, imagen 2 de 2
    • Unscrew the cap counterclockwise on the microphone plug to disconnect the cable.

  6. Cobra 29 LTD Classic Power Port Replacement: paso 6, imagen 1 de 1
    • Gently unplug the microphone plug.

  7. Cobra 29 LTD Classic Power Port Replacement, Outer Cover: paso 7, imagen 1 de 2 Cobra 29 LTD Classic Power Port Replacement, Outer Cover: paso 7, imagen 2 de 2
    • Unscrew the top four 6.0mm Phillips head screws counterclockwise on the left and right side of the device using a #1 Phillips head screwdriver.

  8. Cobra 29 LTD Classic Power Port Replacement: paso 8, imagen 1 de 3 Cobra 29 LTD Classic Power Port Replacement: paso 8, imagen 2 de 3 Cobra 29 LTD Classic Power Port Replacement: paso 8, imagen 3 de 3
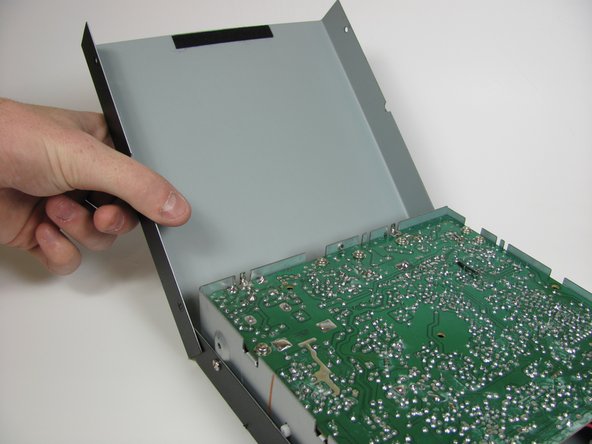
    • Gently life and remove the top cover.

  9. Cobra 29 LTD Classic Power Port Replacement: paso 9, imagen 1 de 3 Cobra 29 LTD Classic Power Port Replacement: paso 9, imagen 2 de 3 Cobra 29 LTD Classic Power Port Replacement: paso 9, imagen 3 de 3
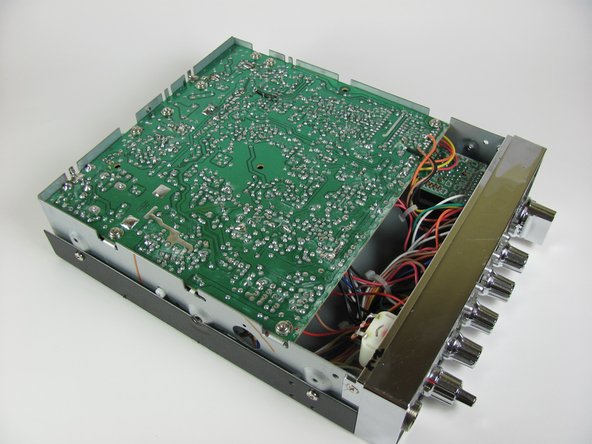
    • Gently set down on a hard, flat, non-conductive surface to minimize risk of shock or breaking your radio.

    • Carefully flip the radio over.

  10. Cobra 29 LTD Classic Power Port Replacement: paso 10, imagen 1 de 2 Cobra 29 LTD Classic Power Port Replacement: paso 10, imagen 2 de 2
    • Unscrew the four 6.0mm Phillips head screws counterclockwise on the left and right side of the device that connect the remaining cover, using a #1 Phillips head screwdriver.

  11. Cobra 29 LTD Classic Power Port Replacement: paso 11, imagen 1 de 3 Cobra 29 LTD Classic Power Port Replacement: paso 11, imagen 2 de 3 Cobra 29 LTD Classic Power Port Replacement: paso 11, imagen 3 de 3
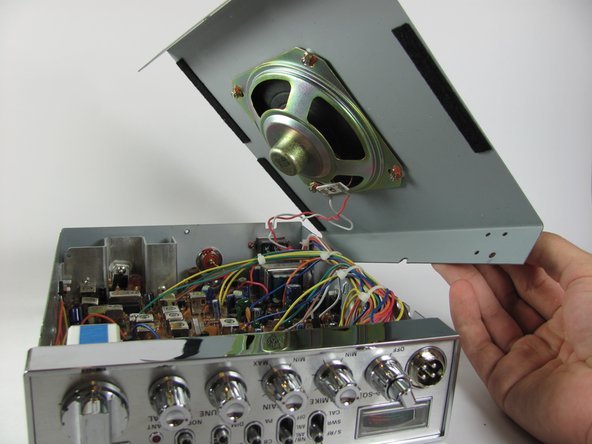
    • Watch out for the wires connected to the speaker. These short wires will not allow you to move the cover very far.

    • Gently lift and remove the case cover.

  12. Cobra 29 LTD Classic Power Port Replacement, Power Port: paso 12, imagen 1 de 3 Cobra 29 LTD Classic Power Port Replacement, Power Port: paso 12, imagen 2 de 3 Cobra 29 LTD Classic Power Port Replacement, Power Port: paso 12, imagen 3 de 3
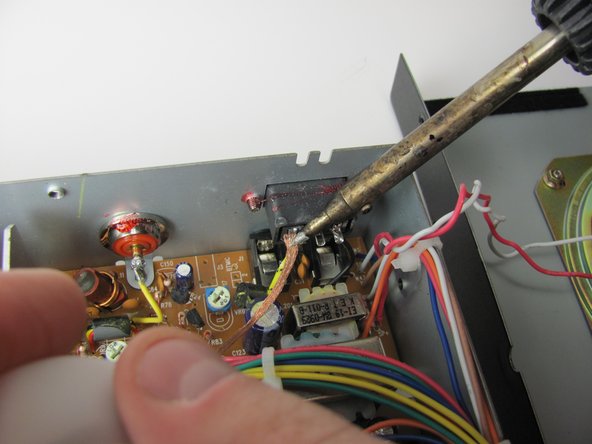
    • De-solder the yellow wire that is connected to the power port, with a soldering iron and the desoldering wick.

    • During reassembly you will need to resolder the components back together.

  13. Cobra 29 LTD Classic Power Port Replacement: paso 13, imagen 1 de 1
    • The wire may still be hot, so let it sit for 30 seconds before continuing.

    • Remove the yellow wire from the power port.

  14. Cobra 29 LTD Classic Power Port Replacement: paso 14, imagen 1 de 1
    • De-solder the black wire that is connected to the power port, with a soldering iron and the desoldering wick.

    • During reassembly you will need to resolder the components back together.

  15. Cobra 29 LTD Classic Power Port Replacement: paso 15, imagen 1 de 1
    • The wire may still be hot, so let it sit for 30 seconds before continuing.

    • Remove the black wire from the power port.

  16. Cobra 29 LTD Classic Power Port Replacement: paso 16, imagen 1 de 1
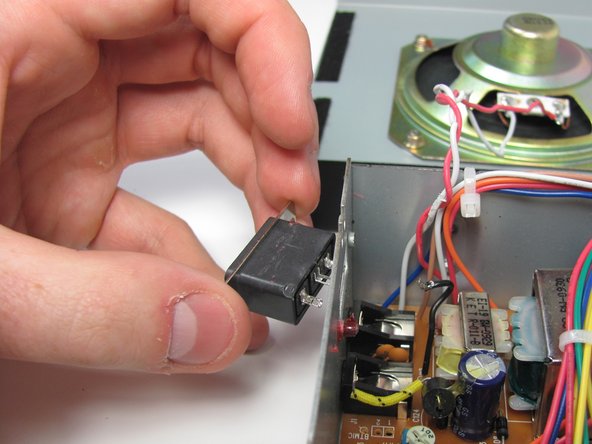
    • Unscrew the two 6mm Phillips screws counterclockwise, using a #1 Phillips head screwdriver.

    • If screws have lock-tight glue on them, use a strong force to initially remove the screws from the device.

  17. Cobra 29 LTD Classic Power Port Replacement: paso 17, imagen 1 de 2 Cobra 29 LTD Classic Power Port Replacement: paso 17, imagen 2 de 2
    • Gently pull the power port out of the case.

Conclusión

To reassemble your device, follow these instructions in reverse order.

2 personas más completaron esta guía.

Noah Negrey

Miembro Desde 10/13/13

349 Reputación

2 Guías creadas

Equipo

Cal Poly, Team 11-37, Amido Fall 2013 Miembro de Cal Poly, Team 11-37, Amido Fall 2013

CPSU-AMIDO-F13S11G37

4 Miembros

9 Guías creadas

4 comentarios

Difficulty Difficult? this is the easiest thing you can do to one of these radios.

bassblaster505 - Contestar

thank you, i’m hoping this will help but i doubt it, i had too big of a fuse in mine and it took a spike hit and lost all power a few years back but i’d really like to get this fixed.

BOB MCMILLAN - Contestar

Any idea what the board pin hole number is that the black cord from the negative goes into? I’ve got a 2018 29 LX

Keith Nicola - Contestar

Not sure. There is a partial schematic available at www.cbtricks.com

Tom Capehart -

Agregar Comentario

Ver Estadísticas:

Ultimas 24 horas: 4

Ultimos 7 días: 11

Ultimos 30 días: 45

Todo El Tiempo: 6,542