Introducción
If you are having issues with the responsiveness or functionality of the key pad on your Casio Cassiopeia E-125, this guide will walk you through the process in 10-15 minutes.
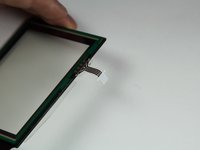
In Step 9, proceed with caution: Potential for device damage. Do not pull apart the wires connecting the outer case.
Qué necesitas
-
-
Use the Phillips #00 screwdriver to remove the two screws near the top of the device.
-
-
-
-
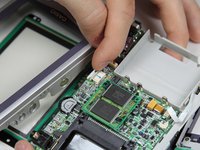
Use the Phillips #00 screwdriver and remove the five screws from the daughterboard.
-


To reassemble your device, follow these instructions in reverse order.
To reassemble your device, follow these instructions in reverse order.
Equipo

Cal Poly, Team 5-4, Forte Spring 2012 Miembro de Cal Poly, Team 5-4, Forte Spring 2012
CPSU-FORTE-S12S5G4
Miembros de 6
5 Guías creadas