Saltar al contenido principal
Únete a la Comunidad de Reparación - Crear Cuenta

Canon Selphy CP720 Circuit Boards Replacement

Qué necesitas

  1. Canon Selphy CP720 Circuit Boards Replacement, Screen: paso 1, imagen 1 de 1
    • Remove the three 6mm Phillips #1 screws.

    Pregunta a FixBot

    Agregar Comentario

  2. Canon Selphy CP720 Circuit Boards Replacement: paso 2, imagen 1 de 2 Canon Selphy CP720 Circuit Boards Replacement: paso 2, imagen 2 de 2
    • Remove the four 8mm Phillips #1 screws, located in each corner of the device.

    Pregunta a FixBot

    Agregar Comentario

  3. Canon Selphy CP720 Circuit Boards Replacement: paso 3, imagen 1 de 1
    • Grasp one half of the device's shell in each hand, and pull them apart. They are connected, so don't separate them completely.

    Pregunta a FixBot

    Agregar Comentario

  4. Canon Selphy CP720 Circuit Boards Replacement: paso 4, imagen 1 de 2 Canon Selphy CP720 Circuit Boards Replacement: paso 4, imagen 2 de 2
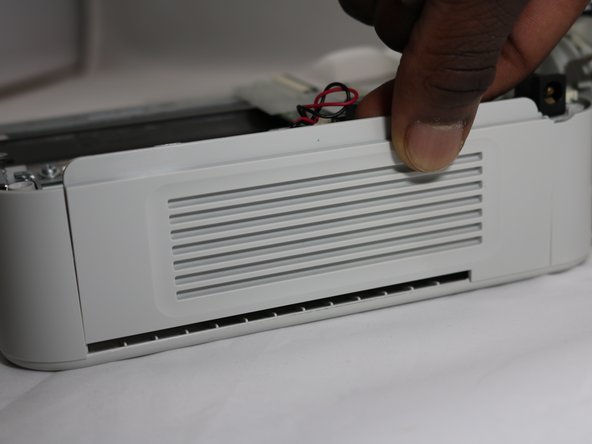
    • Lift the side panel off to expose the inside of the printer.

    Pregunta a FixBot

    Agregar Comentario

  5. Canon Selphy CP720 Circuit Boards Replacement: paso 5, imagen 1 de 1
    • Remove the four 8mm Phillips #00 screws that hold the upper circuit board to the shell.

    Pregunta a FixBot

    Agregar Comentario

  6. Canon Selphy CP720 Circuit Boards Replacement: paso 6, imagen 1 de 1
    • Remove two 8mm Phillips #00 screws from the yellow board.

    Pregunta a FixBot

    Agregar Comentario

  7. Canon Selphy CP720 Circuit Boards Replacement: paso 7, imagen 1 de 1
    • Remove the two 8mm Phillips #00 screws from the screen.

    • Lift off the circuit board, yellow board, and screen.

    Pregunta a FixBot

    Agregar Comentario

  8. Canon Selphy CP720 Circuit Boards Replacement: paso 8, imagen 1 de 3 Canon Selphy CP720 Circuit Boards Replacement: paso 8, imagen 2 de 3 Canon Selphy CP720 Circuit Boards Replacement: paso 8, imagen 3 de 3
    • To separate the screen from the circuit board, grasp the data ribbon cable near the base of the black connector on the circuit board and pull parallel to the surface of the board, toward the screen.

    Pregunta a FixBot

    Agregar Comentario

  9. Canon Selphy CP720 Circuit Boards Replacement, Circuit Boards: paso 9, imagen 1 de 1
    • Turning to the lower half of the printer, remove the two 6mm Philips screws, and the 8mm Philips screw in the hole in the metal plate. Remove the metal plate.

    Pregunta a FixBot

    Agregar Comentario

  10. Canon Selphy CP720 Circuit Boards Replacement: paso 10, imagen 1 de 1
    • Remove the flanged Philips screw from the circuit board, located just under the large data ribbon connecting both boards.

    Pregunta a FixBot

    Agregar Comentario

  11. Canon Selphy CP720 Circuit Boards Replacement: paso 11, imagen 1 de 1
    • Locate the connector on the edge of the board near the first two screws that you removed.

    • To unplug the connector from its socket, grasp it by the white plastic connection, and pull out from the circuit board, away from the center.

    Pregunta a FixBot

    Agregar Comentario

  12. Canon Selphy CP720 Circuit Boards Replacement: paso 12, imagen 1 de 1
    • Locate a second connector further down the same edge of the board .

    • Grasp the white plastic connector by the sides and pull it out, smoothly and firmly.

    Pregunta a FixBot

    Agregar Comentario

  13. Canon Selphy CP720 Circuit Boards Replacement: paso 13, imagen 1 de 1
    • Locate the third connector hidden under the broad data ribbon.

    • Grab the ribbon cable by the body and pull it out.

    Pregunta a FixBot

    Agregar Comentario

  14. Canon Selphy CP720 Circuit Boards Replacement: paso 14, imagen 1 de 1
    • Lift the circuit board up off the lower assembly of the printer, exposing the wide, white data ribbon.

    Pregunta a FixBot

    Agregar Comentario

  15. Canon Selphy CP720 Circuit Boards Replacement: paso 15, imagen 1 de 2 Canon Selphy CP720 Circuit Boards Replacement: paso 15, imagen 2 de 2
    • Pull the ribbon connector out of its socket parallel to the circuit board. All of the circuit boards should now be free of the device.

    Pregunta a FixBot

    Agregar Comentario

Conclusión

To reassemble your device, follow these instructions in reverse order.

Cancelar: No complete esta guía.

Una persona más ha completado esta guía.

0Guía Comentarios

Agregar Comentario

Ver Estadísticas:

Ultimas 24 horas: 3

Ultimos 7 días: 11

Ultimos 30 días: 50

Todo El Tiempo: 1,598