Saltar al contenido principal
Únete a la Comunidad de Reparación - Crear Cuenta

Canon Powershot SX500 IS Motherboard Replacement

Qué necesitas

    1. Canon Powershot SX500 IS Motherboard Replacement, Battery: paso 1, imagen 1 de 1
      • Rotate the camera to expose the underside of the camera.

      Pregunta a FixBot

      Agregar Comentario

    2. Canon Powershot SX500 IS Motherboard Replacement: paso 2, imagen 1 de 1
      • Slide the rounded rectangle tab to the left to release the battery cover.

      Pregunta a FixBot

      Agregar Comentario

    3. Canon Powershot SX500 IS Motherboard Replacement: paso 3, imagen 1 de 1
      • Push the small orange tab forward to release the battery (Battery is ready for removal).

      Pregunta a FixBot

      Agregar Comentario

    1. Canon Powershot SX500 IS Motherboard Replacement, Back Cover: paso 4, imagen 1 de 3 Canon Powershot SX500 IS Motherboard Replacement, Back Cover: paso 4, imagen 2 de 3 Canon Powershot SX500 IS Motherboard Replacement, Back Cover: paso 4, imagen 3 de 3
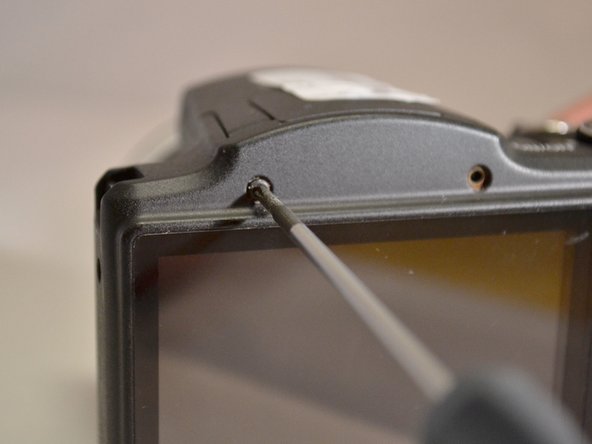
      • Using the Phillips 00 screwdriver, remove the two 4mm top screws above the LCD screen.

      Pregunta a FixBot

      Agregar Comentario

    2. Canon Powershot SX500 IS Motherboard Replacement: paso 5, imagen 1 de 1
      • Using the Phillips 00 screwdriver, remove the two 4mm side screws to the left of the LCD screen.

      Pregunta a FixBot

      Agregar Comentario

    3. Canon Powershot SX500 IS Motherboard Replacement: paso 6, imagen 1 de 1
      • Using the Phillips 00 screwdriver, remove the two 4mm side screws to the left of the LCD screen.

      Pregunta a FixBot

      Agregar Comentario

    4. Canon Powershot SX500 IS Motherboard Replacement: paso 7, imagen 1 de 1
      • Using the Phillips 00 screwdriver, remove the three 4mm screws from the underside of the camera.

      Pregunta a FixBot

      Agregar Comentario

    5. Canon Powershot SX500 IS Motherboard Replacement: paso 8, imagen 1 de 2 Canon Powershot SX500 IS Motherboard Replacement: paso 8, imagen 2 de 2
      • Using the plastic pry tool, remove the back cover from camera.

      Pregunta a FixBot

      Agregar Comentario

    1. Canon Powershot SX500 IS Motherboard Replacement, Control Dial: paso 9, imagen 1 de 1
      • Using the Phillips 00 screwdriver, remove the two 3mm screws closest to the right of the LCD screen.

      Pregunta a FixBot

      Agregar Comentario

    2. Canon Powershot SX500 IS Motherboard Replacement: paso 10, imagen 1 de 1
      • Using the Phiillips 00 screwdriver, remove the 4mm screw to the right of the control dial.

      Pregunta a FixBot

      Agregar Comentario

    3. Canon Powershot SX500 IS Motherboard Replacement: paso 11, imagen 1 de 1
      • Using the spudger, lift the control dial to the right of the LCD screen.

      Pregunta a FixBot

      Agregar Comentario

    4. Canon Powershot SX500 IS Motherboard Replacement: paso 12, imagen 1 de 1
      • Using the spudger, lift the connection tab and remove the control dial's orange ribbon from motherboard.

      Pregunta a FixBot

      Agregar Comentario

    1. Canon Powershot SX500 IS Motherboard Replacement, LCD Screen: paso 13, imagen 1 de 1
      • Using spudger, lift the tab on the connector and remove the orange ribbon from motherboard (LCD screen is separated from camera).

      Pregunta a FixBot

      Agregar Comentario

    1. Canon Powershot SX500 IS Motherboard Replacement, Lens: paso 14, imagen 1 de 1
      • Using the Phillips 00 screwdriver remove the seven 6mm screws from the housing plate of the LCD screen.

      Pregunta a FixBot

      Agregar Comentario

    2. Canon Powershot SX500 IS Motherboard Replacement: paso 15, imagen 1 de 1
      • Using the Phillips 00 screwdriver, remove the 4mm mounting screw from underneath the flash.

      Pregunta a FixBot

      Agregar Comentario

    3. Canon Powershot SX500 IS Motherboard Replacement: paso 16, imagen 1 de 1
      • Using the spudger, lift the flash unit away from the metal housing (Flash is lifted to allow more room for metal housing).

      Pregunta a FixBot

      Agregar Comentario

    4. Canon Powershot SX500 IS Motherboard Replacement: paso 17, imagen 1 de 1
      • Using the spudger, remove the metal housing (Metal housing is removed from camera).

      Pregunta a FixBot

      Agregar Comentario

    5. Canon Powershot SX500 IS Motherboard Replacement: paso 18, imagen 1 de 2 Canon Powershot SX500 IS Motherboard Replacement: paso 18, imagen 2 de 2
      • Using the spudger, lift the tab on the ZIF connector and remove both orange ribbons connected to the green motherboard (Motherboard is lifted from camera).

      Pregunta a FixBot

      Agregar Comentario

    6. Canon Powershot SX500 IS Motherboard Replacement: paso 19, imagen 1 de 1
      • Remove the lens from the lens shaft (Lens is removed from camera).

      Pregunta a FixBot

      Agregar Comentario

    1. Canon Powershot SX500 IS Motherboard Replacement, Motherboard: paso 20, imagen 1 de 2 Canon Powershot SX500 IS Motherboard Replacement, Motherboard: paso 20, imagen 2 de 2
      • Using the plastic pry tool, remove the motherboard and the flash unit from camera frame (Motherboard and flash unit are separated from camera).

      Pregunta a FixBot

      Agregar Comentario

    2. Canon Powershot SX500 IS Motherboard Replacement: paso 21, imagen 1 de 2 Canon Powershot SX500 IS Motherboard Replacement: paso 21, imagen 2 de 2
      • Using the Phillips 00 screwdriver, remove the 4mm screw from motherboard.

      Pregunta a FixBot

      Agregar Comentario

    3. Canon Powershot SX500 IS Motherboard Replacement: paso 22, imagen 1 de 3 Canon Powershot SX500 IS Motherboard Replacement: paso 22, imagen 2 de 3 Canon Powershot SX500 IS Motherboard Replacement: paso 22, imagen 3 de 3
      • Using the plastic opening tool, lift the tab on the connector and remove the two remaining orange ribbons from green motherboard (Motherboard is removed).

      Pregunta a FixBot

      Agregar Comentario

Conclusión

To reassemble your device, follow these instructions in reverse order.

Cancelar: No complete esta guía.

4 personas más completaron esta guía.

1Guía Comentario

I can't download the pictures from the camera. It doesn't have the card you take out and download the pics. I would plug it in and download from camera to my desktop. It's now saying it can't connect to the camera. I bought a new cord but it's apparently the camera itself. Any way to download the pics I have on the camera?

lfj - Contestar Compartir

Agregar Comentario

Ver Estadísticas:

Ultimas 24 horas: 2

Ultimos 7 días: 5

Ultimos 30 días: 24

Todo El Tiempo: 1,271