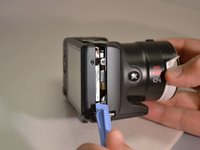
Saltar al contenido principal

Canon Powershot SX500 IS Control Dial Replacement

Qué necesitas

  1. Canon Powershot SX500 IS Control Dial Replacement, Battery: paso 1, imagen 1 de 1
    • Rotate the camera to expose the underside of the camera.

  2. Canon Powershot SX500 IS Control Dial Replacement: paso 2, imagen 1 de 1
    • Slide the rounded rectangle tab to the left to release the battery cover.

  3. Canon Powershot SX500 IS Control Dial Replacement: paso 3, imagen 1 de 1
    • Push the small orange tab forward to release the battery (Battery is ready for removal).

  4. Canon Powershot SX500 IS Control Dial Replacement, Back Cover: paso 4, imagen 1 de 3 Canon Powershot SX500 IS Control Dial Replacement, Back Cover: paso 4, imagen 2 de 3 Canon Powershot SX500 IS Control Dial Replacement, Back Cover: paso 4, imagen 3 de 3
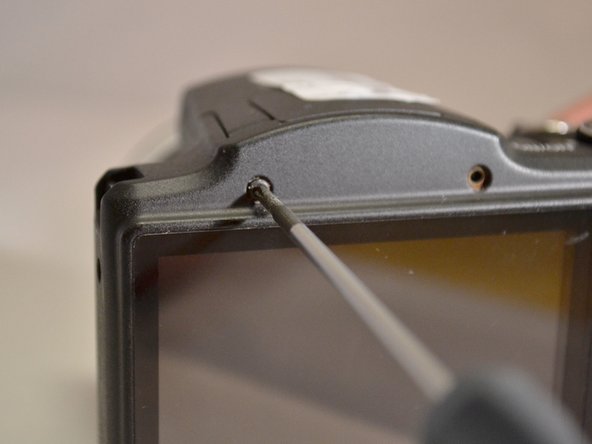
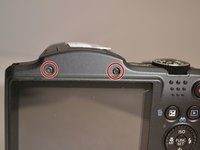
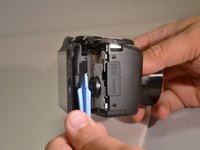
    • Using the Phillips 00 screwdriver, remove the two 4mm top screws above the LCD screen.

  5. Canon Powershot SX500 IS Control Dial Replacement: paso 5, imagen 1 de 1
    • Using the Phillips 00 screwdriver, remove the two 4mm side screws to the left of the LCD screen.

  6. Canon Powershot SX500 IS Control Dial Replacement: paso 6, imagen 1 de 1
    • Using the Phillips 00 screwdriver, remove the two 4mm side screws to the left of the LCD screen.

  7. Canon Powershot SX500 IS Control Dial Replacement: paso 7, imagen 1 de 1
    • Using the Phillips 00 screwdriver, remove the three 4mm screws from the underside of the camera.

  8. Canon Powershot SX500 IS Control Dial Replacement: paso 8, imagen 1 de 2 Canon Powershot SX500 IS Control Dial Replacement: paso 8, imagen 2 de 2
    • Using the plastic pry tool, remove the back cover from camera.

  9. Canon Powershot SX500 IS Control Dial Replacement, Control Dial: paso 9, imagen 1 de 1
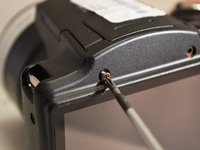
    • Using the Phillips 00 screwdriver, remove the two 3mm screws closest to the right of the LCD screen.

  10. Canon Powershot SX500 IS Control Dial Replacement: paso 10, imagen 1 de 1
    • Using the Phiillips 00 screwdriver, remove the 4mm screw to the right of the control dial.

  11. Canon Powershot SX500 IS Control Dial Replacement: paso 11, imagen 1 de 1
    • Using the spudger, lift the control dial to the right of the LCD screen.

  12. Canon Powershot SX500 IS Control Dial Replacement: paso 12, imagen 1 de 1
    • Using the spudger, lift the connection tab and remove the control dial's orange ribbon from motherboard.

Conclusión

To reassemble your device, follow these instructions in reverse order.

Una persona más ha completado esta guía.

Un comentario

Gracias gracias gracias

edgarlugo20111917 - Contestar

Agregar Comentario

Ver Estadísticas:

Ultimas 24 horas: 0

Ultimos 7 días: 3

Ultimos 30 días: 8

Todo El Tiempo: 447