Saltar al contenido principal

Canon Powershot S110 Option Dial Replacement

Qué necesitas

  1. Canon Powershot S110 Option Dial Replacement, Option Dial: paso 1, imagen 1 de 2 Canon Powershot S110 Option Dial Replacement, Option Dial: paso 1, imagen 2 de 2
    • Remove the battery by sliding open the battery cover on the bottom of the camera.

    • The battery must be removed to avoid shorting out any part of the camera.

  2. Canon Powershot S110 Option Dial Replacement: paso 2, imagen 1 de 3 Canon Powershot S110 Option Dial Replacement: paso 2, imagen 2 de 3 Canon Powershot S110 Option Dial Replacement: paso 2, imagen 3 de 3
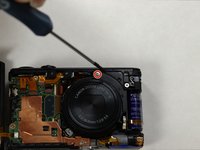
    • Remove the six screws by using a small Phillips head screwdriver.

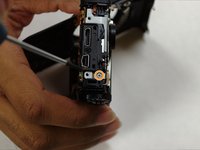
    • Remove the two screws on the side of the camera on either side of the HDMI input panel.

    • Remove the two screws on the opposite side of the camera.

    • Remove the two screws on the bottom of the camera located on either side of the tripod mounting hole.

  3. Canon Powershot S110 Option Dial Replacement: paso 3, imagen 1 de 1
    • Using an opening tool, carefully remove the outermost cover of the camera from its holders around the edges.

    • Once all of the clips around the plastic cover are released, the cover will lift off.

  4. Canon Powershot S110 Option Dial Replacement: paso 4, imagen 1 de 2 Canon Powershot S110 Option Dial Replacement: paso 4, imagen 2 de 2
    • Remove the two screws holding the top plastic bracket in place by using a Phillips head screwdriver.

    • Remove the screw holding down the lens cover.

    • Remove the screw located near the option dial next to the USB connections.

  5. Canon Powershot S110 Option Dial Replacement: paso 5, imagen 1 de 1
    • Carefully lift the top panel of the camera by using a prying tool.

  6. Canon Powershot S110 Option Dial Replacement: paso 6, imagen 1 de 1
    • Remove the screw at the center of the option dial by using a Phillips head screwdriver.

  7. Canon Powershot S110 Option Dial Replacement: paso 7, imagen 1 de 2 Canon Powershot S110 Option Dial Replacement: paso 7, imagen 2 de 2
    • Remove the underlying component that was attached to the now-removed screw by using a prying tool.

    • Remove the dial on the opposite side of the part using a prying tool.

Conclusión

To reassemble your device, follow these instructions in reverse order.

2 personas más completaron esta guía.

akac92

Miembro Desde 07/14/15

298 Reputación

2 Guías creadas

Equipo

UW Tacoma, Team 1-2, Liner SU 2015 Miembro de UW Tacoma, Team 1-2, Liner SU 2015

UWT-LINER-SU15S1G2

4 Miembros

3 Guías creadas

0 comentarios

Agregar Comentario

Ver Estadísticas:

Ultimas 24 horas: 0

Ultimos 7 días: 1

Ultimos 30 días: 7

Todo El Tiempo: 1,099