Saltar al contenido principal

Canon PowerShot SX520 HS Back Face Replacement

Qué necesitas

  1. Canon PowerShot SX520 HS Back Face Replacement, Battery: paso 1, imagen 1 de 1
    • Using your fingers, slide the battery compartment door to the right until it unlocks.

  2. Canon PowerShot SX520 HS Back Face Replacement: paso 2, imagen 1 de 1
    • Rotate the door along hinges to open.

    • Take out the battery with your fingers.

  3. Canon PowerShot SX520 HS Back Face Replacement, Back Face: paso 3, imagen 1 de 3 Canon PowerShot SX520 HS Back Face Replacement, Back Face: paso 3, imagen 2 de 3 Canon PowerShot SX520 HS Back Face Replacement, Back Face: paso 3, imagen 3 de 3
    • Remove 2-3.4 mm screws that secure the back panel using a Phillips #000 screwdriver.

    • Remove 4-4 mm screws on the left and right sides of the camera using a Phillips #000 screwdriver.

  4. Canon PowerShot SX520 HS Back Face Replacement: paso 4, imagen 1 de 1
    • Remove 2-4 mm screws that secure the bottom of the camera using a Phillips #000 screwdriver.

  5. Canon PowerShot SX520 HS Back Face Replacement: paso 5, imagen 1 de 2 Canon PowerShot SX520 HS Back Face Replacement: paso 5, imagen 2 de 2
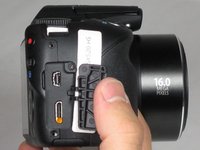
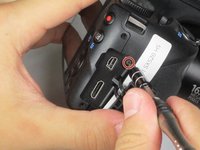
    • Pull back the rubber facing to access the A/V and HDMI output compartment.

    • Remove 1-3.4mm screw inside the compartment using a Phillips #000 screwdriver.

  6. Canon PowerShot SX520 HS Back Face Replacement: paso 6, imagen 1 de 1
    • Once all screws are removed, pull the back facing off with your fingers.

Conclusión

To reassemble your device, follow these instructions in reverse order.

Una persona más ha completado esta guía.

Kyle Crowley

Miembro Desde 09/22/15

337 Reputación

3 Guías creadas

Equipo

Baylor, Team 4-4, Williams Fall 2015 Miembro de Baylor, Team 4-4, Williams Fall 2015

BU-WILLIAMS-F15S4G4

4 Miembros

6 Guías creadas

0 comentarios

Agregar Comentario

Ver Estadísticas:

Ultimas 24 horas: 0

Ultimos 7 días: 1

Ultimos 30 días: 2

Todo El Tiempo: 421