Saltar al contenido principal

Canon PowerShot SX260 HS Flash Assembly Replacement

Qué necesitas

  1. Canon PowerShot SX260 HS Flash Assembly Replacement, Flash Assembly: paso 1, imagen 1 de 3 Canon PowerShot SX260 HS Flash Assembly Replacement, Flash Assembly: paso 1, imagen 2 de 3 Canon PowerShot SX260 HS Flash Assembly Replacement, Flash Assembly: paso 1, imagen 3 de 3
    • Be sure to always remove the battery from the camera before disassembling to avoid permanent damage.

    • The camera has a total of 6 (3 mm) external screws that will need to be removed; 2 on the left side, 2 on the bottom, and 2 on the right side.

    • Remove the 2 screws on the left side.

    • Remove the 2 screws on the bottom of the camera.

    • Remove the 2 screws on the right side of the camera.

  2. Canon PowerShot SX260 HS Flash Assembly Replacement: paso 2, imagen 1 de 1
    • Use your plastic opening tool to gently lift and remove the back face plate.

  3. Canon PowerShot SX260 HS Flash Assembly Replacement: paso 3, imagen 1 de 1
    • After removing the exterior screws, use your fingers to gently lift off the front face plate.

  4. Canon PowerShot SX260 HS Flash Assembly Replacement: paso 4, imagen 1 de 1
    • Next, remove the 2 (3 mm) interior screws on the left side of the camera.

  5. Canon PowerShot SX260 HS Flash Assembly Replacement: paso 5, imagen 1 de 1
    • After removing the interior left screws, use a plastic opening tool to gently pull the top face plate off.

  6. Canon PowerShot SX260 HS Flash Assembly Replacement: paso 6, imagen 1 de 1
    • Next, you will need to remove the dial panel by removing the 2 (3mm) screws on the back side of the camera.

    • Gently remove the dial panel with your fingers.

  7. Canon PowerShot SX260 HS Flash Assembly Replacement: paso 7, imagen 1 de 2 Canon PowerShot SX260 HS Flash Assembly Replacement: paso 7, imagen 2 de 2
    • Remove 1 (3 mm) screw from the flash generator with a Phillips screw driver

    • Gently lift the flash generator off of the camera with the plastic opening tool .

  8. Canon PowerShot SX260 HS Flash Assembly Replacement: paso 8, imagen 1 de 1
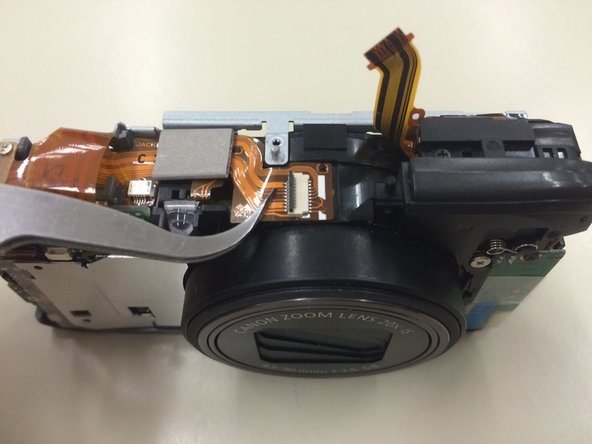
    • Gently unplug the ribbon cable with your tweezers.

    • Be careful not to rip it.

  9. Canon PowerShot SX260 HS Flash Assembly Replacement: paso 9, imagen 1 de 2 Canon PowerShot SX260 HS Flash Assembly Replacement: paso 9, imagen 2 de 2
    • Using your plastic opening tool to gently move the plug lock from the end of the ribbon cord by lifting it upward.

    • Gently remove the ribbon cable from the connector with tweezers.

  10. Canon PowerShot SX260 HS Flash Assembly Replacement: paso 10, imagen 1 de 2 Canon PowerShot SX260 HS Flash Assembly Replacement: paso 10, imagen 2 de 2
    • Gently remove the ribbon cable assembly from the top of the camera with your tweezers.

    • This cable is a long piece that runs across the top of the camera.

    • The flash assembly is connected to this cable.

    • Once removed gently lift out of the camera

    • Replace the ribbon cable with the attached flash assembly.

Conclusión

To reassemble your device, follow these instructions in reverse order.

Una persona más ha completado esta guía.

Tyler Kelch

Miembro Desde 03/05/15

622 Reputación

4 Guías creadas

0 comentarios

Agregar Comentario

Ver Estadísticas:

Ultimas 24 horas: 0

Ultimos 7 días: 2

Ultimos 30 días: 10

Todo El Tiempo: 1,653