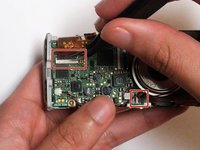
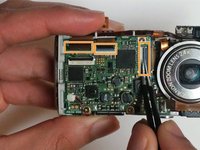
Saltar al contenido principal

Canon PowerShot SD30 Motherboard Replacement

Qué necesitas

  1. Canon PowerShot SD30 Motherboard Replacement, Back Cover: paso 1, imagen 1 de 3 Canon PowerShot SD30 Motherboard Replacement, Back Cover: paso 1, imagen 2 de 3 Canon PowerShot SD30 Motherboard Replacement, Back Cover: paso 1, imagen 3 de 3
    • Remove the wrist strap and battery before removing the back cover.

    • Remove the 2mm screw from the back of the camera.

    • Remove two 2mm screws from the bottom of the camera.

    • Remove two 2mm screws the left side of camera.

  2. Canon PowerShot SD30 Motherboard Replacement: paso 2, imagen 1 de 1
    • Gently remove the back cover.

  3. Canon PowerShot SD30 Motherboard Replacement, Front Cover: paso 3, imagen 1 de 2 Canon PowerShot SD30 Motherboard Replacement, Front Cover: paso 3, imagen 2 de 2
    • Be sure to remove the wrist strap and battery before removing the cover.

    • Remove the two 2mm black screws that are located on the underside of the camera.

    • Remove the two 3mm silver screws from the right side of camera.

  4. Canon PowerShot SD30 Motherboard Replacement: paso 4, imagen 1 de 1
    • Gently remove the front cover.

  5. Canon PowerShot SD30 Motherboard Replacement, Motherboard: paso 5, imagen 1 de 2 Canon PowerShot SD30 Motherboard Replacement, Motherboard: paso 5, imagen 2 de 2
    • Unscrew the 3mm silver screw from the top of the camera.

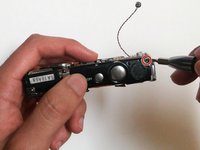
    • Gently remove the top button panel.

  6. Canon PowerShot SD30 Motherboard Replacement: paso 6, imagen 1 de 2 Canon PowerShot SD30 Motherboard Replacement: paso 6, imagen 2 de 2
    • Using the tweezers, carefully lift up the 2 folds where the ribbon connects to the motherboard.

    • Now, lift up the three remaining ribbon connectors to disconnect them.

  7. Canon PowerShot SD30 Motherboard Replacement: paso 7, imagen 1 de 1
    • Unscrew the three 3mm silver screws from the motherboard.

  8. Canon PowerShot SD30 Motherboard Replacement: paso 8, imagen 1 de 3 Canon PowerShot SD30 Motherboard Replacement: paso 8, imagen 2 de 3 Canon PowerShot SD30 Motherboard Replacement: paso 8, imagen 3 de 3
    • Gently pull the left wire out and disconnect it from the device.

    • Use the tweezers to pop the right set of wires out of the connector. Do this by positioning the tweezers under the connector and lifting up.

  9. Canon PowerShot SD30 Motherboard Replacement: paso 9, imagen 1 de 1
    • Remove the motherboard from the device.

    • The motherboard will have nothing connecting it to anything, so be sure to have it grasped.

Conclusión

To reassemble your device, follow these instructions in reverse order.

Una persona más ha completado esta guía.

0 comentarios

Agregar Comentario

Ver Estadísticas:

Ultimas 24 horas: 0

Ultimos 7 días: 0

Ultimos 30 días: 5

Todo El Tiempo: 154