Saltar al contenido principal

Canon PowerShot ELPH330 HS Camera Power/Shutter Button Panel Replacement

Qué necesitas

  1. Canon PowerShot ELPH330 HS Camera Power/Shutter Button Panel Replacement, Power/Shutter Button Panel: paso 1, imagen 1 de 2 Canon PowerShot ELPH330 HS Camera Power/Shutter Button Panel Replacement, Power/Shutter Button Panel: paso 1, imagen 2 de 2
    • On the top-center of your device, turn off the camera by pressing the power button.

    • Put your finger on the battery door and slide the battery door to the right to open it.

    • Push the release button downward and it will release the battery.

  2. Canon PowerShot ELPH330 HS Camera Power/Shutter Button Panel Replacement: paso 2, imagen 1 de 1
    • Use the Phillips #00 screwdriver to remove the screws.

  3. Canon PowerShot ELPH330 HS Camera Power/Shutter Button Panel Replacement: paso 3, imagen 1 de 1
    • Remove the two 4.0mm screws on the bottom of the camera located near the battery door using a Phillips #00 screwdriver.

  4. Canon PowerShot ELPH330 HS Camera Power/Shutter Button Panel Replacement: paso 4, imagen 1 de 1
    • At the bottom of the camera next to the battery door, remove two more screws using the Phillips #00 screwdriver.

  5. Canon PowerShot ELPH330 HS Camera Power/Shutter Button Panel Replacement: paso 5, imagen 1 de 1
    • To remove the back portion of the camera case, use your fingers to carefully pry the case apart at the seam.

  6. Canon PowerShot ELPH330 HS Camera Power/Shutter Button Panel Replacement: paso 6, imagen 1 de 2 Canon PowerShot ELPH330 HS Camera Power/Shutter Button Panel Replacement: paso 6, imagen 2 de 2
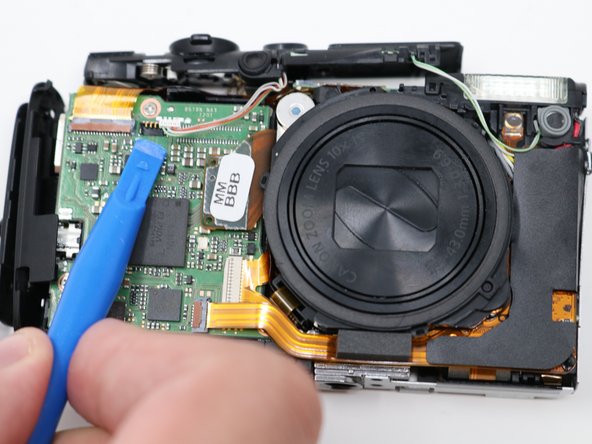
    • On the motherboard there should be a white port. Using the spudger, disconnect it from the motherboard.

  7. Canon PowerShot ELPH330 HS Camera Power/Shutter Button Panel Replacement: paso 7, imagen 1 de 1
    • Follow the green and white wire. There is a gray piece of rubber holding the button into place. Remove it with the spudger.

  8. Canon PowerShot ELPH330 HS Camera Power/Shutter Button Panel Replacement: paso 8, imagen 1 de 1
    • Lift the panel off from the top of the camera with your hands.

Conclusión

To reassemble your device, follow these instructions in reverse order.

Michelle Ngo

Miembro Desde 07/23/19

595 Reputación

3 Guías creadas

Equipo

UW Tacoma, Team S1-G3, Liner Summer 2019 Miembro de UW Tacoma, Team S1-G3, Liner Summer 2019

UWT-LINER-SU19S1G3

4 Miembros

3 Guías creadas

0 comentarios

Agregar Comentario

Ver Estadísticas:

Ultimas 24 horas: 0

Ultimos 7 días: 3

Ultimos 30 días: 9

Todo El Tiempo: 295