Saltar al contenido principal
Únete a la Comunidad de Reparación - Crear Cuenta

Canon EOS Rebel T6i Flash Assembly Replacement

Qué necesitas

    1. Canon EOS Rebel T6i Flash Assembly Replacement, Flash Assembly: paso 1, imagen 1 de 3 Canon EOS Rebel T6i Flash Assembly Replacement, Flash Assembly: paso 1, imagen 2 de 3 Canon EOS Rebel T6i Flash Assembly Replacement, Flash Assembly: paso 1, imagen 3 de 3
      • Remove two 6.8 mm JIS #000 screws on the right side.

      • Remove six 5.3 mm JIS #000 screws on the bottom.

      • Remove two 5.3 mm JIS #000 screws on either side of the viewfinder.

      Pregunta a FixBot

      Agregar Comentario

    2. Canon EOS Rebel T6i Flash Assembly Replacement: paso 2, imagen 1 de 2 Canon EOS Rebel T6i Flash Assembly Replacement: paso 2, imagen 2 de 2
      • Remove one 5.9 mm JIS #000 screw on the top right.

      • Remove one 3.4 mm JIS #000 screw on the top left.

      Pregunta a FixBot

      Agregar Comentario

    3. Canon EOS Rebel T6i Flash Assembly Replacement: paso 3, imagen 1 de 3 Canon EOS Rebel T6i Flash Assembly Replacement: paso 3, imagen 2 de 3 Canon EOS Rebel T6i Flash Assembly Replacement: paso 3, imagen 3 de 3
      • Using a metal spudger, pry the rubber grip off of the casing on the left side of the camera.

      • Potential for device damage: Be careful not to rip the rubber with the metal spudger.

      • Remove five silver 5.8 mm JIS #000 screws from underneath the grip.

      Pregunta a FixBot

      Agregar Comentario

    4. Canon EOS Rebel T6i Flash Assembly Replacement: paso 4, imagen 1 de 2 Canon EOS Rebel T6i Flash Assembly Replacement: paso 4, imagen 2 de 2
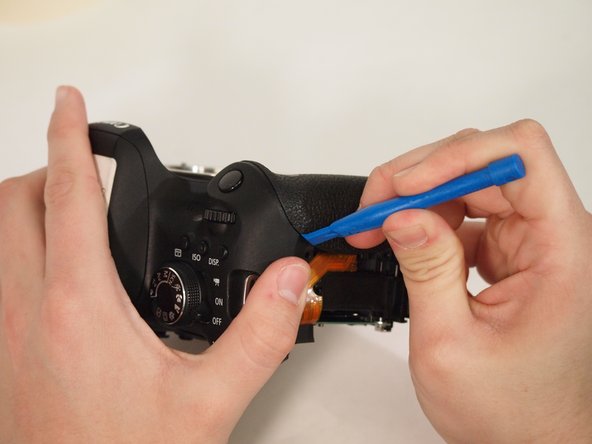
      • Using the metal spudger, pry the rubber grip located just below the turndial.

      • Potential for device damage: Be careful not to rip the rubber.

      Pregunta a FixBot

      Agregar Comentario

    5. Canon EOS Rebel T6i Flash Assembly Replacement: paso 5, imagen 1 de 2 Canon EOS Rebel T6i Flash Assembly Replacement: paso 5, imagen 2 de 2
      • Carefully use the plastic opening tool to pry the casing apart along the seam.

      • Follow the seam with the plastic tool until the back is ready to remove.

      • Potential for device damage: Make sure you use the grounding strip to remove the chance of discharging static electricity into the internal components.

      Pregunta a FixBot

      Agregar Comentario

    6. Canon EOS Rebel T6i Flash Assembly Replacement: paso 6, imagen 1 de 3 Canon EOS Rebel T6i Flash Assembly Replacement: paso 6, imagen 2 de 3 Canon EOS Rebel T6i Flash Assembly Replacement: paso 6, imagen 3 de 3
      • Notice the two connections attaching the back of the camera to the motherboard.

      • To disconnect the white wire, pinch the wire casing and pull it directly out from the camera.

      • This may take a very small amount of strength; however, do not force or pry it.

      • To disconnect the ribbon connector, softly pull the back away from the motherboard. It should come undone with little force.

      • Once removed, set the back in a safe place.

      Pregunta a FixBot

      Agregar Comentario

    7. Canon EOS Rebel T6i Flash Assembly Replacement: paso 7, imagen 1 de 2 Canon EOS Rebel T6i Flash Assembly Replacement: paso 7, imagen 2 de 2
      Herramienta utilizada en este paso:
      Tweezers
      $4.99
      • Remove the five ribbon connectors along the bottom of the assembly using either needle nose tweezers or a plastic opening tool to flip the small flaps to the "up" position.

      • Use a nylon spudger to pull each ribbon connector out of its connection using the hole in the center of the ribbon.

      Pregunta a FixBot

      Agregar Comentario

    8. Canon EOS Rebel T6i Flash Assembly Replacement: paso 8, imagen 1 de 1
      • Remove the button cell battery from the motherboard using a pair of tweezers.

      Pregunta a FixBot

      Agregar Comentario

    9. Canon EOS Rebel T6i Flash Assembly Replacement: paso 9, imagen 1 de 2 Canon EOS Rebel T6i Flash Assembly Replacement: paso 9, imagen 2 de 2
      • Disconnect the small plastic connectors on the top left corner of the motherboard by gripping the small plastic portion of the wire and gently pulling out of the connector.

      • Disconnect the three ribbon connectors along the top.

      • Don't detach the connectors underneath or the ribbon connectors with the foam block, as these will be removed later.

      Pregunta a FixBot

      Agregar Comentario

    10. Canon EOS Rebel T6i Flash Assembly Replacement: paso 10, imagen 1 de 2 Canon EOS Rebel T6i Flash Assembly Replacement: paso 10, imagen 2 de 2
      • Remove the four screws from the front of the camera. There are two screws above the lens mount and two screws inside the lens mount.

      • Remove the four screws from the bottom of the camera.

      Pregunta a FixBot

      Agregar Comentario

    11. Canon EOS Rebel T6i Flash Assembly Replacement: paso 11, imagen 1 de 3 Canon EOS Rebel T6i Flash Assembly Replacement: paso 11, imagen 2 de 3 Canon EOS Rebel T6i Flash Assembly Replacement: paso 11, imagen 3 de 3
      • Using the plastic opening tool, pry the front of the casing off of the camera.

      • Warning: Electric Shock! Be careful not to touch the terminals of the capacitor (black cylinder). This can cause the capacitor to discharge.

      Pregunta a FixBot

      Agregar Comentario

    12. Canon EOS Rebel T6i Flash Assembly Replacement: paso 12, imagen 1 de 2 Canon EOS Rebel T6i Flash Assembly Replacement: paso 12, imagen 2 de 2
      • Remove the yellow and red connections on the front near the black cylinder (capacitor).

      • The yellow connector will just pop out if pried from the bottom using a plastic opening tool.

      • The red connector will pull out of the casing with either a plastic opening tool or a thin set of tweezers.

      • Warning: Electric Shock! Be careful not to touch the terminals of the capacitor (black cylinder). This can cause the capacitor to discharge.

      Pregunta a FixBot

      Agregar Comentario

    13. Canon EOS Rebel T6i Flash Assembly Replacement: paso 13, imagen 1 de 1
      • Remove the diopter adjustment knob next to the viewfinder using a JIS #000 screwdriver.

      Pregunta a FixBot

      Agregar Comentario

    14. Canon EOS Rebel T6i Flash Assembly Replacement: paso 14, imagen 1 de 2 Canon EOS Rebel T6i Flash Assembly Replacement: paso 14, imagen 2 de 2
      • Remove the entire upper flash assembly by gently pulling it up and off the camera.

      • The flash assembly is sold as a single piece.

      Pregunta a FixBot

      Agregar Comentario

Conclusión

To reassemble your device, follow these instructions in reverse order.

Cancelar: No complete esta guía.

3 personas más completaron esta guía.

0Guía Comentarios

Agregar Comentario

Ver Estadísticas:

Ultimas 24 horas: 2

Ultimos 7 días: 12

Ultimos 30 días: 64

Todo El Tiempo: 4,608