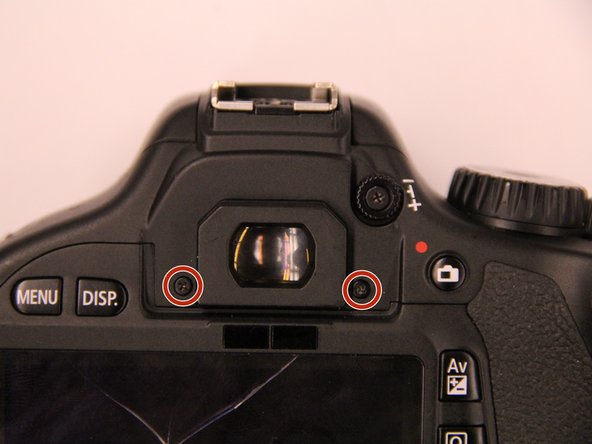
Saltar al contenido principal
Únete a la Comunidad de Reparación - Crear Cuenta

Canon EOS Rebel T2i Eyepiece Replacement

Qué necesitas

  1. Canon EOS Rebel T2i Eyepiece Replacement, I/F Terminal Cover: paso 1, imagen 1 de 3 Canon EOS Rebel T2i Eyepiece Replacement, I/F Terminal Cover: paso 1, imagen 2 de 3 Canon EOS Rebel T2i Eyepiece Replacement, I/F Terminal Cover: paso 1, imagen 3 de 3
    • Before beginning, ensure that the camera is off, and the battery is removed.

    • Pry open the rubber I/F terminal cap with your finger.

    • Remove the two M1.7x2.5mm JIS #000 screws that are underneath the I/F terminal cap.

    • Using a plastic pick, or another thin plastic prying tool, pop off the I/F terminal cover from the camera.

    Pregunta a FixBot
  2. Canon EOS Rebel T2i Eyepiece Replacement, Remove the back casing.: paso 2, imagen 1 de 2 Canon EOS Rebel T2i Eyepiece Replacement, Remove the back casing.: paso 2, imagen 2 de 2
    • On the left side of the camera, remove the following screw:

    • One M1.7x6.0mm JIS #000 screw

    • On the right side, remove the following screws:

    • One M1.7x5.5mm JIS #000 screw

    • One M1.7x3.5mm JIS #000 screw

    Pregunta a FixBot
  3. Canon EOS Rebel T2i Eyepiece Replacement: paso 3, imagen 1 de 2 Canon EOS Rebel T2i Eyepiece Replacement: paso 3, imagen 2 de 2
    • Remove the battery door.

    • Open the battery door to about a 35° angle.

    • Pull the battery door straight outwards.

    • Remove the following screws from the bottom of the camera:

    • One M1.7x6.0mm JIS #000 screw

    • Two M1.7x2.5mm JIS #000 screws

    • One M1.7x5.5mm JIS #000 screw

    Pregunta a FixBot
  4. Canon EOS Rebel T2i Eyepiece Replacement, Open the back panel.: paso 4, imagen 1 de 3 Canon EOS Rebel T2i Eyepiece Replacement, Open the back panel.: paso 4, imagen 2 de 3 Canon EOS Rebel T2i Eyepiece Replacement, Open the back panel.: paso 4, imagen 3 de 3
    • Slide the viewfinder eyepiece vertically upwards.

    • Start to pull the back cover partially off of the camera.

    • Use caution when removing the back cover, there is a ribbon cable that connects the LCD screen to the main PCB board.

    • Disconnect the LCD screen ribbon cable from the main PCB board.

    • Use a plastic spudger to lift up the black locking tab.

    • Carefully pull out the ribbon cable from its connector using a pair of angled tweezers.

    • Finish pulling the back cover off of the camera body.

    Pregunta a FixBot
  5. Canon EOS Rebel T2i Eyepiece Replacement, Front Cover: paso 5, imagen 1 de 2 Canon EOS Rebel T2i Eyepiece Replacement, Front Cover: paso 5, imagen 2 de 2
    • Remove the following screws from the front of the camera:

    • Two M1.7x5.5mm JIS #000 screws

    • On the bottom of the camera, remove the following screws:

    • Three M1.7x5.5mm JIS #000 screws

    Pregunta a FixBot
  6. Canon EOS Rebel T2i Eyepiece Replacement: paso 6, imagen 1 de 3 Canon EOS Rebel T2i Eyepiece Replacement: paso 6, imagen 2 de 3 Canon EOS Rebel T2i Eyepiece Replacement: paso 6, imagen 3 de 3
    • Slide a spudger tool towards the tripod mount, underneath the plastic cover.

    • Push the plastic cover up and over the tripod mount.

    • Pull the front cover off of the camera.

    • Electric Shock Warning: With the front cover off, the high voltage capacitor on the DC PCB board is now exposed. It is recommended that you use a capacitor discharge tool to ensure the capacitor is fully discharged before proceeding further.

    Pregunta a FixBot
  7. Canon EOS Rebel T2i Eyepiece Replacement, Top Casing: paso 7, imagen 1 de 2 Canon EOS Rebel T2i Eyepiece Replacement, Top Casing: paso 7, imagen 2 de 2
    • Remove the screws next to the viewfinder:

    • Two M1.7x2.5mm JIS #000 screws

    • One M2.0x8.9mm JIS #000 diopter screw

    • Remove the following screws from the top of the camera:

    • One M1.7x2.5mm JIS #000 screw

    • One M1.7x5.0mm Phillips #000 screw

    Pregunta a FixBot
  8. Canon EOS Rebel T2i Eyepiece Replacement: paso 8, imagen 1 de 2 Canon EOS Rebel T2i Eyepiece Replacement: paso 8, imagen 2 de 2
    • Disconnect the microphone cable from the main PCB board.

    • Position a flathead 2.5mm screwdriver between the main PCB board connector and the microphone connector.

    • Gently wiggle the flathead screwdriver back and forth until the microphone connector comes free.

    • If you do not have a flathead 2.5mm screwdriver, another similarly sized flathead screwdriver should work.

    Pregunta a FixBot
  9. Canon EOS Rebel T2i Eyepiece Replacement: paso 9, imagen 1 de 3 Canon EOS Rebel T2i Eyepiece Replacement: paso 9, imagen 2 de 3 Canon EOS Rebel T2i Eyepiece Replacement: paso 9, imagen 3 de 3
    • Locate the ribbon cable which connects the top cover the main PCB board.

    • Use a plastic spudger tool to carefully pry off the connector.

    • Use caution when handling ribbon connectors and their connectors.

    • Take note of where this fiber optic cable connects to the main PCB board.

    • The cable will slide out of the connector when you pull the top cover off. You will need to remember to slide this cable back into the connector with a pair of tweezers when reinstalling the top cover. This cable is crucial for the function of the camera flash.

    Pregunta a FixBot
  10. Canon EOS Rebel T2i Eyepiece Replacement: paso 10, imagen 1 de 2 Canon EOS Rebel T2i Eyepiece Replacement: paso 10, imagen 2 de 2
    • Disconnect these two cables connected to the DC PCB board.

    • Use the same method as with removing the microphone cable, except with using a flathead 3.0mm screwdriver.

    • Gently wiggle the flathead screwdriver back and forth until the connectors comes free.

    • If you do not have a flathead 3.0mm screwdriver, another slightly larger flathead screwdriver should work.

    • Gently lift the top cover up and off of the camera body, being careful that the loose cables do not snag on anything.

    Pregunta a FixBot
  11. Canon EOS Rebel T2i Eyepiece Replacement, Eyepiece: paso 11, imagen 1 de 2 Canon EOS Rebel T2i Eyepiece Replacement, Eyepiece: paso 11, imagen 2 de 2
    • Remove the red wire that travels across the mirror box.

    Pregunta a FixBot
  12. Canon EOS Rebel T2i Eyepiece Replacement: paso 12, imagen 1 de 1
    • Remove the following screws holding the mirror box in place:

    • Four M1.7x4.5mm Phillips #000 screws

    Pregunta a FixBot
  13. Canon EOS Rebel T2i Eyepiece Replacement: paso 13, imagen 1 de 1
    • Remove three JIS #000 screws to disconnect the ribbon mount assembly

    Pregunta a FixBot
  14. Canon EOS Rebel T2i Eyepiece Replacement: paso 14, imagen 1 de 2 Canon EOS Rebel T2i Eyepiece Replacement: paso 14, imagen 2 de 2
    • Now that the top assembly is free, this exposes another screw on the right side of the mirror box.

    • Remove the following screw:

    • One M2.0x4.3mm JIS #000 screw

    • Remove the orange ribbon cable.

    Pregunta a FixBot
  15. Canon EOS Rebel T2i Eyepiece Replacement: paso 15, imagen 1 de 1
    • Remove the viewfinder assembly from the camera. The screws that hold the eyepiece in place are accessible. Remove these three JIS #000 screws from the rear face of the eyepiece. Two screws are located at the bottom and one screw is located on top.

    Pregunta a FixBot
  16. Canon EOS Rebel T2i Eyepiece Replacement: paso 16, imagen 1 de 2 Canon EOS Rebel T2i Eyepiece Replacement: paso 16, imagen 2 de 2
    • With the screws removed, the eyepiece can easily be pulled free.

    Pregunta a FixBot
Conclusión

To reassemble your device, follow these instructions in reverse order.

7 personas más completaron esta guía.

Documentos Adjuntos

Equipo

UMass Dartmouth, Team 1-1, Shastany Spring 2015 Miembro de UMass Dartmouth, Team 1-1, Shastany Spring 2015

UMASSD-SHASTANY-S15S1G1

Miembros de 3

4 Guías creadas

3Guía Comentarios

I used this guide to fix my 600D (Rebel T3i), and it worked like a charm.

The middle lens of my viewfinder had popped out of its plastic holder. it is now back in place, thanks to this guide.

I have added a couple of marker, to make it just that little bit easier to spot the screws and ribbon cables.

Thanks again!

dauffret - Contestar Compartir

I used this guide to fix my 600D, and it also worked like a charm.

The front lens of my viewfinder (the one closest to the eyepiece) has popped out of its plastic holder.

Leo Sauermann - Contestar Compartir

Thank you so much for this guide. The viewfinder lens of my 1100D came loose some days ago and this guide served perfectly.

Just a heads-up to the newbies like me: Take a lot of care with the focusing screen (the one with the focus points printed on it), I tried to clean it and ruined it. Fortunately, the replacement is not expensive, but still, better not touching it with anything.

Martin - Contestar Compartir

Agregar Comentario

Ver Estadísticas:

Ultimas 24 horas: 0

Ultimos 7 días: 7

Ultimos 30 días: 56

Todo El Tiempo: 5,516