Saltar al contenido principal

Canon EOS 60D Rear LCD Screen Replacement

Qué necesitas

  1. Canon EOS 60D Rear LCD Screen Replacement, Rear LCD Screen Dissasembly: paso 1, imagen 1 de 1
    • Take the LCD out of its place to expose the Phillips #PH00 screws.

    • Remove the two 2.5 mm Phillips #PH00 black screws on both sides of the LCD screen.

    • Next remove the two 3 mm Phillips #PH00 black screws near both sides of the base where the screen swivels.

  2. Canon EOS 60D Rear LCD Screen Replacement: paso 2, imagen 1 de 1
    • Using a plastic opening tool, carefully pry off the back cover of the LCD.

  3. Canon EOS 60D Rear LCD Screen Replacement: paso 3, imagen 1 de 2 Canon EOS 60D Rear LCD Screen Replacement: paso 3, imagen 2 de 2
    • Remove the 3 mm Phillips #PH00 silver screw on the side of the screen.

    • Turn the screen to remove the second 3 mm Phillips #PH00 silver screw.

  4. Canon EOS 60D Rear LCD Screen Replacement: paso 4, imagen 1 de 1
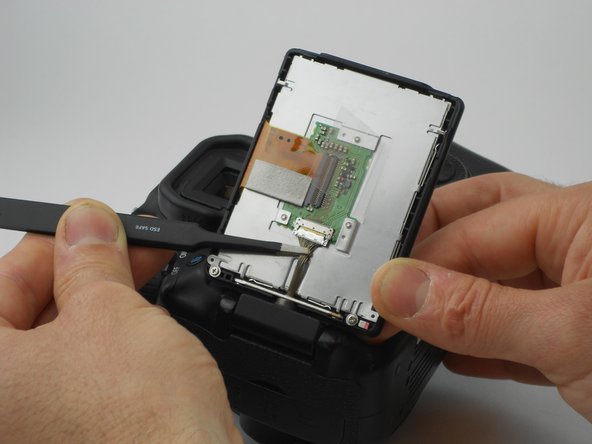
    • Using the tweezers, carefully disconnect the rear connector by pulling it away from the screen.

  5. Canon EOS 60D Rear LCD Screen Replacement, Rear LCD Screen: paso 5, imagen 1 de 2 Canon EOS 60D Rear LCD Screen Replacement, Rear LCD Screen: paso 5, imagen 2 de 2
    • Remove the two 2.5 mm Phillips #PH00 silver screws using the PH00 screwdriver.

    • Using the plastic Spudger opening tool, carefully lift up on the medal tabs next to where the screws were located.

  6. Canon EOS 60D Rear LCD Screen Replacement: paso 6, imagen 1 de 1
    • Finally, remove the LCD screen by grabbing the clear plastic tab and lifting it carefully.

Conclusión

To reassemble your device, follow these instructions in reverse order.

3 personas más completaron esta guía.

Equipo

USF Tampa, Team 16-6, Wollert Fall 2015 Miembro de USF Tampa, Team 16-6, Wollert Fall 2015

USFT-WOLLERT-F15S16G6

3 Miembros

14 Guías creadas

0 comentarios

Agregar Comentario

Ver Estadísticas:

Ultimas 24 horas: 0

Ultimos 7 días: 15

Ultimos 30 días: 67

Todo El Tiempo: 7,652