Saltar al contenido principal

CASIO CDP-230R Key Replacement

Qué necesitas

  1. CASIO CDP-230R Key Replacement, Panels: paso 1, imagen 1 de 3 CASIO CDP-230R Key Replacement, Panels: paso 1, imagen 2 de 3 CASIO CDP-230R Key Replacement, Panels: paso 1, imagen 3 de 3
    • Flip the keyboard upside down, with the keys on a flat surface.

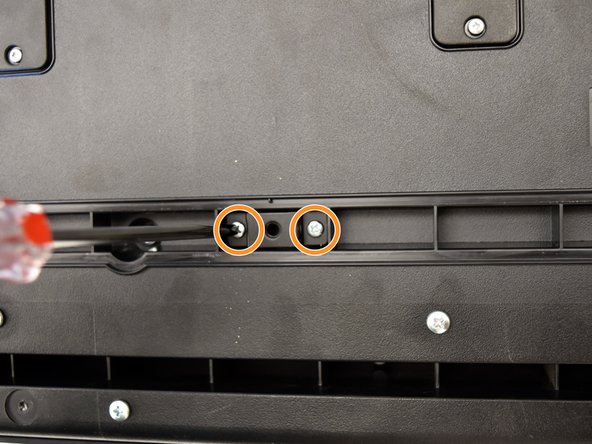
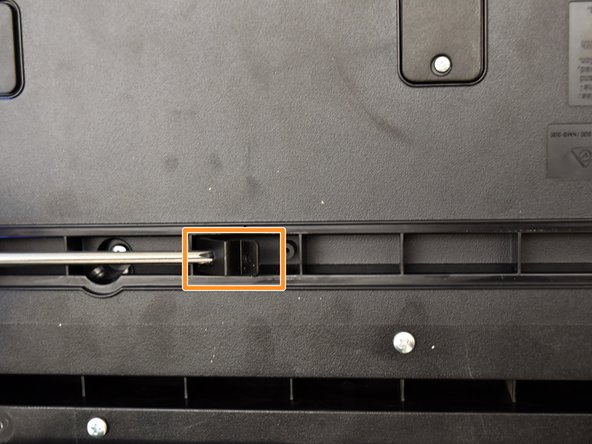
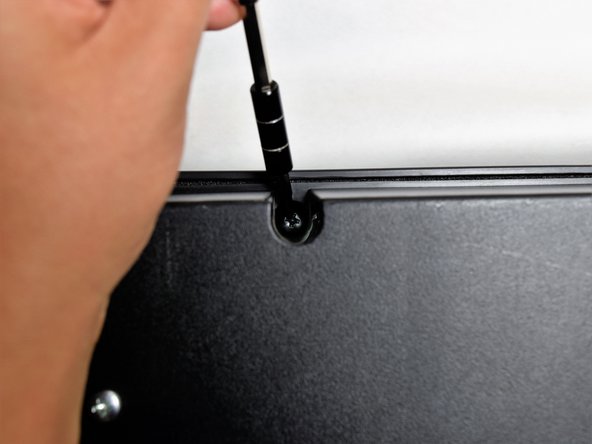
    • Remove the three black 14mm Japanese Industrial Standard (J) head screws using a J1 screwdriver on the top half of the outermost side panel.

  2. CASIO CDP-230R Key Replacement: paso 2, imagen 1 de 3 CASIO CDP-230R Key Replacement: paso 2, imagen 2 de 3 CASIO CDP-230R Key Replacement: paso 2, imagen 3 de 3
    • Use two hands to grab the side panel from both sides.

    • Pull the panel apart from the device one side at a time.

    • There will be popping sounds when you remove this panel.

    • One side panel will not have an orange & white cable connected to it.

  3. CASIO CDP-230R Key Replacement: paso 3, imagen 1 de 3 CASIO CDP-230R Key Replacement: paso 3, imagen 2 de 3 CASIO CDP-230R Key Replacement: paso 3, imagen 3 de 3
    • Remove the three silver 10mm screws with a J1 screwdriver on the bottom half of the innermost side panel of the device.

    • One side panel will not have an orange & white cable running through.

  4. CASIO CDP-230R Key Replacement: paso 4, imagen 1 de 3 CASIO CDP-230R Key Replacement: paso 4, imagen 2 de 3 CASIO CDP-230R Key Replacement: paso 4, imagen 3 de 3
    • Remove the innermost side panel by pinching the top and bottom of the panel and pulling the panel off with both hands.

    • There will be popping sounds when you remove this panel.

    • Repeat steps one through four to remove the other side panel of the keyboard.

  5. CASIO CDP-230R Key Replacement: paso 5, imagen 1 de 3 CASIO CDP-230R Key Replacement: paso 5, imagen 2 de 3 CASIO CDP-230R Key Replacement: paso 5, imagen 3 de 3
    • Remove the two black 30 mm J head screws with a J1 screwdriver to remove the long black bar.

    • Remove the four silver 8mm x 2mm J head screws with a J1 screwdriver and the two brackets from the back panel.

    • There will be two screws per bracket.

  6. CASIO CDP-230R Key Replacement: paso 6, imagen 1 de 3 CASIO CDP-230R Key Replacement: paso 6, imagen 2 de 3 CASIO CDP-230R Key Replacement: paso 6, imagen 3 de 3
    • Remove the eight silver 10mm x 1.5mm J head screws with a J1 screwdriver and the square tabs from the back panel.

    • Remove the eight silver 10mm J head screws with a J1 screwdriver underneath the square tabs.

  7. CASIO CDP-230R Key Replacement: paso 7, imagen 1 de 3 CASIO CDP-230R Key Replacement: paso 7, imagen 2 de 3 CASIO CDP-230R Key Replacement: paso 7, imagen 3 de 3
    • Remove the 36 silver 10mm J head screws with a J1 screwdriver from the back panel.

  8. CASIO CDP-230R Key Replacement: paso 8, imagen 1 de 3 CASIO CDP-230R Key Replacement: paso 8, imagen 2 de 3 CASIO CDP-230R Key Replacement: paso 8, imagen 3 de 3
    • Place a hand on the front panel and speakers and carefully flip the keyboard over with the keys facing up.

    • Having a extra pair of hands will be useful.

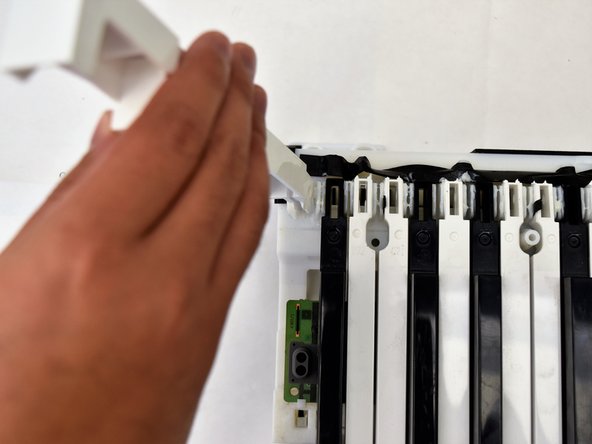
    • Grab the center of the front panel with two hands and lift to remove panel.

    • Grab the speakers from the sides and lift to remove. Once you have done this for the first speaker, repeat with the second speaker.

  9. CASIO CDP-230R Key Replacement, Key: paso 9, imagen 1 de 3 CASIO CDP-230R Key Replacement, Key: paso 9, imagen 2 de 3 CASIO CDP-230R Key Replacement, Key: paso 9, imagen 3 de 3
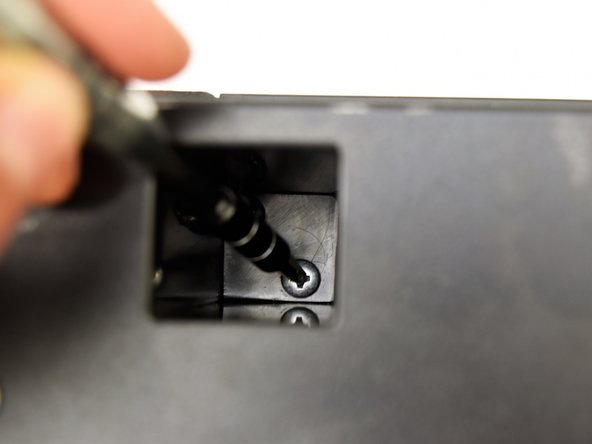
    • Locate the three screws behind the keys (left, center, and right).

    • Remove these 10mm J screws using a J1 screwdriver.

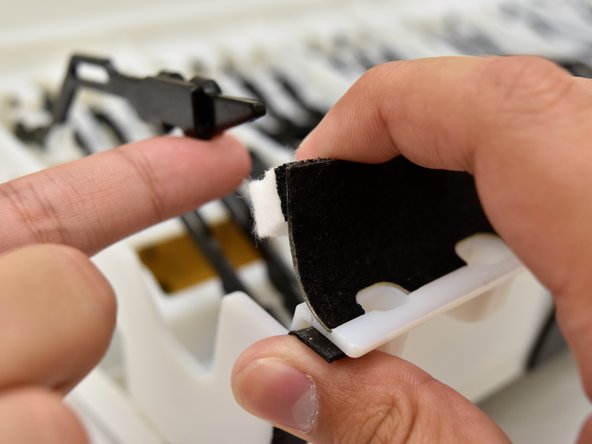
    • Grasp the white ribbon lined with foam and pull up to remove from the main circuit board.

  10. CASIO CDP-230R Key Replacement: paso 10, imagen 1 de 1
    • Place one hand on the side with fingers underneath the keys and one hand on the upper edge and lift off of the back panel.

    • Having an extra pair of hands will be useful.

  11. CASIO CDP-230R Key Replacement: paso 11, imagen 1 de 3 CASIO CDP-230R Key Replacement: paso 11, imagen 2 de 3 CASIO CDP-230R Key Replacement: paso 11, imagen 3 de 3
    • Pull up on the white key from the side nearest to you until the key lifts up.

    • Pull up on the two surrounding white keys before pulling up on the black key.

  12. CASIO CDP-230R Key Replacement: paso 12, imagen 1 de 3 CASIO CDP-230R Key Replacement: paso 12, imagen 2 de 3 CASIO CDP-230R Key Replacement: paso 12, imagen 3 de 3
    • Wiggle the white key from side to side and pull up to detach it from the rest of the board.

  13. CASIO CDP-230R Key Replacement: paso 13, imagen 1 de 3 CASIO CDP-230R Key Replacement: paso 13, imagen 2 de 3 CASIO CDP-230R Key Replacement: paso 13, imagen 3 de 3
    • To reattach the white key, snap the key back in place.

    • Flip the keyboard so the keys are laying on a flat surface.

    • Pull up on the black and white felt to dislodge the black shank.

    • Push up on the white key while pulling the felt up to reposition the black shank underneath the felt.

Conclusión

To reassemble your device, follow step 13 and then the rest of the instructions in reverse order.

13 personas más completaron esta guía.

Areli Reyes

Miembro Desde 10/01/17

545 Reputación

4 Guías creadas

Equipo

Cal Poly, Team S4-G2, Livingston Fall 2017 Miembro de Cal Poly, Team S4-G2, Livingston Fall 2017

CPSU-LIVINGSTON-F17S4G2

4 Miembros

6 Guías creadas

11 comentarios

Thankyou very much - I have a CDP-200R that I had to pull apart - yours was the only post I could find that helped me decode what it took!

rooster0001 - Contestar

Me too, I have 200R need to replace the keys, but afraid to dismantle , now you save us all.thank you

Rus Azdy Ezzat Mohd Idrus -

Searched everywhere on how to fix my Casio CDP-220RBK and this was all I could find that actually helped! Awesome and very helpful guide!!!

albert einstien - Contestar

Thanks a lot. This manual is very detailed, and the only one I've found in the whole Internet.

Владимир Белявский - Contestar

Hello,

One of my kids lifted a black key from my piano. It won't come down fully and doesn't play when pressed. It's also harder to press, with more resistance.

Will I be able to put it back in place by following these instructions?

Many thanks.

Bernard Déry - Contestar

Agregar Comentario

Ver Estadísticas:

Ultimas 24 horas: 0

Ultimos 7 días: 13

Ultimos 30 días: 68

Todo El Tiempo: 11,499